End-to-end tasks for parallel (with staging server) upgrade in a server group without overlays already present
This topic explains the end-to-end tasks of a typical parallel (with staging server) upgrade in a server group without overlays already present.
Overview
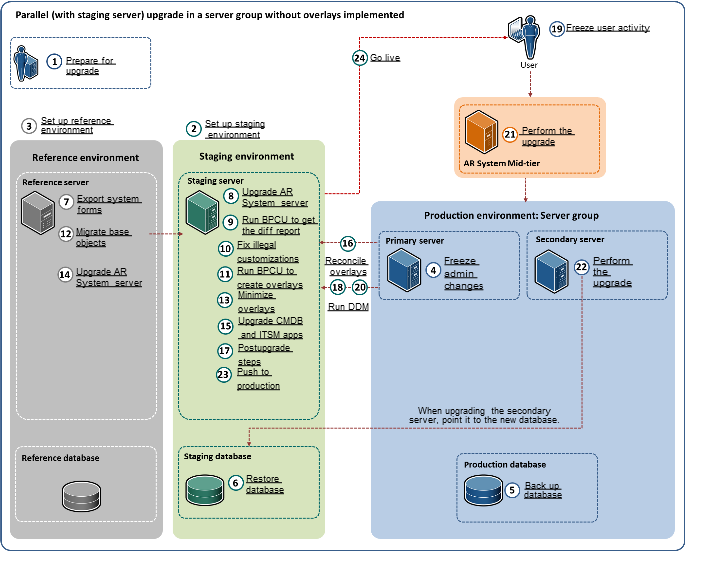
In this scenario, you create a staging environment wherein you prepare the primary server in the staging environment and go live with the staging server. In this scenario, you keep the original environment intact to prevent any postupgrade issues.
End-to-end tasks
Procedure 1: Prepare for the upgrade
| Step | Action | Additional information |
|---|---|---|
| 1 | Understand the different installers you need to upgrade different components | For some components, you must run the same installer multiple times. |
| 2 | Review the compatibility matrix before upgrading | To access the product compatibility information on the Customer Support website, you must have a Support login. |
| 3 | Review the software and hardware requirements for upgrading | BMC Atrium Core has additional requirements. |
| 4 | Complete the planning spreadsheet for an upgrade | This spreadsheet is a Microsoft Excel document that contains all of the fields and input that you must update when you run the installer. |
| 5 | Download the installation files to upgrade | When viewing the latest version of a product on the Electronic Product Download (EPD) site, you see only the components (including licensed add-ons) that are covered under the licenses associated with your Support ID or EPD profile. Ensure that you download the latest service pack and patch. |
| 6 | Prepare your database for upgrade | — |
Procedure 2: Set up the staging environment
| Step | Action | Additional information |
|---|---|---|
| 1 | Decide which of the following types of staging server you want to use:
| You choose the server method based on your configuration. At the end of the process, the staging server becomes the new production server. |
| 2 | Set up the accelerated staging server | If you are upgrading using the accelerated staging server method, you must create a copy of the production server database in the staging environment only. The BMC Remedy AR System server installation must then be done on the staging server against the copy of the production server database. You must run the installer in Install mode so that the AR System server is upgraded, not reinstalled. |
| Set up the duplicated staging server | If you are upgrading using the duplicated staging server method, you must create an exact duplicate of your production server, installing the AR System server and all of the BMC Remedy IT Service Management suite applications and components, and any other applications such as BMC Service Impact Manager, integration for BMC Remedy Service Desk, or BMC ProactiveNet Performance Management, before starting the upgrade. You must run the installer in Upgrade mode. | |
| 3 | (If you are using the duplicated staging server) Duplicate the production server installations | Ensure that you have backups of all versions listed. |
Procedure 3: Set up the reference environment
| Step | Action | Additional information |
|---|---|---|
| 1 | Understand the reference server implementation | Set up a reference server with unmodified versions of the same applications and components that are on the staging server. |
Procedure 4: Freeze administrative changes on the primary server
| Step | Action | Additional information |
|---|---|---|
| 1 | Suspend all administrative operations until the upgrade is complete | — |
Procedure 5: Perform a backup of the database in the production environment
| Step | Action | Additional information |
|---|---|---|
| 1 | Perform a backup of the database in the production environment | — |
Procedure 6: Restore the production database backup on the staging database
| Step | Action | Additional information |
|---|---|---|
| 1 | Restore the production database on the staging database | The steps are different for the accelerated staging server and the duplicated staging server. |
| 2 | Review the restrictions after restoring the database on the staging database | Do not perform the activities listed in this topic on your production server until the upgrade and delta data migration are completed successfully. |
Procedure 7: Export system forms
| Step | Action | Additional information |
|---|---|---|
| 1 | System objects that might be overwritten during upgrade | Certain AR System server definitions might be lost or overwritten when you upgrade from earlier versions of AR System server (assuming that you select only AREA LDAP during installation). If you have modified any of these objects, save a copy and restore your changes after upgrading the server. |
Procedure 8: Upgrade the AR System server on the staging server
| Step | Action | Additional information |
|---|---|---|
| 1 | Review the upgrading tips | — |
| 2 | Prepare the approval server for upgrade | These tasks preserve customizations and ensure that definition files are updated successfully. |
| 3 | If you are upgrading from a version earlier than 7.6.03, prepare Full Text Search (FTS) | Perform these tasks only if you are upgrading from a version earlier than 7.6.03. |
| 4 | Ensure that you have enough transactional log space for an upgrade | During the upgrade, the production dataset record data is copied from the BMC Atrium CMDB BMC.CORE:BMC_BaseElement form to a new AST:Attributes form. Ensure that you have enough transactional log space to accommodate the new form. |
| 5 | Perform the AR System server upgrade | This action upgrades the BMC Remedy AR System server, Approval Server, Assignment Engine, Email Engine, and Flashboards. It also installs the following plug-ins: AREA LDAP, ARDBC, Web Services, SNMP, and FTS. |
| 6 | Disable ServletExec after the upgrade | (Windows or UNIX) If you are upgrading and you do not want to use the ServletExec application server, follow the instructions in this section to disable it. |
| 7 | Perform the approval server postupgrade steps | If you upgraded BMC Remedy Approval Server after backing up your data and customizations, perform the steps described in this section. |
| 8 | Perform the IPv6 postupgrade steps | You must update Java paths and configuration after upgrading and changing from IPv4 to IPv6. |
Procedure 9: Run BPCU to get a difference report
| Step | Action | Additional information |
|---|---|---|
| 1 | Obtain BPCU | You must install the AR System server to obtain the Best Practice Conversion Utility (BPCU). Do not install any BMC Remedy AR System components or applications other than the AR System server. If you do, your customizations might be overwritten. |
| 2 | Configure your system for BPCU | Ensure that your CLASS path and Oracle Java Runtime Engine (JRE) are correctly configured to support the Best Practice Conversion Utility (BPCU). |
| 3 | Use BPCU to generate difference reports | Run the BPCU in ReportDiff mode to compare objects between the overlay hash file and an AR System server, and generate difference reports. |
Procedure 10: Fix nonpermitted modifications
| Step | Action | Additional information |
|---|---|---|
| 1 | Fix nonpermitted modifications | It is assumed that modified objects are on StagingServer and unmodified origin objects of the same version are on ReferenceServer. |
Procedure 11: Run BPCU to create overlays
| Step | Action | Additional information |
|---|---|---|
| 1 | Use BPCU to create overlays for modified legacy objects
| Run the Best Practice Conversion Utility (BPCU) to create overlays:
After you perform these actions, run BPCU for any remaining objects. |
| 2 | BPCU log information | When BPCU is first run on a server, it creates the BPCU-Log form. This form records information about each run of the utility, such as the run date, run mode, and return code. The form also stores the log file and the difference report that are associated with the run as attachments. |
Procedure 12: Migrate base objects from reference server to staging server
| Step | Action | Information |
|---|---|---|
| 1 | Set BMC Migrator options before migration | — |
| 2 | View differences between objects | The BPCU generates a differences report that identifies objects that differ from the origin objects. However, the differences are not described. In this step, you view the difference between objects. |
| 3 | Acquire origin objects | You acquire unmodified origin objects and then compare them to the overlays on your server to see exactly what has changed in any object. |
| 4 | Restore origin objects to the staging server | This step replaces the origin objects on the staging server with the unmodified origin objects from the reference server. |
Procedure 13: Remove identical overlay objects
| Step | Action | Additional information |
|---|---|---|
| 1 | Minimize overlays | Remove all overlays that are the same as the object that they overlay, and all overlays that contain changes that are no longer needed. Minimizing overlays reduces the number of customizations that must be maintained during future application upgrades. |
| 2 | Compare overlays to overlaid objects on the same server | Use BMC Migrator to compare overlays to overlaid objects on the staging server. |
Procedure 14: Upgrade AR System server on the reference server
| Step | Action | Additional information |
|---|---|---|
| 1 | Review the upgrading tips | — |
| 2 | Prepare the approval server for upgrade | These tasks preserve customizations and ensure that definition files are updated successfully. |
| 3 | If you are upgrading from a version earlier than 7.6.03, prepare Full Text Search (FTS) | Perform these tasks only if you are upgrading from a version earlier than 7.6.03. |
| 4 | Ensure that you have enough transactional log space for an upgrade | During the upgrade, production dataset record data is copied from the BMC Atrium CMDB BMC.CORE:BMC_BaseElement form to a new AST:Attributes form. Ensure that you have enough transactional log space to accommodate the new form. |
| 5 | Perform the AR System server upgrade | This action upgrades the AR System server, Approval Server, Assignment Engine, Email Engine, and Flashboards. It also installs the following plug-ins: AREA LDAP, ARDBC, Web Services, SNMP, and FTS. |
| 6 | Disable ServletExec after the upgrade | (Windows or UNIX) If you are upgrading and you do not want to use the ServletExec application server, follow the instructions in this section to disable it. |
| 7 | Perform the approval server postupgrade steps | If you upgraded BMC Remedy Approval Server after backing up your data and customizations, perform the steps described in this section. |
| 8 | Perform the IPv6 postupgrade steps | You must update Java paths and configuration after upgrading and changing from IPv4 to IPv6. |
Procedure 15: Upgrade BMC Atrium Core and BMC Remedy ITSM suite applications on the staging server
| Step | Action | Additional information |
|---|---|---|
| Upgrade BMC Atrium Core | ||
| 1 | Prepare your operating system and your server before you upgrade BMC Atrium Core | All BMC Atrium Core versions have steps in common. You must comment out the entries in the armonitor and ar configuration files. Also, perform a complete health check of the AR System server and BMC Atrium CMDB. |
| 2 | Prepare the AR System server before you upgrade BMC Atrium Core and other BMC applications | The BMC Atrium Core installer prompts you to enter information about the AR System server. The steps in this topic will help you prepare your system to install the BMC Atrium Core features on the AR System server. |
| 3 | Perform procedures to improve the upgrade performance of BMC Atrium Core | After you upgrade the AR System server, perform these procedures to reduce the time required run the installer for an upgrade. |
| 4 | Perform the BMC Atrium Core upgrade | This procedure installs BMC Atrium CMDB, Reconciliation Engine, and Normalization Engine. You cannot install BMC Atrium CMDB on a remote AR System server; you must perform the installation on the computer on which BMC Remedy AR System is installed. |
| 5 | Validate the upgrade | From the BMC Atrium Core Maintenance tool, run a health check to ensure that the upgrade was successful. |
| 6 | Review the upgrade log files | The installer writes status messages to a log file, giving a detailed account of all changes made to your data model during the upgrade. If the upgrade fails and you must run the installer again, the installer resumes after the last operation it completed, rather than repeating operations that have already been completed. |
| 7 | Identify duplicate records | The upgrade of BMC Atrium CMDB can result in duplicate records of the same virtual system. To identify those duplicate records, the upgrade installer launches a postupgrade utility called vzUtil. |
| 8 | Enable entries in the armonitor and ar configuration files | — |
| 9 | Delete obsolete directories after upgrade | When you upgrade from version 7.5 or later, you must choose a new installation directory for the upgrade that is not below the BMC_AR_SYSTEM_HOME directory. The old installation directory is now obsolete and should be deleted to avoid confusion. |
| 10 | Clean up normalized CI relationships | The datamig utility cleans up the configuration items (CIs) in the staging datasets for which relationship names are normalized following the old best-practice relationship rules, and impact relationships are generated following the old best-practice impact normalization rules. |
| 11 | Perform the BMC Atrium Core Web Services upgrade |
|
| 12 | Perform the Atrium Integrator server upgrade | For upgrade from 8.0 to 8.1: Before running the Atrium Integrator server installation program, set Max Attach Size in the AR System Server Information window to 0 MB or 100 MB. If Max Attach Size is set to a value other than 0 MB or 100 MB, the Atrium Integrator server installation does not complete. For upgrade from 7.6.04 to 8.1: When you upgrade Atrium Integrator 7.6.04 to 8.1, a backup of your old jobs and transformations is created and saved to the ARSystem directory. The upgrade then proceeds like a fresh installation. The backup might complete or fail at times, depending on which you may need to perform additional tasks in case of failure. |
| Upgrade BMC Remedy ITSM suite applications | ||
| 1 | (Optional) Understand mixed version upgrades | BMC Remedy ITSM Suite 8.1 introduces the ability to selectively upgrade BMC Remedy ITSM applications. |
| 2 | Review this section if you are upgrading from BMC Remedy ITSM Suite 6.0.00 or earlier applications | Upgrading a BMC Remedy ITSM Suite 6.0.00 or earlier application directly to BMC Remedy ITSM Suite 7.5.00 or later is not supported. |
| 3 | Review this section if you are upgrading BMC Remedy ITSM Suite 7.0.03 patch 009 or later applications to BMC Remedy ITSM Suite 8.1 | The BMC Remedy ITSM Suite 8.1 installer supports upgrading from the BMC Remedy ITSM Suite 7.0.03 patch 009 or later to BMC Remedy ITSM Suite 8.1. |
| 4 | Understand data changes that will happen if you are upgrading from BMC Remedy ITSM Suite 7.0.03 patch 009 to BMC Remedy ITSM Suite 8.1 | This section provides information about the forms into which BMC Software loads new or modified data and about the ARX files. For BMC Remedy ITSM Suite 7.6.04 and later, the ARX files have been consolidated to improve installer performance. |
| 5 | Review the BMC Remedy ITSM suite upgrade recommendations | This section contains postupgrade recommendations. |
| 6 | Preserve your customized join forms and related views | As of BMC Remedy ITSM Suite 7.6.04, the field deletion driver scripts have been changed, and fields are now deleted using the Cascade option. This option not only deletes referenced fields, but it also deletes all associated fields in all join forms. |
| 7 | If you are upgrading from a pre-7.6.03 release, preserve your customizations to Classic views | This section contains steps to preserve your customizations to Classic views during an upgrade from a pre-7.6.03 release of the BMC Remedy ITSM suite. |
| 8 | If you customized the BMC Remedy ITSM suite, create overlays for your existing customizationsbefore you start the upgrade | Use the Best Practices Conversion Utility (BPCU) to create overlays and custom objects from your existing objects. |
| 9 | Perform the BMC Remedy ITSM suite application upgrade | This procedure upgrades BMC Service Desk and includes BMC Incident Management, BMC Problem Management, BMC Asset Management, BMC Change Management, and BMC Knowledge Management. |
| Upgrade BMC Service Level Management on the staging server | ||
| 1 | Review the upgrade recommendations for BMC Service Level Management | — |
| 2 | If you are using DB2, review the preupgrade DB2 recommendations for BMC Service Level Management | If you are using a version of BMC Service Level Management (BMC SLM) earlier than version 7.6.04 and you want to upgrade to version 8.1, then you must upgrade your BMC SLM DB2 database by running the IBM DB2 database script. |
| 3 | Perform BMC Service Level Management upgrade | The BMC Service Level Management installer enables you to deploy the BMC Service Level Management primary server in your IT environment. |
| 4 | Perform BMC Service Level Management Collector upgrade | The Collector is an optional component and can be omitted if you do not need to create performance or SIM-based service targets. |
| 5 | Perform BMC Service Level Management Collection Point upgrade | The BMC Service Level Management installer enables you to deploy BMC Service Level Management Collection Point. |
| 6 | Update the multi-tenancy model | The multi-tenancy update utility is integrated with the BMC Remedy IT Service Management suite and application installers. You can also start the multi-tenancy update utility manually in the following situations:
|
| Upgrade BMC Service Request Management on the staging server | ||
| 1 | Prepare to upgrade BMC Service Request Management | — |
| 2 | Import sample data when upgrading | If you change the data set before installing or upgrading, you do not need to import the data manually. |
| 3 | Perform the BMC Service Request Management upgrade | When you start the installer, you can choose one or more features to upgrade at one time. Because certain applications depend on a specific set of features, you might need to run the installer multiple times to upgrade all of the features in BMC Service Request Management. |
| 4 | Update the multi-tenancy model | The update to the multi-tenancy model is not supported if BMC Service Request Management is installed by itself as a stand-alone product or if BMC Service Request Management is installed on a mixed-version stack. The multi-tenancy update utility is integrated with the BMC Remedy IT Service Management suite and application installers. You can also start the multi-tenancy update utility manually in the following situations:
|
| 5 | Complete the upgrade | — |
| 6 | Upgrade the Product Ordering PDT | After you upgrade from BMC Service Request Management 8.0.00 or 8.1.00 to version 8.1.01 or later, you can decide whether to configure your Product Ordering service request definitions (SRDs) to use the new Product Ordering process definition template (PDT). |
| 7 | Upgrade Data Visualization modules | If you are upgrading from BMC Service Request Management 2.2.00 to BMC Service Request Management 8.1.00, you must also upgrade the Data Visualization modules used in the Request Entry Console and Visual Process views. |
| 8 | Reconcile custom AIF workflows | When upgrading from BMC Service Request Management 7.6.04 to 8.1.00, you must reconcile the custom advanced interface form (AIF) workflows. |
| 9 | Export and import data between different versions of the application | Importing data from BMC Service Request Management versions earlier than 7.6.03 directly into BMC Service Request Management 8.1.00 is not supported. To export BMC Service Request Management data from versions earlier than 7.6.03, you must first upgrade the application to BMC Service Request Management 7.6.03 (or later). You can then export the data from that system and import it to a BMC Service Request Management 8.1.00 system. |
| Perform the database backup | ||
| Perform the postupgrade configuration steps | ||
| 1 | Rebuild join forms that were deleted before an upgrade | If join forms were deleted before an upgrade, you can rebuild them. |
| 2 | Identify and correct invalid field mappings in join forms | When you upgrade the BMC Remedy ITSM suite, if the installer detects invalid field mappings, you can refer to the CIDataMig.log file to identify the forms and fields that require correction. |
| 3 | Rebuild customizations before deleting BMC Remedy ITSM suite attributes from the BMC Atrium CMDB | You must rebuild your customizations before you can delete all of the BMC Remedy ITSM suite attributes from the BMC Atrium CMDB while performing an upgrade. |
| Back up the upgraded staging server database | ||
Procedure 16: Reconcile overlays on the staging server
| Step | Action | Additional information |
|---|---|---|
| 1 | View differences between objects | Update overlays on the staging server for overlaid objects that were changed during the upgrades.
|
Procedure 17: Perform the postupgrade steps
| Step | Action | Additional information |
|---|---|---|
| 1 | Perform feature and functionality validation and performance testing. | — |
| 2 | Restore the backed-up, upgraded staging server database after testing is complete. | — |
| 3 | Perform any required changes based on issues found in testing. | — |
| 4 | Back up the postconfigured staging server database. You might need a stable point to revert to, if delta data migration has issues. | — |
Procedure 18: Perform the delta data migration
| Step | Action | Additional information |
|---|---|---|
| 1 | Understand the supported migration paths | — |
| 2 | Verify the minimum infrastructure requirements | — |
| 3 | Install BMC Remedy Migrator for migrating delta data |
|
| 4 | Prepare the source and destination servers for delta data migration | After the upgrade is complete and customizations are reapplied, the environment is ready for delta data migration. Perform the procedures to prepare your source and destination servers for the Delta Data Migration tool. |
| 5 | Perform the delta data migration |
|
| 6 | Review the migration results and resolve issues | — |
| 7 | Complete the postmigration procedures | After a successful migration, back up the staging server database. |
Procedure 19: Freeze user activity
| Step | Action | Additional information |
|---|---|---|
| 1 | Update the Admininstrator-Only setting | This setting enables only administrators and sub-administrators to access BMC Remedy AR System. Users who are not administrators or sub-administrators cannot perform any BMC Remedy AR System operations. Administrator-Only mode is useful during system maintenance. By default, this option is not selected.Only administrators (not sub-administrators) can set Administrator-Only mode. After an administrator sets this option, sub-administrators can access only forms for which they have permission. |
Procedure 20: Perform the delta data migration
| Step | Action | Additional information |
|---|---|---|
| 1 | Perform the delta data migration |
|
| 2 | Review the migration results and resolve issues | — |
| 3 | Complete the postmigration procedures | After successful migration, back up the staging server database. |
Procedure 21: Upgrade BMC Remedy Mid Tier
| Step | Action | Additional information |
|---|---|---|
| 1 | Perform the BMC Remedy Mid Tier upgrade | Use the BMC Remedy AR System installer. |
Procedure 22: Upgrade the secondary servers
| Step | Action | Additional information |
|---|---|---|
| 1 | Follow the procedures in Step 8 and Step 15 | You must point the secondary server to the new production (staging server) database. |
Procedure 23: Push to production
| Step | Action | Additional information |
|---|---|---|
| 1 | Test and promote staging server with overlays to production | Validate the upgrade on the staging server with user acceptance testing (UAT). |
Procedure 24: Go live for users
| Step | Action | Additional information |
|---|---|---|
| 1 | Update the Administrator-Only setting | You must disable Administrator-Only mode. |
Troubleshooting
The following table lists topics you can refer to for troubleshooting installation issues.
| Component | Topic |
|---|---|
| BMC Remedy AR System | For known and corrected issues, see: Installation and upgrade known and corrected issuesFor troubleshooting tips, see: Troubleshooting BMC Remedy AR System installation, migration, or upgradeFor logging information, see: Working with logsFor error message descriptions, see: Working with error messages |
| BMC Atrium Core | For known and corrected issues, see: Install and upgrade known and corrected issuesand Atrium Integrator known and corrected issuesFor troubleshooting tips, see: BMC Atrium Core upgrade issuesFor logging information, see: Working with logsFor error message descriptions, see: Working with error messages |
| BMC Remedy ITSM suite | For known and corrected issues, see: BMC Remedy ITSM suite installer issuesFor troubleshooting tips, see: Troubleshooting the installationFor logging information, see: Working with logsFor error message descriptions, see: Working with error messages |
| BMC Service Level Management | For known and corrected issues, see: Installation and upgrade issuesFor troubleshooting tips, see: Troubleshooting the installationFor logging information, see: Working with logs |
| BMC Service Request Management | For known and corrected issues, see: Installation issuesFor troubleshooting tips, see: Troubleshooting the installation, migration, or upgradeFor logging information, see: Working with logs |
Comments
In the graphic at the top of the page:
Procedure 2 step 2:
You must run the installer in Install mode so that the AR System server is upgraded, not reinstalled.
should be "Upgrade" mode to upgrade, else it will reinstall.
Hi Jan,
I discussed your comment with the concerned SME. The statement, "You must run the installer in Install mode so that the AR System server is upgraded, not reinstalled" is valid for the given step.
The step mentions upgrading using the accelerated staging server method. However, it also refers to BMC Remedy AR System server installation on the staging server.
Hope this helps.
Thanks,
Amol
Log in or register to comment.