Performing the data migration
When migrating your data, observe the following guidelines:
- Use the same Admin user account to log in to both servers. The upgrade environment is a database restore of the production environment. BMC recommends that you use one user to do this migration, which will help to track and debug issues. If you use Demo, ensure that you have the same password for both servers for that Admin account.
- You can run the Delta Data Migration Tool one time or multiple times. BMC recommends that you run the tool at least twice — before you start your production outage, and again after the production outage begins. The first data migration moves all of the data that has been added or changed since you made the production backup. The second migration moves only the data that has changed since you started the first data migration. This ensures that the time required to do the data migration (your outage window) is as small as possible.
This topic includes the following sections:
Before you begin
If you have forms that contain large amounts of data and you want to know the total numbers of records that are migrated or you want to improve performance, you can set the following configuration settings before running delta data migration.
The BMC Remedy Migrator Migrator Configuration.xml file (located in the * migrator* folder under <MigratorInstalledDirectory>) contains the count-enabled attribute which executes select count(*) queries by default and calculates the percentage completion (for every 100 records) that is shown in the MigratorCLI command window.
To improve performance if you have a large number of records, you can set the attribute to false, which means that you only see the total number of records processed instead of the percentage. For example:
<count enabled="false" />
Note
After you set this configuration, you no longer can see what percentage of migration is finished while delta data migration is running.
To see the percentage of migration completed information while delta data migration is running, set count enabled back to true.
To migrate data
Use the Delta Data Migration Tool to migrate data from the production server (source server) to the staging server (destination server) as follows:
- Go to the <MigratorInstallFolder>\DeltaDataMigration folder.
- Double-click the DeltaMigration.exe file to open the Delta Migrations window.
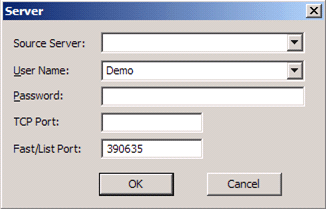
- Click the button next to the Source Server field to open the Server dialog box.

- Complete the following fields:
- Source Server — The source server name (production server).
- User Name — The user name of the source server and destination servers. The user name should be the same.
- Password — The password of the source server and destination servers. The password should be the same.
- TCP Port — The default value used by the script. If no port is specified, the default is 0.
- Fast/List Port — The default is 390635.
- Click OK.
- Click the button next to the Destination Server field to open the Server dialog box.
- Enter the destination server (staging server) information, and click OK.
The Delta Data Migration tool validates the versions on your source and destination servers. It provides a list of all supported BMC Remedy AR Server products and applications. Applications shown in red indicate that an appropriate package was not found or is not applicable for your server.

After you click the Migrate or Compare button, the DeltaMigration.log file is created and includes information about the source and destination servers, the products you selected, date parameters, and the option that you selected (Migrate or Compare). You can find this file in the same location where you ran the .exe file for Delta Data Migration Tool.Note
The destination server data will probably not be consistent until all the data up to the current time is migrated. You can migrate the data in one or more "chunks" (using the Start Date and End Date fields in the Delta Data Migration Tool to specify the range of data to migrate).
To ensure that the destination server data is consistent, enter an empty date range (which means the current time stamp) in the End Date field to migrate the final chunk of data. - Make sure that the Re-run applications with previous criteria & instructions check box is selected.
This check box is selected by default and should remain selected even if you are re-running the migration after fixing any data issues.Note
If you are using the multi-run approach to migrate to minimize your downtime, clear the Re-run applications with previous criteria & instructions check box after confirming that the previous delta data migration is error free and has successfully completed.
At this point, delta data migration will migrate based on the new date and selection criteria that you have specified. If the previous delta data migration had errors, then fix the errors and run the delta data migration again with the Re-run applications with previous criteria & instructions check box selected.
Then, the delta data migration will be based solely on the time stamp. - Select all applications that are not shown in red.
- In the Fetch Data/Objects Created/Modified After Date fields, use the Start Date and End Date fields to enter a range of dates (so that you can migrate a "chunk" of data).
The dates allow you to migrate only those records that were modified or created in that date range.- In Start Date, enter the timestamp from when you want to transfer the data.
Data in the forms that are greater than or equal to this timestamp are migrated.Note
- To account for daylight savings time, enter enter the Start Date and End Date with a time stamp that is greater than 12:00:00 midnight (for example, 1:00:00 AM).
- If this is the first time you are running the migration, the timestamp that applies is when the production server backup was used to create the staging server. If this is a multiple-run scenario, the timestamp that applies is when you initiated the previous run.
- In End Date, enter the date with the timestamp to when you want to transfer the data (for example, 12/20/2012 1:00:00 AM).
You can run the migration multiple times as needed to finish the delta data. For the final migration, do not enter an end date.
- In Start Date, enter the timestamp from when you want to transfer the data.
- If you are not migrating custom forms data, you can unselect the Custom in the application name list.
- When you perform the final delta data migration, select Data count validation to generate a report:
This field (not selected by default) validates the data count from the source and the destination servers and ensures that the counts match. When you finish, navigate to the Working\Logs folder (by default, <MigratorInstallDir>\DeltaDataMigration\Working\Logs) to review the Count_statistics.csv file. The report lists:- Source form name
- Destination form name
- Qualification
- Source record count
- Destination record count
- Semicolon separated string that lists the errors information with unique index field values for entries that were not migrated from source server due to the errors.
Note
If you see errors in the report, see Reviewing the migration results and resolving issues to fix them.
- Click Migrate or Compare.
- Click Migrate to start the data migration.
All delta data is transferred from the source server to the destination server. - Click Compare to create a comparison result report.
This report can be used to identify all data that has been created or updated in the source server during the delta time period.
The comparison script generates an .xml result file for each instruction xml file with the instruction name and suffix _Compare. For example:
Remedy_Service_Request_Management_Compare.xml
The script generates compare .xml result files for each instruction .xml file. These files include all data entries that are either different (records updated in the source server during the delta period) or missing (records created in the source server during the delta period) in the destination server.
The Delta Migration window displays and shows the parameters that will be used by the Migrator.
- Click Migrate to start the data migration.
- Click Yes to continue with the migration or comparison.
One command window is launched for each application you are running. The windows close automatically when the process is done or if there is an error.
If you click No, the migration or comparison is cancelled.The command output is available as an HTML log file.Note
If you want to re-run the migration or the comparison, you must wait for all of the command prompts windows to close before executing a new run.

Related topics
Performing the data migration for server groups
Extending Delta Data Migration to include customizations
Comments
I want the
to go under the screenshot where we are explaining about start and end dates.
Table of Contents got broken:
This topic includes the following sections:
Thanks for the feedback, Wallace. It's fixed now.
Log in or register to comment.