AMIGO checklist for TrueSight Operations Management
This topic was edited by a BMC Contributor and has not been approved. More information.
The Assisted MIGration Offering (AMIGO) checklist provides the steps needed to install/upgrade TrueSight Presentation Server, Remedy Single Sign On, TrueSight Infrastructure Management, and the Integration Service Node.
The checklist is comprised of material gathered from multiple resources, such as documentation, knowledge articles, webinars, and feedback from other customers. The result is a definitive list of steps needed to efficiently and successfully install/upgrade TrueSight.
To download the TrueSight 11.0 components, go here.
In the "Filter Products" field, type in "TrueSight Infrastructure", without the quotes
Click the Go button
In the right side pane, click 'TrueSight Infrastructure Management'
Note: If you don't see 'TrueSight Infrastructure Management', then contact your Account Manager.
The version in the drop-down menu will default to the latest version. Be sure that is shows 11.0.00
Click the Products tab
Get the following components corresponding to your operating system:
•Infrastructure Management Base Monitoring Installation Repository Version 11.0.00 - September 2017
•Infrastructure Management Extended Monitoring Installation Repository Version 11.0.00 - September 2017
•Remedy Single Sign-On for TrueSight Version 11.0.00
•TrueSight Infrastructure Management Version 11.0.00 - Core Components
Close the window and go back to the main EPD screen.
In the "Filter Products" field, type in "TrueSight Presentation", without the quotes
Click the Go button
In the right side pane, click 'TrueSight Presentation Server'
Note: If you don't see 'TrueSight Presentation Server', then contact your Account Manager.
The version in the drop-down menu will default to the latest version. Be sure that is shows 11.0.00
Click the Products tab
Get the following component corresponding to your operating system:
•TrueSight Presentation Server Version 11.0.00
Note that TrueSight requires all of the components listed above (e.g. Presentation Server, Remedy SSO, etc.).
If you need more detail on the above steps, go here
Note: The Infrastructure Management component should be on a dedicated machine (e.g. Do not share the server with an Integration Service, Presentation Server, etc.)
The recommended configuration is to have the Presentation Server and Remedy SSO on one box and TrueSight Infrastructure Management on another. Putting all TrueSight Operations Management components on a single server is possible only for a proof-of-concept or as a test, not for production. Go here for details.
When downloading the files, save the files to a local directory on the server where the files will be installed. BMC Software recommends that you install TrueSight from a local copy of the installation image and not from a network drive. Installing from a network drive can cause delays in completing the installation.
You can configure an existing Remedy Single Sign-On that is integrated with other BMC products to work the Presentation Server. However, the version of RSSO should be 9.1.03.001 or later (but not up to 9.1.04).
Note that you will need a minimum of two boxes for TrueSight Operations Management:
a) One box to host Presentation Server and Remedy SSO
b) Another box to host Infrastructure Manager
Since Remedy SSO and Presentation Server can be installed on the same box, you may want to select an OS which is supported by both applications. OSs which support both are denoted by the "^" character.
Remedy SSO hardware & OS requirements (64-bit x86)
- Windows 2016^
- Windows Server 2012^
- Windows Server 2008 R2^
- 11Gb disk space
- 2 Gb RAM dedicated to Remedy SSO
Update Terminal Services configuration options:
regedit
Go to HKEY_LOCAL_MACHINE\SYSTEM\CurrentControlSet\Control\Terminal Server
Change:
PerSessionTempDir to 0
and
DeleteTempDirsOnExit to 0
If you made changes to the Registry, reboot the computer.
Oracle JRE must be installed before you install Remedy SSO (the Remedy SSO installer does not include the bundled JRE). Get Oracle JRE here
Note that Remedy SSO documentation states that Tomcat must be separately installed prior to installing Remedy SSO. This isn't needed when performing the installation per these AMIGO steps.
For ports and/or existing Postgres DB details, click here
Click here to go to the Remedy SSO requirements documentation, if needed.
Click here regarding the Terminal Services, if needed.
^ OSs common to both Remedy SSO & TSPS
Presentation Server hardware & OS requirements (64-bit x86)
•Windows 2016, Standard or Datacenter Edition^
•Windows 2012 R2, Standard or Datacenter Edition
•Windows 2012, Standard or Datacenter Edition^
•Windows 2008 R2, Standard, Datacenter, or Enterprise Edition^
•RAM: 8Gb for Small environments / 24Gb for Medium environments / 32Gb for Large environments
•Disk space: 200Gb for Small environments / 300Gb for Medium environments / 500Gb for Large environments (15,000 RPM drive or a tier 1 SAN storage with 2–4 GBps SAN dedicated channel for Medium and Large sizes)
•CPU: 4 vCPU for Small & Medium environments / 8 vCPU for Large environments (2.2 GHz for all sizes)
If you are installing the Presentation Server on an IPv6 Windows host, ensure that the 'IP helper' service is started.
Click here to determine the size of your Presentation Server.
The hardware requirements are the same for physical or virtual machines.
Parallel CPUs usually improves user response time better than a single CPU with a higher clock speed.
Click here for OS and hardware requirements.
^ OSs common to both Remedy SSO & TSPS
TrueSight Infrastructure Management server hardware & OS requirements (64-bit x86)
•Windows 2016, Standard or Datacenter Edition
•Windows 2012 R2, Standard or Datacenter Edition
•Windows 2012, Standard or Datacenter Edition
•Windows 2008 R2
•RAM: 8Gb for Small environments / 16Gb for Medium environments / 32Gb for Large environments
•Disk space for TSIM bundled with Sybase DB: 200Gb for Small environments / 300Gb for Medium environments / 600Gb for Large environments
•Disk space for TSIM server only (Oracle info on next line): 30Gb for Small environments / 50Gb for Medium environments / 100Gb for Large environments
•Disk space for TSIM's Oracle DB: 170Gb for Small environments / 250Gb for Medium environments / 500Gb for Large environments
•15000 RPM drive or Tier 1 SAN storage (2-4 GBps SAN dedicated channel)
•CPU: For Small & Medium environments: Intel Core i7 CPU: 4 vCPU, Frequency: 2.2GHz, Threads :16 (For Large TSIM servers use Intel Core i7 CPU: 8 vCPU, Frequency: 2.2GHz Threads :16)
•Pagefile: Pagefile size should be Microsoft Windows Recommended
For more detail on the above requirements, go here and here
Veritas file systems are not recommended for large deployments due to performance problems.
Use RAID 10 or 01 on larger TrueSight installations to better satisfy the higher demands on write I/O operations. BMC does not recommend using RAID 5.
Use a larger number of physical disk drives (spindle count) instead of larger capacity disks. Because disk drive throughput performance has not increased at the same rate as disk capacity, you can achieve better performance with smaller disks.
Parallel CPUs usually improves user response time better than a single CPU with a higher clock speed.
Configure Terminal Services to save log files:
1. Open the Registry Editor (regedit) and navigate to the following registry:
HKEY_LOCAL_MACHINE\System\CurrentControlSet\Control\Terminal Server
2. Verify that the following registry keys in the Terminal Server registry have the appropriate settings:
•DeleteTempDirsOnExit (REG_DWORD) = 0
•PerSessionTempDir (REG_DWORD) = 0
If you made any change to the registry, reboot the computer.
If you are installing the Infrastructure Management Server on Windows 2016, the Defender Service removes some of the installation files during installation. To avoid this, perform any of the following:
- Add an exception rule in the Defender Service to recognize all files in the Infrastructure Management Server installation directory as valid files.
- Disable the Defender Service.
Clean the following directories:
•The temporary folder in your home folder
•%Temp%
•%Tmp%
•C:\WINNT\Temp (if it exists)
•C:\Windows\Temp (if it exists)
You might not be able to delete all the files, but BMC recommends that you remove any files or directories that match "Infrastructure Management*" or "TrueSight*".
Note: Windows installation accounts no longer needs to be a direct member of the Administrators group. (But the CLI and pwtray.exe presently still require direct membership to the Administrator's group.)
Ensure that the Windows Firewall service is running (services.msc)
For more detail on the above steps, go here
If you want to integrate TrueSight with SCOM, ensure that .NET Framework version 3.0 is installed. Use the Role Management tool to accomplish this. For more information about how to install the .NET Framework, visit microsoft.com.
BMC recommends that you remove all the files or folders named "Program" or those that begin with "Program" from the drive where TrueSight is installed (with the exception of "Program Files" or "Program Files (x86)"). For example, if TrueSight is installed under C:\Program Files, but another folder C:\Program exists on the same drive, the upgrade may fail. (This recommendation holds true when you install hotfixes also.)
Ensure that the target computer has the most recent patch level for supported Windows operating systems. If it does not, use Microsoft Update (or Windows Update) to update it.
User Access Control (UAC) must be disabled.
If you are using the Remote Desktop Connection (RDC) to install the product, then the RDC must be in console mode.
The following ports should be available on the TrueSight Infrastructure Management server:
7, 80, 443, 1099, 1100, 1827, 1828, 1851, 2638, 3084, 3115, 3182, 3183, 8005, 8008, 8009, 8093, 8080, 9149, 12123, 12124, 12126, 12130, 12134, 12141, 15000, and 45000.
Perl must not be installed on the target computer where TrueSight Infrastructure Management is being installed.
TrueSight IS hardware & OS requirements (64-bit x86)
•Windows 2016 Standard or Datacenter
•Windows 2012 R2 Standard or Datacenter
•Windows 2012 Standard or Datacenter
•Windows 2008 R2 Standard or Datacenter
•Windows 2008 SP2 Standard or Datacenter
•RAM for Small/Medium/Large configurations: 4Gb/8Gb/8Gb
•50Gb of disk space
BMC recommends a maximum of three Integration Services instances running on a single Integration Service host computer.
Configure Terminal Services to save log files:
1. Open the Registry Editor and navigate to the following registry:
HKEY_LOCAL_MACHINE\System\CurrentControlSet\Control\Terminal Server
2. Verify that the following registry keys in the Terminal Server registry have the appropriate settings:
•DeleteTempDirsOnExit (REG_DWORD) = 0
•PerSessionTempDir (REG_DWORD) = 0
Reboot if you made changes to the registry
Click here for more hardware & OS details.
Note that you will need a minimum of two boxes for TrueSight Operations Management:
a) One box to host Presentation Server and Remedy SSO
b) Another box to host Infrastructure Manager
Since Remedy SSO and Presentation Server can be installed on the same box, you may want to select an OS which is supported by both applications. OSs which support both are denoted by the "^" character.
Remedy SSO hardware & OS requirements (64-bit x86)
- Red Hat Enterprise Linux 6.x, 7.x
- SUSE Enterprise Linux Server 11
- Oracle Solaris 10
- CentOS 6.5
- 11Gb disk space
- 2 Gb RAM dedicated to Remedy SSO
Ensure that the system default locale is UTF-8 (run the 'locale' command).
For ports and/or existing Postgres DB details, click here
The $TMP directory must have execute permissions. You can assign the execute permissions by removing the noexec attribute from the /tmp line in the /etc/fstab file. For example, remove the noexec entry from the following:
UUID=0aef28b9-3d11-4ab4-a0d4-d53d7b4d3aa4 /tmp ext4 defaults,noexec 1 2
Click here as a reference, if needed.
Presentation Server hardware & OS requirements
•Red Hat Enterprise Linux versions 6.7^, 6.8^, 6.9^, 7.2^, 7.3^ (64-bit versions)
- Run 'cat /etc/redhat-release' to get the Linux version.
- Run 'uname -a' to get the kernel version, as certain versions are supported:
- Supported kernel version for Red Hat Enterprise Linux versions:
- 6.7 (2.6.32-573)
- 6.8 (2.6.32-642)
- 6.9 (2.6.32-696)
- 7.2 (3.10.0-327)
- 7.3 (3.10.0-514)
•SUSE Linux Enterprise Server 11 Service Pack 3^, Service Pack 4^, 12, 12 SP2 (64-bit versions)
- Run 'uname -a' to get the kernel version, as certain versions are supported:
- Supported kernel version for SUSE Linux Enterprise Server versions:
- 11 Service Pack 3 (3.0.76-0.11.1)
- 11 Service Pack 4 (3.0.101-88.1)
- 12 (3.12.28-4.6)
- 12 SP 2 (4.4.21-81)
If you are installing the Presentation Server on a SUSE Linux host, ensure that the glibc library version is 2.12 or above.
•Oracle Linux Server (with Unbreakable Enterprise Kernel (UEK) Release 4):
- 6.8
- 7.3
•RAM: 8Gb for Small environments / 24Gb for Medium environments / 32Gb for Large environments
•Disk space: 200Gb for Small environments / 300Gb for Medium environments / 500Gb for Large environments (15,000 RPM drive or a tier 1 SAN storage with 2–4 GBps SAN dedicated channel for Medium and Large sizes)
•CPU: 4 vCPU for Small & Medium environments / 8 vCPU for Large environments (2.2 GHz for all sizes)
Click here to determine the size of your Presentation Server.
•Character encoding: LANG=_.UTF-8, LC_ALL=_.UTF-8, LANGUAGE=_.UTF-8
The hardware requirements are the same for physical or virtual machines.
Parallel CPUs usually improves user response time better than a single CPU with a higher clock speed.
A non-root user who has modification permissions to specific directories and files is needed to install the Presentation Server. A user with root privileges cannot install the Presentation Server.
Red Hat (TSPS, TSIM, ISN): Run the following commands to install required OS libraries:
yum install libXtst.i686 libXtst.x86_64 libXtst-1.0.1-3.1 libX11-devel-1.0.3-11.el5
yum install glibc.i686 glibc.x86_64 glibc-2.12.x86_64 glibc-2.12-1.107.el6.i686 glibc-devel-2.5-65
yum install libstdc++.i686 libstdc++.x86_64
yum install compat-libstdc++-33.i686 compat-libstdc++-33.x86_64 compat-libstdc++-33-3.2.3-69.e16.i686
yum install compat-libstdc++-296.i686
yum install pam.i686 pam.x86_64 pam-1.1.1-13.e16.i686
yum install libgtk-x11-2.0.so.0
yum groupinstall 'X Window System'
The 'yum install' commands require a Red Hat subscription. Register the system by clicking System >Administration > Red Hat Subscription Manager in the menu on the server itself.
Note: The above commands will install both 32 bit and 64 bit libraries on the 64 bit system, which is intentional.
If an error occurs while installing a 32 bit library, try re-running the 'yum install' command with both 32-bit and 64-bit versions. For example:
yum install pam.i686 pam.x86_64
If the "No package <package name> name available" message is seen, run the command again without specifying the version. For example:
"No package libX11-devel-1.0.3-11.el5 available."
"Error: Nothing to do"
# yum install libX11-devel
SUSE: Click here for the commands to install the required OS libraries.
^ OSs common to both Remedy SSO & TSPS
TrueSight Infrastructure Management server hardware & OS requirements (64 bit)
•Red Hat Enterprise Linux versions 6.7, 6.8, 6.9, 7.2, 7.3
- Run 'cat /etc/redhat-release' to get the Linux version.
- Run 'uname -a' to get the kernel version, as certain versions are supported:
- 6.7 (2.6.32-573)
- 6.8 (2.6.32-642)
- 6.9 (2.6.32-696)
- 7.2 (3.10.0-327)
- 7.3 (3.10.0-514)
•SUSE Linux Enterprise Server 11 Service Pack 3^, Service Pack 4^, 12, 12 SP2 (64-bit versions)
- Run 'uname -a' to get the kernel version, as certain versions are supported:
- Supported kernel version for SUSE Linux Enterprise Server versions:
- 11 Service Pack 3 (3.0.76-0.11.1)
- 11 Service Pack 4 (3.0.101-88.1)
- 12 (3.12.28-4.6)
- 12 SP 2 (4.4.21-81)
. •Oracle Linux Server (with Unbreakable Enterprise Kernel (UEK) Release 4):
- 6.8
- 7.3
•RAM: 8Gb for Small environments / 16Gb for Medium environments / 32Gb for Large environments
•Disk space for Small/Medium/Large configurations with Sybase DB:200Gb/300Gb/600Gb
•Disk space for Small/Medium/Large configurations with Oracle DB:30Gb for TrueSight Infrastructure Management server & 170Gb for DB / 50Gb for TrueSight Infrastructure Management server & 250Gb for DB / 100Gb for TrueSight Infrastructure Management server & 500Gb for DB
•15000 RPM drive or Tier 1 SAN storage (2-4 GBps SAN dedicated channel)
•Minimum values in /etc/security/limits.conf for the TSIM user:
- File descriptors: 4096
- Max processes: 10000
To confirm your values:
- ulimit -n
- ulimit -u
•Ports for Linux: The following ports should be available in listen mode:
7, 80, 443, 1099, 1100, 1827, 1828, 1851, 2638, 3084, 3115, 3182, 3183, 8005, 8008, 8009, 8080, 8093, 9149, 12123, 12124, 12126, 12130, 12134, 12141, 15000, 45000.
Veritas file systems are not recommended for large deployments due to performance problems.
Use RAID 10 or 01 on larger TrueSight installations to better satisfy the higher demands on write I/O operations. BMC does not recommend using RAID 5.
Use a larger number of physical disk drives (spindle count) instead of larger capacity disks. Because disk drive throughput performance has not increased at the same rate as disk capacity, you can achieve better performance with smaller disks.
Parallel CPUs usually improves user response time better than a single CPU with a higher clock speed.
Red Hat (TSPS, TSIM, ISN): Run the following commands to install required OS libraries:
yum install libXtst.i686 libXtst.x86_64 libXtst-1.0.1-3.1 libX11-devel-1.0.3-11.el5
yum install glibc.i686 glibc.x86_64 glibc-2.12.x86_64 glibc-2.12-1.107.el6.i686 glibc-devel-2.5-65
yum install libstdc++.i686 libstdc++.x86_64
yum install compat-libstdc++-33.i686 compat-libstdc++-33.x86_64 compat-libstdc++-33-3.2.3-69.e16.i686
yum install compat-libstdc++-296.i686 compat-libstdc++-296.x86_64
yum install pam.i686 pam.x86_64 pam-1.1.1-13.e16.i686
yum install libgtk-x11-2.0.so.0
yum install libfreebl3.so
yum groupinstall 'X Window System'
The 'yum install' commands require a Red Hat subscription. Register the system by clicking System >Administration > Red Hat Subscription Manager in the menu on the server itself.
Note: The above commands will install both 32 bit and 64 bit libraries on the 64 bit system, which is intentional.
If an error occurs while installing a 32 bit library, try re-running the 'yum install' command with both 32-bit and 64-bit versions. For example:
yum install pam.i686 pam.x86_64
If the "No package <package name> name available" message is seen, run the command again without specifying the version. For example:
"No package libX11-devel-1.0.3-11.el5 available."
"Error: Nothing to do"
# yum install libX11-devel
SUSE: Run these commands to install required OS libraries prior to installing TSIM.
The 'umask' command should return 022
1 Gb of free space is required in /tmp (in addition to 3Gb free in swap overall), with read and write permissions to /tmp.
The gzip compression utility needs to be present in the PATH environment variable.
The directory where TrueSight is installed and all its parent directories must have 755 permissions and must be owned by root, as well as the other group. Without these permissions and ownership, you will not be able to log into TrueSight.
Disable X Windows access control by using the 'xhost' command.
Ensure that the 'nobody' user account and the 'nobody' group exist on the target computer.
The installation directory name cannot contain spaces
Ensure that you have root permissions for the computer on which you want to install TrueSight.
If desired, it is possible to install TrueSight Infrastructure Management Server to run as a non-root user. Go here for non-root details
Ensure that you install the csh and tcsh shells.
BMC highly recommends that you use MobaXterm as the UI to install TrueSight on Linux systems. Other X emulators, such as eXceed, may not allow the GUI to launch, while allowing other X utilities to do so.
Click here for more hardware details.
Click here for OS details.
Click here for Small/Medium/Large definitions.
Click here for preinstallation checks.
TrueSight IS hardware & OS requirements (64 bit)
•Red Hat Enterprise Linux 6.7, 6.8, 6.9, 7.2, 7.3
•SUSE Linux 11 SP3, 11 SP4, 12, 12 SP2
•Oracle Linux Server 6.8, 7.3
•RAM for Small/Medium/Large configurations: 4Gb/8Gb/8Gb
Click here for details.
Red Hat (TSPS, TSIM, ISN): Run the following commands to install required OS libraries:
yum install libXtst.i686 libXtst.x86_64 libXtst-1.0.1-3.1 libX11-devel-1.0.3-11.el5
yum install glibc.i686 glibc.x86_64 glibc-2.12.x86_64 glibc-2.12-1.107.el6.i686 glibc-devel-2.5-65
yum install libstdc++.i686 libstdc++.x86_64
yum install compat-libstdc++-33.i686 compat-libstdc++-33.x86_64 compat-libstdc++-33-3.2.3-69.e16.i686
yum install compat-libstdc++-296.i686 compat-libstdc++-296.x86_64
yum install pam.i686 pam.x86_64 pam-1.1.1-13.e16.i686
yum install libgtk-x11-2.0.so.0
yum install libfreebl3.so
The 'yum install' commands require a Red Hat subscription. Register the system by clicking System >Administration > Red Hat Subscription Manager in the menu on the server itself.
Note: The above commands will install both 32 bit and 64 bit libraries on the 64 bit system, which is intentional.
If an error occurs while installing a 32 bit library, try re-running the 'yum install' command with both 32-bit and 64-bit versions. For example:
yum install pam.i686 pam.x86_64
If the "No package <package name> name available" message is seen, run the command again without specifying the version. For example:
"No package libX11-devel-1.0.3-11.el5 available."
"Error: Nothing to do"
# yum install libX11-devel
SUSE (TrueSight IS): Run these commands to install required OS libraries prior to installing TrueSight IS.
Clean your temporary directories (e.g. /tmp and /var/tmp). You may not be able to delete all the files, but BMC recommends that you remove any files or directories that match "*ProactiveNet*" and "TrueSight*".
The 'umask' command should return 022
It is possible to install the Integration Service as non-root. Go here for non-root details
Consider the following VMware best practices:
•To prevent performance problems when deploying on VMware, ensure that you enable the Unlimited memory setting for the VM.
•CPU and memory resources should be dedicated to the VM on which TrueSight or any of its components are running. You must also ensure that you do not use the shared option.
•The Integration Service node(s) should be excluded from VMware HA if you are using the out-of-the-box active/active configuration, because PATROL Agents will automatically switch to their secondary location if the primary location is interrupted for any period of time
•You must use the Thick Provision Eager Zeroed disk type for the Infrastructure Management server. The Thick Provision Eager Zeroed disk provides the advantages of clustering features such as fault tolerance.
•Use only two to three virtual machine snapshots in a chain. BMC recommends that you avoid using the single snapshot for more than 72 hours. You can either delete the snapshot or consolidate it. For more information, see http://kb.vmware.com/kb/1009402
•Enable NIC teaming.
•Use a VMware paravirtual NIC adapter for optimized performance
•For ESX storage, ensure that you use dedicated disk storage all virtual machines; avoid sharing disk storage.
•Configure Jumbo frames for the storage adapter.
•Reserve the resources that are allocated for the virtual machine on which the BMC applications are installed.
Click here for more details on the above points
The hardware requirements are the same for physical or virtual machines.
For TSIM, if deciding between the pre-packaged Sybase DB or the customer-provided Oracle DB go here.
For TSIM, if using Oracle for TrueSight's database:
•Use Oracle versions 11.2.0.2.0, 11.2.0.3.0, 11.2.0.4.0, 12.1.0.1.0, 12.1.0.2.0 (Standard and Enterprise)
•Make sure that Oracle has been installed on a separate box than the TrueSight Infrastructure Management server
•Ensure that you dedicate one Oracle database instance exclusively only to BMC TrueSight Infrastructure Management Servers.
•You can install multiple BMC TrueSight Infrastructure Manager servers and configure them to run on a single instance of the Oracle database. Click here for details.
•Create an instance with the proper character sets
-Database Character Set—AL32UTF8
-NLS_LENGTH_SEMANTICS—BYTE
-National Character Set—AL16UTF16
•If NLS_LENGTH_SEMANTICS has been set to BYTE, as recommended by BMC, also set the DB_BLOCK_SIZE value to 8192. If you set the NLS_LENGTH_SEMANTICS value to CHAR, ensure that you set the DB_BLOCK_SIZE value to 16384
•Set the Oracle database instance on the Oracle server to run in ARCHIVELOG mode.
•Create at least two sets of redo log files with a minimum of 500 MB each on the Oracle database instance. Click here for details.
•Ensure that you set the Oracle database system parameters before running the TrueSight application server installer. For information about setting Oracle database system parameters click here.
BMC TrueSight has been tested on localized operating system platforms in these languages:
•English
•Simplified Chinese
•German
•Japanese
•Korean
•French
For more detail on the above points, go here
For Chinese, Korean, and Japanese installations, ensure that the system default locale is a UTF-8 locale. This enables the Input Method feature in the BMC TrueSight Administration Console.
For a list of third party integrations & their versions, go here
For a list of BMC Software integrations & their versions, go here
Deploy the Integration Service strategically so that the connections from Patrol Agents to the Integration Service do not span network boundaries or firewalls.
Pagefile/swap space minimum is 3 GB (4 GB is recommended).
Free disk space on system root should be 4GB or greater.
Exclude the BMC TrueSight installation directory from virus scanning. Virus scanners can block the SMTP port and lock files that the installation program needs to configure the mail server and perform the installation.
TrueSight automatically configures Windows firewall from installer, but third party firewalls need manual intervention. Disable third party firewall protection programs, such as McAfee Host Intrusion Prevention Service (HIPS). HIPS can block access to ports that are used by the installation program during installation and by TrueSight at run time. You must leave HIPS disabled after the installation is completed. You must reboot the computer after you disable the service.
Ensure that the host name or cluster name does not contain an underscore (_).
Java must not be installed on the target computer where TrueSight Infrastructure Management is being installed.
The BMC TrueSight Infrastructure Management Server 11.0 can simultaneously interoperate with Integration Service versions 11.0, 10.7, 10.5, 10.0.500, 10.0, 9.6, and 9.5
A server can host both earlier and the new Integration Service processes if you set the ports so that they do not conflict and you provide proper resources (CPU, memory, disk, and so on).
The supported Integration Service versions can only communicate with PATROL Agent versions 9.5.00 or later.
For more details on Interoperability, go here.
If setting up a Disaster Recovery environment, go here.
If setting up a multiple TrueSight Infrastructure Management server environment (Central and Child servers), go here.
If possible, consider installing a new installation of TrueSight rather than upgrading from a previous version. This minimizes monitoring downtime and allows for an easier and less stressful experience. Go here for details.
For known and corrected issues, click here.
TSPS:
Migrate the data format. Click here for details.
Before upgrading the TSPS with a non-root user, delete the Utilities directory from the /var/tmp directory.
TSIM & ISN:
To determine whether you can upgrade an earlier version to the desired version directly (or if you have to plan for an incremental upgrade from the earlier versions), get your current version information:
Run "pw viewhistory" on the TSIM/BPPM server to determine the current version
Run "pw remote list" on the TSIM/BPPM server to determine the build numbers of the ISNs.
You can directly upgrade to TSIM 11.0 from TSIM 10.5, TSIM 10.7, or from TSIM/BPPM 9.6 FP2
You can upgrade to TSIM 11.0 from previous versions after upgrading to an intermediate stage. Go here for details.
On Solaris and Linux, you cannot migrate BEM and IM to TSIM 11.0. You have to uninstall BMC Event and Impact Management prior to installing TSIM 11.0.
On Windows, you can migrate from BMC Event and Impact Management 7.1, 7.2, 7.3.xx, or 7.4 to TSIM 11.0, click here for the steps.
Backup your TSIM database prior to upgrading. For details, go here
Or, better yet, backup the entire installation: Stop TrueSight processes "pw system stop", then backup (zip/tar) the entire TrueSight directory. Note that if you are using Oracle as your TSIM database, this will need to be backed up separately.
If your current version of ProactiveNet is 9.0 and below, run the StaleCleaner utility. If you don't have a copy, download it here.
Review .\pw\pronto\logs\pruner.log and proactivenetpruner.log (if exists) for errors (e.g. search for "fail" and "error").
If upgrading from ProactiveNet, truncate the table ITEMCFG_DTLSLOG to speed up the upgrade:
•Bring up database: 'pw process start dbsrv'
•Confirm table size: 'runjava scripts.runsqli “select count(*) from ITEMCFG_DTLSLOG”'
•Truncate the table: 'runjava scripts.runsqli “truncate table ITEMCFG_DTLSLOG”'
•Confirm new size (should be 0): 'runjava scripts.runsqli “select count(*) from ITEMCFG_DTLSLOG”'
•Bring down the database: 'pw process end dbsrv'
Ensure that you have merged any customized KBs. Go here for details.
Close all the BMC related application windows that are opened before launching the upgrade.
Note: During the upgrade to TSIM 11.0, you will receive a system reboot prompt if any of the existing BMC files were locked. You must set all the BMC services to manual mode (or disable any rc scripts, if the issue is seen in Linux), restart the server, and launch the upgrade process again. An alternative for Windows is to download Process Explorer (https://technet.microsoft.com/en-us/sysinternals/bb896653), run it, then:
Find -> Find Handle or DLL -> enter the path for TrueSight (e.g. C:\Program Files\BMC Software\TrueSight) -> Search
Kill whatever processes are returned. Complete the installation.
You must disable any Pn* Scheduled Tasks (or /usr/pw/pronto/bin cron jobs) and any custom schedulers that access BMC installation files before starting the upgrade process. After completing the upgrade process, you can enable them again.
Disconnect all the Integration Services that are connected to the Infrastructure Management server from the Configuration > Managed Devices page in the TrueSight Console.
Ensure that there are no Integration Services installed on the computer where the TrueSight Infrastructure Management Server will be installed.
Upgrade the TrueSight Infrastructure Manager before upgrading the TrueSight Integration Services.
To upgrade TSIM on Linux, reserve at least 4 GB of space in the /tmp directory.
Note that a TSIM upgrade requires 4 GB of space whereas an initial installation of TSIM only needs 1 Gb of space in /tmp.
Before upgrading the TSIM with a non-root user, delete the Utilities directory from the /var/tmp directory.
Customization:
Customization is outside the scope of BMC Support. Our policy on this is here. For example, if BMC Consulting Services has provided a solution to you (e.g. Event Management Framework/Event Optimization Toolkit, etc.), then contact BMC Consulting Services for assistance with that solution. In other words, if you have 'enr' and/or 'norm' cells specified in your mcell.dir, then you have EMF customization. Therefore, contacting BMC Support for help with that will lead to human sacrifice, dogs and cats living together... mass hysteria. And nobody wants that to happen.
Prior to installing/upgrading in a production environment, BMC recommends performing that in a test/dev/QA environment.
Ensure that your installation account is a member of the Administrators group.
Extract the Remedy SSO file
Go to Remedy_Single_Sign-On_for_TrueSight_Version_11.0_Windows\Disk1
Right Click on the Setup Icon and “Run as Administrator”
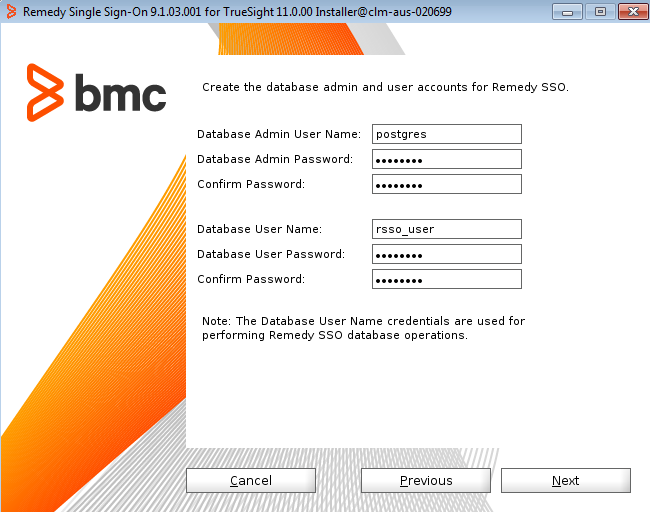
Most customers will select the following options:

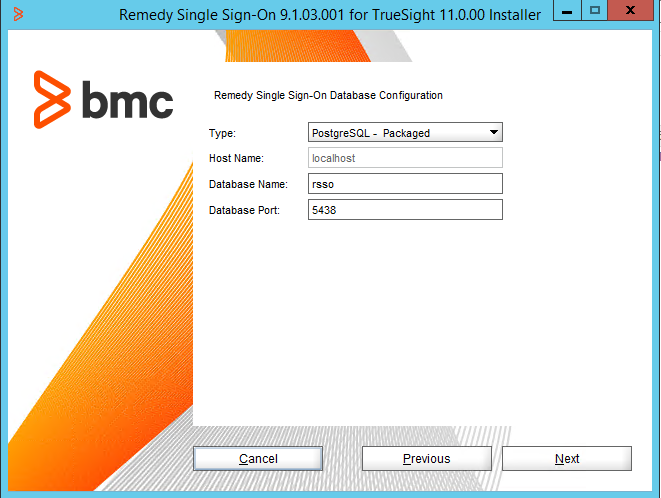


Cookie domain: The domain value of the cookie must be the network domain of Remedy Single Sign-On or one of its parent domains (e.g. bmc.com). The TSPS needs to be hosted on the same domain as the cookie domain configured on the Remedy Single Sign-On server.
Click here for more detailed steps (e.g. installing Remedy SSO in an HA environment), if needed.
To verify the installation:
The URL to open the BMC Remedy SSO Console is:
https://<ssoserver>.<domain>:<port>/rsso/admin
For example: https://ssoserver.bmc.com:448/rsso/admin
(The Remedy port and URL are different vs. Atrium SSO.)
Login into RSSO using:
UserID: Admin
Password: RSSO#Admin#
All Entries are Case Sensitive
Note: If you are using FireFox and see "SSL received a weak ephemeral Diffie-Hellman key in Server Key Exchange", then you can disable Diffie-Hellman cypher keys here:
https://addons.mozilla.org/en-us/firefox/addon/disable-dhe/
When you are prompted that you are connecting to an insecure or untrusted connection, add the exception and then continue.
Click here for configuration steps.
If you were using Atrium Single Sign On, click here to migrate user data.
Run services.msc and stop the BMC Remedy Single Sign-On service:

Then in File Explorer, go to %TEMP%, and delete the extract* directory:
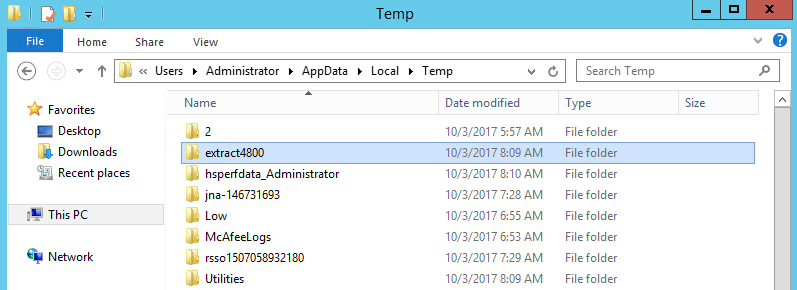
Start the BMC Remedy Single Sign-On service.
That directory must be removed prior to installing TSPS (and the directory is locked by Remedy SSO), otherwise the TSPS installation will not allow you to proceed.
Extract the TrueSight Presentation Server file
As an account with Administrative privileges, go to TrueSight_Presentation_Server_11.0.00_Windows\Windows\Disk1
Double click setup.exe
The path for the installation directory cannot exceed 125 characters
Ensure that the directory is empty
Most customers will select the following options:


For the Remedy SSO settings screen, the admin password is RSSO#Admin#
If the Presentation Server cannot connect to Remedy SSO during the installation, an error will be thrown. Make sure that the hostname can be resolved.
To verify the installation, navigate to the TrueSightPServer\truesightpserver\bin directory and enter the following command:
tssh server status
A list of Presentation Server processes is displayed that is similar to the following sample:
Process status
================================
Core Server Running (13176)
Index Server Running (11028)
Database Server Running (6052)
If one or more processes aren't running, restart the Presentation Server by running the following command:
tssh server start
Note that when logging into the TrueSight Presentation Server website as the admin user, use the password admin12345
Click here for the steps.
Import the repository. Click here for the steps.
Login as a direct member of the Administrators group.
Extract the TrueSight Infrastructure Manager file on a dedicated box
Go to .\Windows\TSIMServer\Disk1
It is recommended to start the installation via command line with the Run as administrator option as follows:
install.cmd -J PERFORM_SERVER_PARAMETER_TUNING=true
The PERFORM_SERVER_PARAMETER_TUNING allows the MaxHeap values to be set according to the hardware resources on the server.
If you don't want MaxHeap to be set for you, then just double-click install.cmd
Do not install TrueSight in a root directory (for example C: or D: ), on a shared drive, or in the Documents and Settings folder.
While installing TrueSight on a 64-bit Windows computer, ensure that you do not install it in the Program Files (x86) directory path.
Click here for the steps and screenshots during the installation wizard
If using an Oracle database for TrueSight, click here for details.
Also, if you get "Listener refused the connection with the following error: ORA-12514, TNS:listener does not currently know of service requested in connect descriptor", refer to this.
Steps to perform a silent/unattended installation are available here.
To verify the installation, run the following commands to verify that all processes are running:
pw system status
A list of pw server processes is displayed.
Review the output for errors.
•Processes that are not running properly are denoted by a numbered error message, such as 961 > max 1.
•Processes that are not running at all are denoted by !Not Running!.
If errors occur, restart TrueSight Infrastructure Manager by running the following command:
pw system start
During installation, the installation log files are saved in the following locations:
tsim_server_install_log.txt and TrueSight_server_install.log can be located in the %temp% folder. After installation, the log files are copied to the installationDirectory\pw\pronto\logs folder.
Details about the installation log are here.
Apply the TSIM license. Click here for the steps.
Register the TSIM to your TSPS. Click here for the steps.
To download the Integration Service software:
1. Log on to TrueSight Presentation Server.
2. Click on the Action menu (3 white stacked lines in the upper left corner)
3. Configuration -> Managed Devices -> Click the 3 dots next to your TSIM -> Launch Downloads Console
4. Select the file for a specified operating system, and save the file to the computer on which you want to install the Integration Service.
Or go to the TSIM server & find it at: C:\Program Files\BMC Software\TrueSight\pw\pronto\web\html\download
If you want to install both cell and Integration Service on the same computer on which you have installed only the cell, then you should provide a different location for installing Cell and Integration Service. If you provide the same location where you installed the Cell (C:\ProgramFiles\BMC Software\TrueSightAgent), then the Cell entries are removed from the system.
To install multiple Integration Services on a single computer click here.
Save the TSIMAgent.zip file on your drive and extract its contents. Open the install.cmd file with the Run as administrator option.
After the Integration Service has been installed, do not install an earlier version of the Integration Service on the same computer.
To verify the installation, navigate to the installation directory (e.g. .\pw\pronto\bin) and run the 'pw agent status' command. Verify that the pronet_agent process is listed.
If the pronet_agent process is not listed, run the 'pw agent start' command.
To determine the ISN version, open .\pronto\bin\AGENT_VERSION
For information showing Patrol Agent version compatibility with the Integration Service, click here.
Details about the installation log are here.
Steps to perform a silent/unattended installation are available here.
Prior to installing/upgrading in a production environment, BMC recommends testing the same in a test/dev/QA environment
You can install Remedy SSO as a non-root user only.
To be able to perform the installation, a non-root user needs the permissions listed in the following table:
| Permission | File or directory |
|---|---|
| Read, write, and execute | Remedy SSO installation directory |
| /tmp directory | |
Read and write | /opt/bmc The ProductRegistry.xml file is created in the /opt/bmc directory. Therefore, the /opt/bmc directory requires read/write permissions. If the bmc directory does not exist, create the bmc directory with read/write permissions. |
After ensuring that the non-root user has the permissions listed above:
- Extract the Remedy SSO file
- chmod -R 755 Disk1
As the non-root user, run the following commands:
DISPLAY=targetHostName:0.0
export DISPLAY
xhost
cd Disk1
./setup.bin
Click here for the steps.
Most customers will select the following options:


Cookie domain: The domain value of the cookie must be the network domain of Remedy Single Sign-On or one of its parent domains (e.g. bmc.com). The TSPS needs to be hosted on the same domain as the cookie domain configured on the Remedy Single Sign-On server.
Click here for more detailed steps (e.g. installing Remedy SSO in an HA environment), if needed.
To verify the installation:
The URL to open the BMC Remedy SSO Console is:
https://<ssoserver>.<domain>:<port>/rsso/admin
For example: https://ssoserver.bmc.com:448/rsso/admin
(The Remedy SSO port and URL are different vs. Atrium SSO.)
Login into RSSO using:
UserID: Admin
Password: RSSO#Admin#
All Entries are Case Sensitive
Note: If you are using FireFox and see "SSL received a weak ephemeral Diffie-Hellman key in Server Key Exchange", then you can disable Diffie-Hellman cypher keys here:
https://addons.mozilla.org/en-us/firefox/addon/disable-dhe/ When you are prompted that you are connecting to an insecure or untrusted connection, add the exception and then continue.
If you were using Atrium Single Sign on, click here to migrate user data.
Extract the TrueSight Presentation Server file
Log on as a root user. (This is done to set permissions & ownership, not to install)
chmod -R 755 <installationDirectoryFolderName>
chown -R <nonrootuser> <installationDirectoryFolderName>
<installationDirectoryFolderName> is the name of the directory that contains all the installation files
<nonrootuser>; is the name of the non-root user which will perform the TSPS installation
For example:
chmod -R 755 /data1/TSPS/Linux/Disk1
chown -R tspsuser /data1/TSPS/Linux/Disk1
Make sure that <nonrootuser> can write to:
/opt/bmc
/tmp
/etc
While still logged in as root:
cd ./Linux/Disk1/utility
./PreinstallConfig.sh <TSPS_OWNER_NAME>
For example:
./PreinstallConfig.sh tspsuser
Login as a non-root user (root cannot install Presentation Server). Make sure that it is a new session (and not just an 'exit' from the root session), because the PreinstallConfig.sh changes will take effect upon login.
At the command prompt, run the following commands:
DISPLAY=targetHostName:0.0
export DISPLAY
xhost
./Linux/Disk1
./setup.bin
The path for the installation directory cannot exceed 125 characters
Ensure that the directory is empty
BMC recommends installing to the default installation directory of /opt/bmc/TrueSightPServer
If the Presentation Server cannot connect to Remedy SSO during the installation, an error will be thrown. Make sure that the hostname can be resolved. Also be sure to enter the correct Remedy SSO password (RSSO#Admin#)
To verify the installation, navigate to the ./TrueSightPServer/truesightpserver/bin directory and enter the following command:
./tssh server status
A list of Presentation Server processes is displayed that is similar to the following sample:
Process status
================================
Core Server Running (13176)
Index Server Running (11028)
Database Server Running (6052)
If one or more processes aren't running, restart the Presentation Server by running the following command:
./tssh server start
Note that when logging into the TrueSight Presentation Server website as the admin user, use the password admin12345
Click here for details & post installation steps.
Extract the TrueSight Infrastructure Manager file on a dedicated box
chmod -R 755 Disk1
cd Disk1
It is recommended to start the installation as follows:
./install.sh -J PERFORM_SERVER_PARAMETER_TUNING=true
The PERFORM_SERVER_PARAMETER_TUNING allows the MaxHeap values to be set according to the hardware resources on the server.
If you don't want MaxHeap to be set for you, then just run:
./install.sh
Click here for the steps and screenshots during the installation wizard
Do not install TrueSight in /usr or in a root directory.
If using an Oracle database for TrueSight, click here for details.
Also, if you get "Listener refused the connection with the following error: ORA-12514, TNS:listener does not currently know of service requested in connect descriptor", refer to this.
To verify the installation, run the following commands to verify that all processes are running:
. /opt/bmc/TrueSight/pw/pronto/bin/.tmprofile
pw system status
A list of pw server processes is displayed.
Review the output for errors.
•Processes that are not running properly are denoted by a numbered error message, such as 961 > max 1.
•Processes that are not running at all are denoted by !Not Running!.
If errors occur, restart TrueSight Infrastructure Manager by running the following command:
pw system start
During installation, the installation log files are saved in the following locations:
tsim_server_install_log.txt and tsim_server_install.log are saved in the /tmp or the /var/tmp folder depending on the operating system's temp directory settings.
After installation, the log files are copied to the installationDirectory/pw/pronto/logs folder.
Details about the installation log are here.
Steps to perform a silent/unattended installation are available here.
Apply the TSIM license. Click here for the steps.
Register the TSIM to your TSPS. Click here for the steps.
To download the Integration Service software:
1. Log on to TrueSight Presentation Server.
2. Click on the Action menu (3 white stacked lines in the upper left corner)
3. Configuration -> Managed Devices -> Click the 3 dots next to your TSIM -> Launch Downloads Console
4. Select the file for a specified operating system, and save the file to the computer on which you want to install the Integration Service.
Or go to the TSIM server & find it at: /opt/bmc/TrueSight/pw/pronto/web/html/download
If you want to install both the cell and Integration Service on the same computer on which you have installed only the TrueSight cell, then you should provide a different location for installing the cell and the Integration Service. If you provide the same location where you installed the cell, then the cell entries are removed from the system.
BMC recommends running the ISN installation as root:
DISPLAY=targetHostName:0.0
export DISPLAY
chmod -R 755 Disk1
./install.sh
To install as a non-root user, perform the following steps:
1. Log on as a root user.
2. Use the useradd command to create a user account. Assign a password to this user account.
3. Open the /etc/sudoers file.
4. At the end of the file, add the line <NON_ROOT_USER> ALL=(ALL) PASSWD:ALL, where <NON_ROOT_USER> is the user account you created.
5. Save the file and exit from root.
6. Log on to the computer using the non-root user account you created.
7. Enter:
DISPLAY=targetHostName:0.0
export DISPLAY
8. Save the TSIMAgent.zip file on your drive and extract its contents.
9. Run 'sudo install.sh'. Enter the non-root account password when prompted.
To install multiple Integration Services on a single computer click here.
After the TrueSight Integration Service has been installed, do not install an earlier version of the Integration Service on the same computer.
To verify the installation, navigate to the installation directory (e.g. ./pw/pronto/bin/) and run the 'pw agent status' command. Verify that the pronet_agent process is listed.
If the pronet_agent process is not listed, run the 'pw agent start' command.
For information showing Patrol Agent version compatibility with the Integration Service, click here.
Details about the installation log are here.
Additional details are here.
Steps to perform a silent/unattended installation are available here.
If you have questions which aren't covered in the checklist, please open a case with BMC Customer Support and provide:
- "AMIGO Starter" in the Subject line
- Your questions
- Essential background information, such as your current version, intended version, OS, etc.
BMC Customer Support will also review your plan when you've finished it. For this, open a new case and provide:
- "AMIGO Review" in the Subject line
- Your plan
- The expected date & time of the installation/upgrade
Comments
Log in or register to comment.