Configuring Proactive Service Resolution for incidents in BMC Helix ITSM
As an administrator, you must configure Proactive Service Resolution as a solution to establish a connection with BMC Helix ITSM and ServiceNow ITSM systems.
When you configure the solution, depending on the information available in the event, Level 1, Level 2, or Level 3 incidents are created. For more information about levels, see Overview-of-Proactive-Service-Resolution.
The following video (4:29) explains how to configure Proactive Service Resolution solution for BMC Helix ITSM.
Before you begin
Before configuring the solution, ensure that the following actions are performed:
Product/area | Actions required |
|---|---|
BMC Helix ITSM |
For more information, see Roles and permissions in BMC Helix ITSM documentation. |
BMC Helix Operations Management | Proactive Service Resolution with BMC Helix Integration Service is NOT enabled from BMC Helix Operations Management. |
BMC Helix Intelligent Automation | You have the required BMC Helix Intelligent Automation permissions to configure the solution. |
To configure Proactive Service Resolution
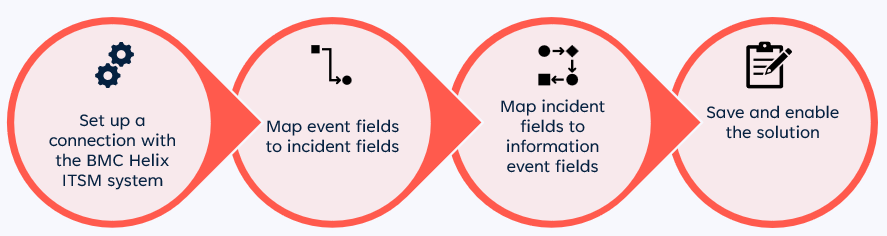
Perform the following tasks to configure Proactive Service Resolution:
- To enable incident noise reduction
- Step 1: To set up a connection with the IT Service Management system
- Step 2: To define a trigger condition
- Step 3: To provide the event to incident field mapping
- Step 4: To provide the incident fields to Information Event mapping
- To merge new or updated field mappings
When the solution is enabled, it automatically creates artifacts such as the event policy, automation policies to create incidents, and an information event.
The following graphic illustrates the steps involved in configuring Proactive Service Resolution.
To enable incident noise reduction
The incident noise reduction capability is available only if you are using ML-based situations in BMC Helix AIOps and BMC Helix ITSM for managing incidents in your organization.
- Click Solutions > Proactive Service Resolution and click Configure.
Use the Incident Noise Reduction toggle key to enable the capability.
The Associate event to Incident policy is created in this step.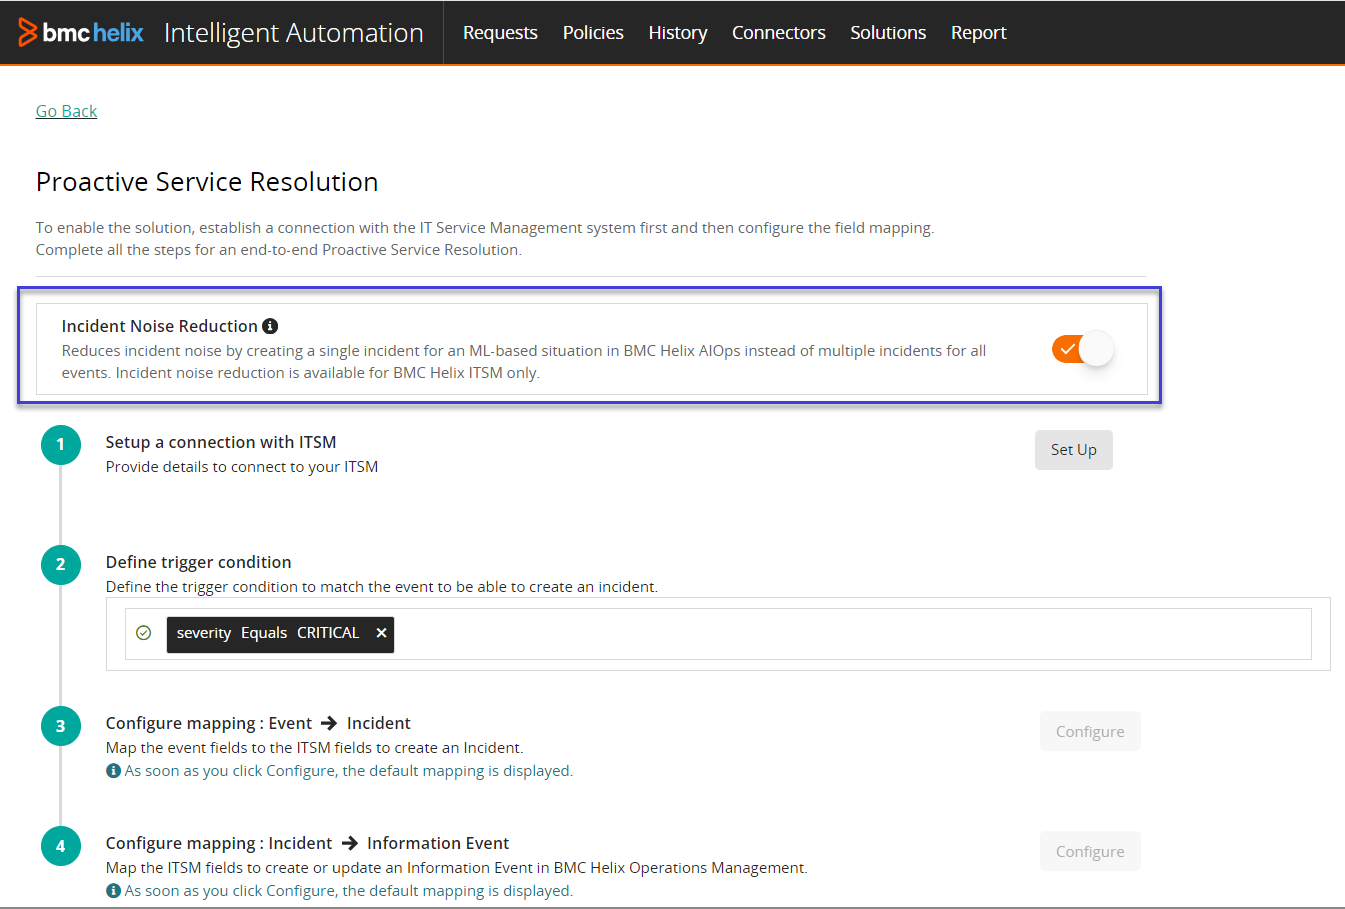
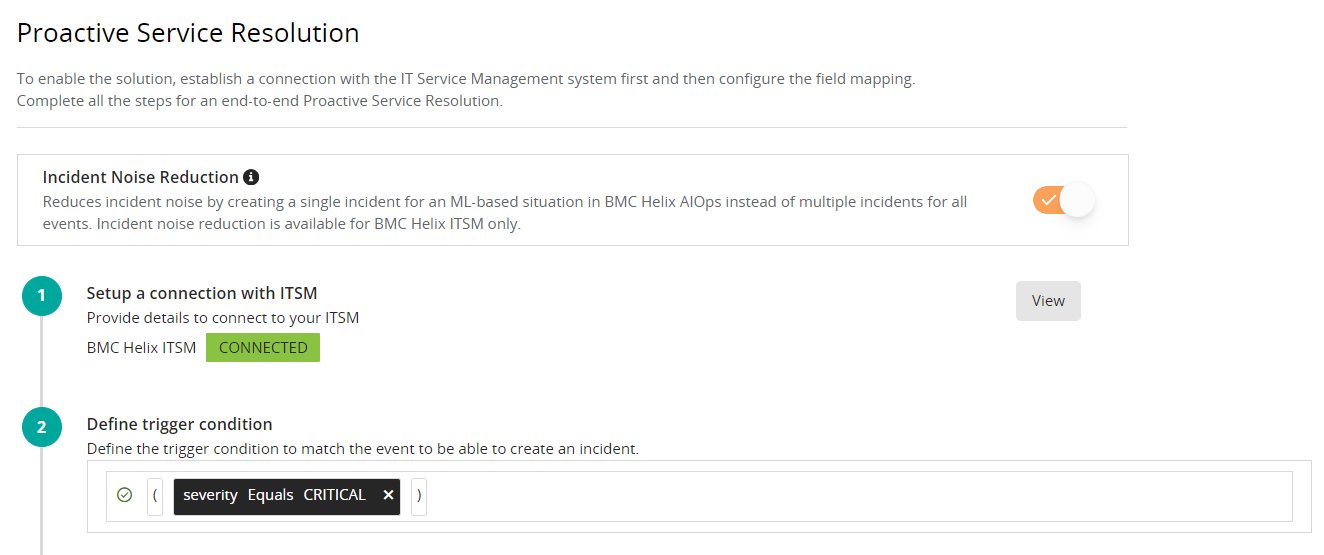
Step 1: To set up a connection with the IT Service Management system
- Click Solutions > Proactive Service Resolution and click Configure.
- Click Set Up and perform the following steps:
By default, BMC Helix ITSM is selected.For BMC Helix ITSM, type the following details:
Field
Description
BMC Helix ITSM Endpoint URL
The REST API URL for BMC Helix ITSM.
For example, https://helixtrial-restapi.onbmc.com.
To obtain the REST API URL, contact your BMC Helix ITSM team.
Username
Username to log on to the application.
Supports # ! $ & * ( ) _ - +, and . special characters.
Password
Password that matches the username.
- (Optional) To connect to an on-premises deployment of BMC Helix ITSM, download and install the connector before performing the next steps.
For more information, see Configuring-BMC-Helix-ITSM-connector-for-Proactive-Service-Resolution.
- Click Save.
Step 2: To define a trigger condition
By default, the trigger condition is set to Severity = Critical, which indicates that BMC Helix Intelligent Automation creates an incident when the event severity is critical.
Step 3: To provide the event to incident field mapping
By default, BMC Helix Intelligent Automation provides mapping of event fields to the incident fields. Based on these mappings, an incident gets created. You can choose to specify custom values for the default fields, add more fields, or apply transformation based on your requirements. For more information about the out-of-the-box field mappings, see Field-mappings-for-Proactive-Service-Resolution-for-incidents.
The Create or Update Incident Ticket automation policy is created as part of this step.
- To view the default mappings, click Configure against the Configure mapping: Event → Incident field.
(Optional) Click Add Incident Field to add more fields to be updated while creating a trouble ticket.
The field names in the list appear based on the fields supported by BMC Helix ITSM.
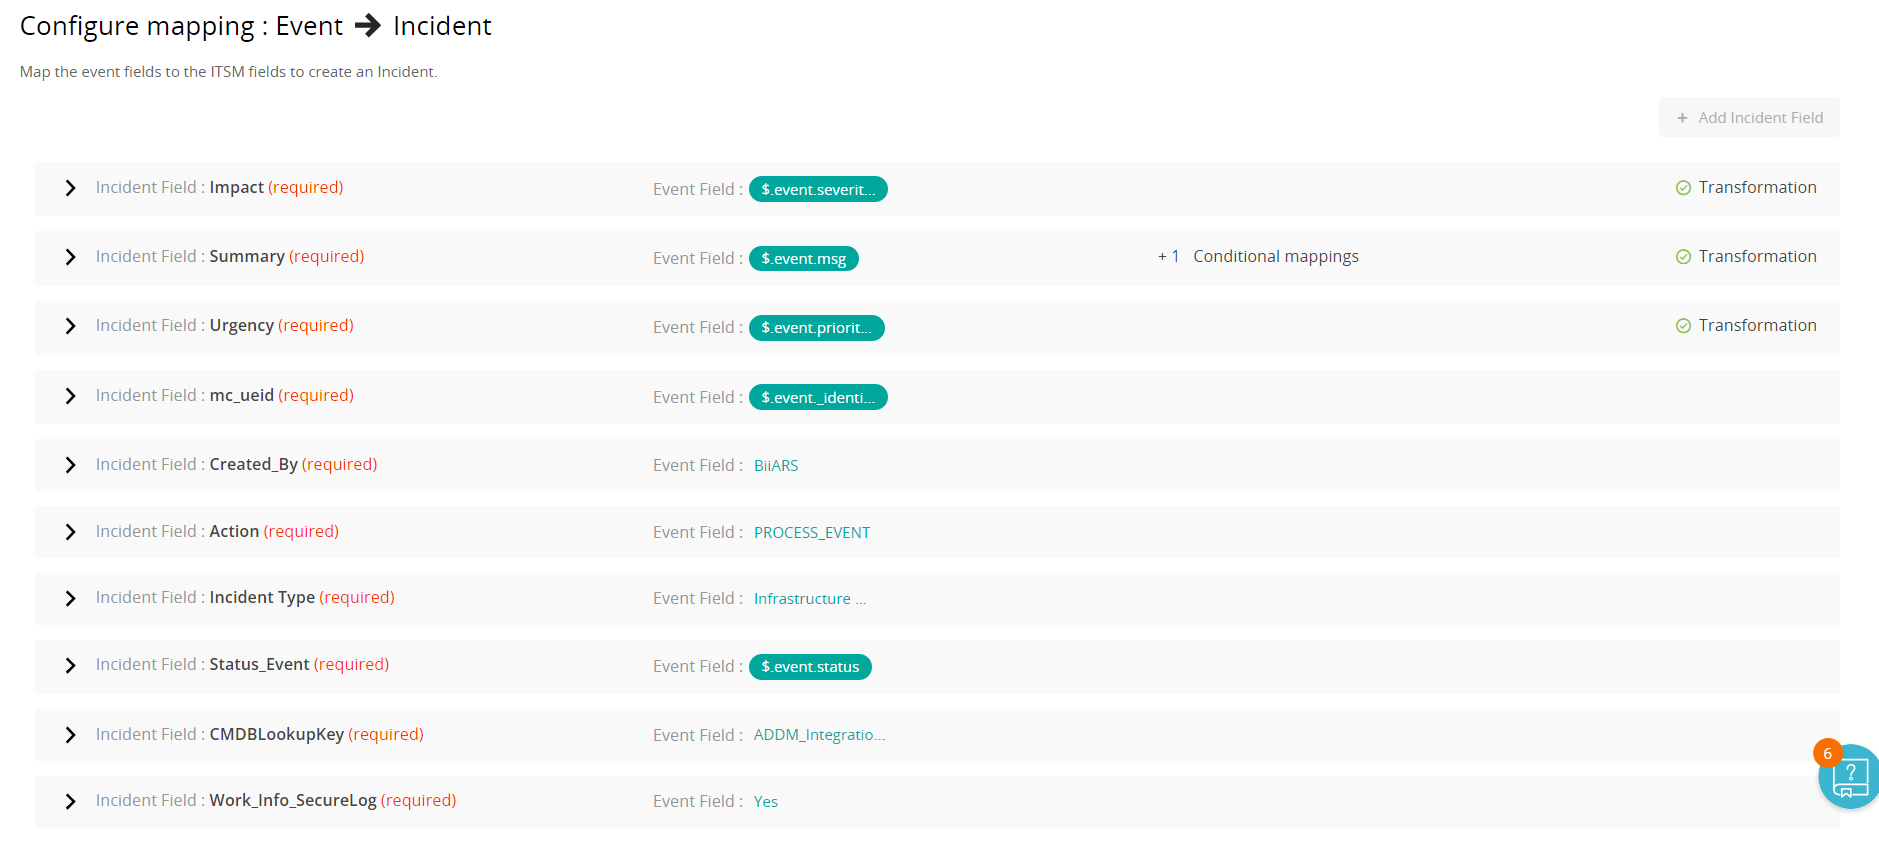
When you add a field, you must map it to a field in the incoming event, or add value based on the selected field.
For example, if you add a field, StatusReason, you can add any reason in the event field.(Optional) If your organization uses Reconciliation ID and Reconciliation Service ID in the event, in the CMDBLookupKey field, type ReconciliationIndentity and ReconciliationIndentity_NodeCI.
- In the ADDMIntegrationId field, click +Add Condition and add the following condition:
- In the Condition field, enter $.event.status=CLOSED.
In the Map with field, do not specify any value.

(Optional) To add a condition to a field, click +Add Condition, add the incident field, and map it to the event field.
- (Optional) Against any field, click Transform fields and select the transformation type:
- Source value to target value: This enables you to map the event source fields to the target incident fields.
- String: This enables you to concatenate or extract a part of a string.
(Optional) To add multiple functions to process the strings for a field, navigate to a field and specify the conditions based on your requirement:
For example, in the following MP4, you can add another function to process the value available in the Summary field in the event:- (Optional) To add a date and time function, add a new field, click Configure Text, and perform the following steps:
- Click Add.
- Select the transformation type as Date & Time.
- To transform the date, select the getDate function.
The time zone format is generated based on your system settings. - Select an output format:
- ISO
- yyyy-dd-MM hh:mm:ss
- ddMMyyyy
- MMddyyyy
- To transform time, select the getTime function and select the output format as hhmm.
- Save changes.
- Click Save.
A Policy published successfully message is displayed.

Step 4: To provide the incident fields to Information Event mapping
By default, BMC Helix Intelligent Automation maps incident fields to event fields. Based on these mappings, an information event is created in BMC Helix Operations Management. Every time the incident is updated, the information event is updated too. For more information about the out-of-the-box field mappings, see Field-mappings-for-Proactive-Service-Resolution-for-incidents.
As part of this step, the Create an Information Event automation policy is created.
- To view the default mapping, click Configure against the Configure mapping: Incident → Information Event field.

- If required, make changes, and click Save.
- Click Enable.
The Proactive Service Resolution enabled successfully message is displayed. If you skip any of the steps, the status on the Solutions page shows the pending step. To make any changes to the field mappings after the solution is enabled, disable the solution first and then continue with the updates.

Artifacts created after configuring Proactive Service Resolution
Consult the following table to learn more about the artifacts created after configuring the solution:
Artifact name | Type | Available in product |
|---|---|---|
BMC Helix ITSM connector | Connector | BMC Helix Intelligent Automation |
Create or Update Incident Ticket | Automation Policy | BMC Helix Intelligent Automation |
Create an Information Event | Automation Policy | BMC Helix Intelligent Automation |
Associate event to incident Policy | Automation Policy | BMC Helix Intelligent Automation |
Predefined Policy for Incident For more information, see Out-of-the-box event policies and templates | Event policy | BMC Helix Operations Management |
HPD:IncidentOutboundEvent (Webhook) For more information, see Adding AR System webhook to receive automatic notifications | Webhook | BMC Helix ITSM |
To view Proactive Service Resolution
- On the Solutions page, click View.
You can view the connection details, such as the IT service management system's name, endpoint URL, and the user name used for the connection. You can also view the trigger condition and the configured mappings. - Click Go back to return to the Solutions page.
To enable or disable Proactive Service Resolution
If there is a downtime for any of the integrated products, you can disable the solution temporarily. This ensures that the artifacts and the customizations are not deleted when you enable the solution again. You must also disable the solution before you make any changes to the field mappings.
- Click Solutions > Proactive Service Resolution.
Use the toggle key to disable the solution.
The message Proactive Service Resolution disabled successfully Is displayed. Use the toggle key to enable the solution as required.
After the solution is enabled again, if there are any events for which you need to create an incident, you can manually create them by using the Create Incident option in BMC Helix Operations Management or BMC Helix AIOps. For more information, see Performing event operations.
To modify Proactive Service Resolution
To modify the solution, you first disable it.
- Click Solutions > Proactive Service Resolution and use the toggle key to disable the solution.
- Click Modify.
You can only view the connection details, such as the selected ITSM system, endpoint URL, and the user name (only for cloud deployment) used for connecting with the system. - (Optional; only for BMC Helix ITSM cloud) To update the tenant URL in the webhooks created in BMC Helix ITSM, perform the following steps:
- In the Setup a connection with ITSM section, click Modify.
The connection details to BMC Helix ITSM are displayed. Click Recreate Webhook.
A success message is displayed.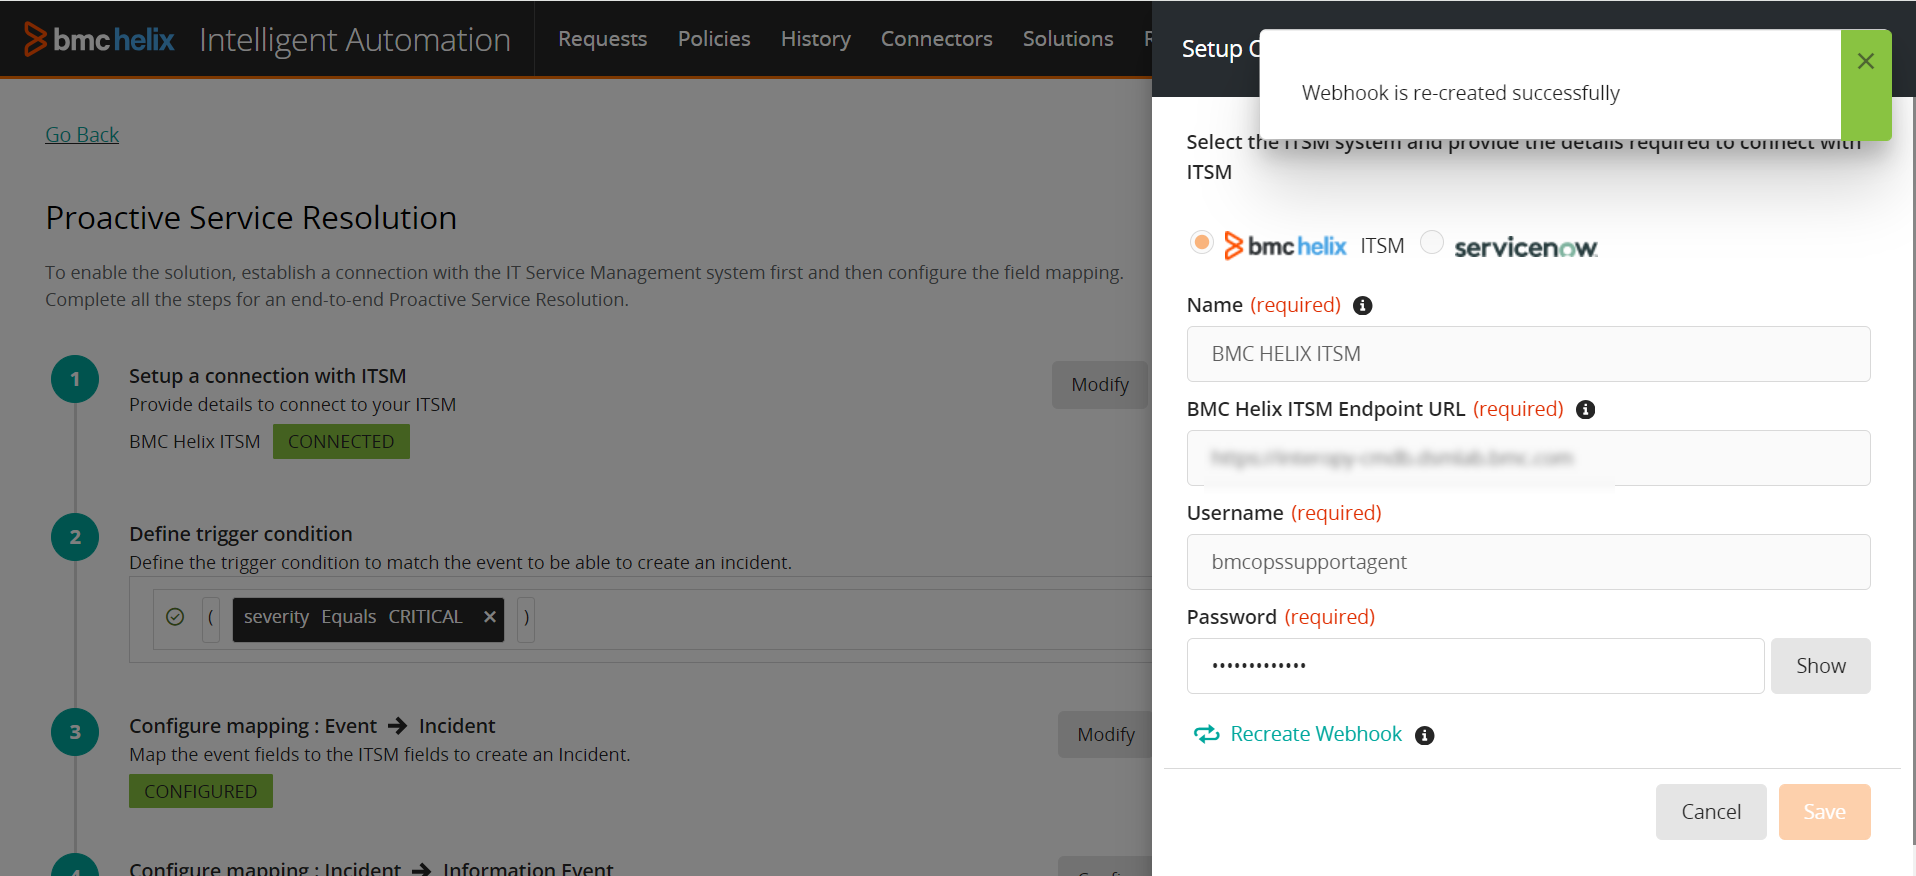
- Click Save.
- In the Setup a connection with ITSM section, click Modify.
- Click Enable.
To merge new or updated field mappings
If new out-of-the-box field mappings are provided or if the existing mapped values are updated, you can merge them with the existing mappings. The out-of-the-box policies get updated, and the solution creates incidents automatically based on the updated configurations.
- Click Solutions > Proactive Service Resolution and use the toggle key to disable the solution.
- Click Modify and then click Modify against the Configure mapping: Event Incident or Configure mapping: Incident Information Event section.
- For updated fields, click View Difference to view the updated values.
For example, in the following image, the updated value for the Short Description field is displayed.
- Click Merge Changes and select the new or updated fields that you want to merge.
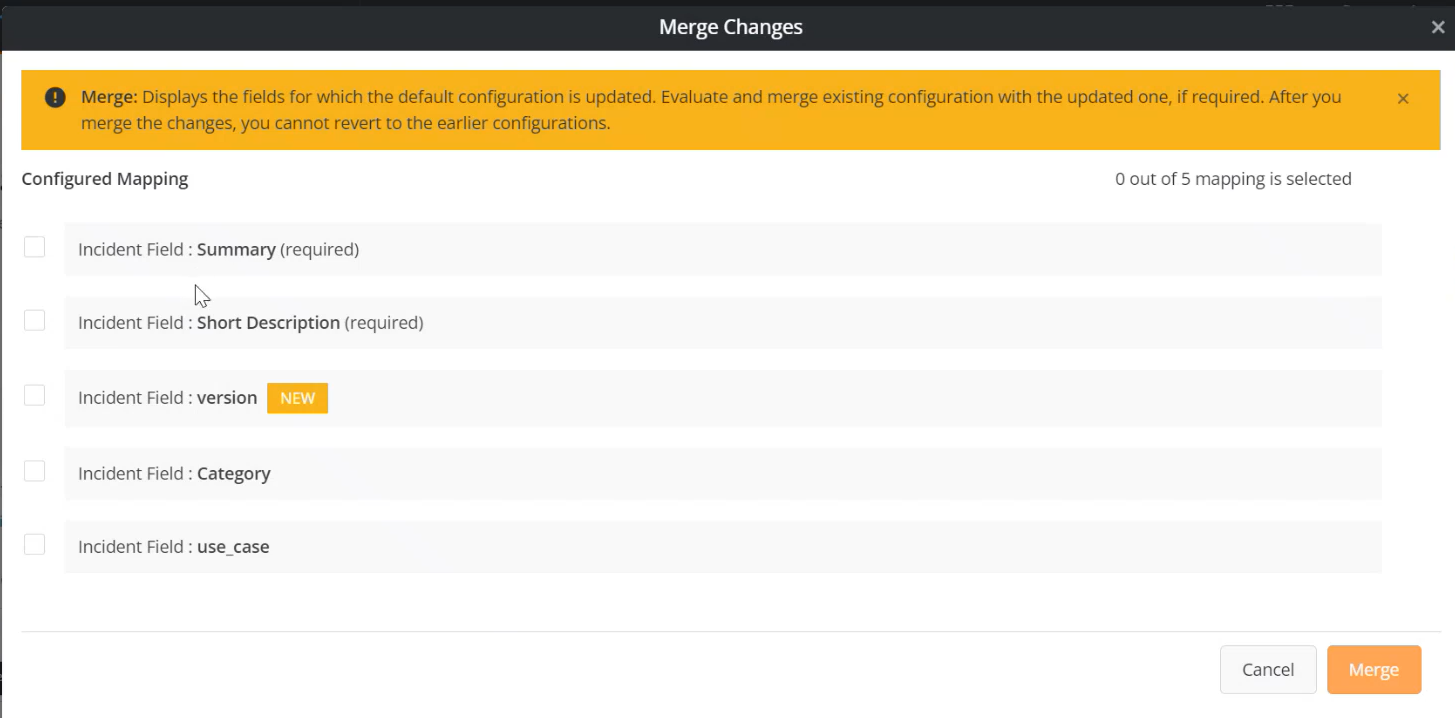
- Click Merge.
Changes are merged successfully and the updated field mappings are displayed. - Click Save and then enable the solution.
To delete Proactive Service Resolution
To delete the solution, you must perform the following steps:
- Disable the solution in BMC Helix Intelligent Automation:
- Click Solutions > Proactive Service Resolution and use the toggle key disable the solution.
- Click Delete.
On the warning message that appears, click Yes.
- (For on-premises BMC Helix ITSM connector only) Delete the webhooks created in BMC Remedy AR System:
- Log on to BMC Remedy AR System as an AR administrator and go to the AR System Webhook form:
https://<midtier>/arsys/forms/onbmc-s/AR+System+Webhook - Search for the webhook by using the following criteria and then delete the webhook:
- Form Name : HPD:IncidentOutboundEvent
- Tenant ID : <tenantid>
- Callback URL: https://<ingress_hostname>/intelligent-automation/restplugin/api/v1/tmf/callback?helix_itsm=true
- Log on to BMC Remedy AR System as an AR administrator and go to the AR System Webhook form:
When you delete the solution, the Create or Update Incident Ticket and Create an Information Event automation policies, the BMC Helix ITSM connector, and any custom mappings get deleted. If you configure the solution again, you have to provide the custom values for field mappings again.
Where to go from here
You can view the status of the policies run by BMC Helix Intelligent Automation for creating incidents. For more information, see Viewing-automation-policy-runs-history.