Configuring the BMC Helix Operations Management on-premises connector
As an automation engineer, you configure the BMC Helix Operations Management on-premises connector to be able to collect specific events and forward them to a third-party application.
To configure an on-premises connector, download the remote-restapi-plugin utility from the BMC Helix Intelligent Automation console. By using the utility, you install the connector, configure credentials, and run the plug-in as a service. You can use the same utility to install and configure any on-premises connectors, however, we recommend downloading the latest package when you want to configure a new connector.
The following image shows the high-level process of configuring an on-premises connector:

Before you begin
Before configuring the on-premises connector, make sure that the following prerequisites are met:
- The server where you want to run and install the remote plug-in matches the minimum hardware and software requirements.
For more information, see System-requirements. - The host where the remote plug-in utility is running is accessible from the host where the endpoint automation tool is installed.
- You have the permissions required to install and configure an on-premises connector.
For more information, see Roles-and-permissions. (For Linux) The GNU Compiler Collection (GCC) G++ version is 5.4.0 or later.
Task 1: To create a plug-in key
- Log in to BMC Helix Intelligent Automation console, and click Connectors > Plugin Keys.
- Click Create Plugin Key.
The plug-in key details, the expiry date, and the default name are displayed. - (Optional) Type the plug-in name.
- (Optional) Click the calendar
 icon to update the expiry date.
By default, the plug-in key expires in 90 days. - Click Download Plugin Key.
The creds.json file is downloaded.
- Click Save.
The plug-in key is displayed on the Plugins page with the status as Active. - Continue with Task 2: To download the remote plug-in utility.
Task 2: To download the remote plug-in utility
- Click Connectors > Available Connectors and click Configure against the connector.
- On the Configure On-premises Connector page, click Download Plugin.
The remote-restapi-plugin.zip utility is downloaded. - Extract the downloaded ZIP file and navigate to the remote-restapi-plugin directory.
- Navigate to the remote-restapi-plugin\config location and replace the creds.json file with the credential file generated in Task 1.
(For Linux only) Run the following command to provide the execute permission:
chmod +x install.sh- Continue with Task 3: To create credentials for the connector.
Task 3: To create credentials
- Navigate to the directory where you have extracted the remote-restapi-plugin.zip file.
Create a credentials file with relevant credentials for BMC Helix Operations Management:
Sample JSON file for creating credentials for BMC Helix Operations Management{
"auth": {
"access_token": "$.json_web_token",
"bearer_parameter": "Bearer",
"login_action": {
"https://<hostname>.ade-labs.bmc.com/ims/api/v1/access_keys/login": {
"post": {
"parameters": [],
"body": {
"content": {
"application/json": {
"access_key": "MHRT1C3************VL7SAKD5LG3",
"access_secret_key": "QrhuqyPf4Bsjo8************6QgT2WsRKQYN39vBK0MbQNiW"
}
}
}
}
}
},
"use_proxy": true
}
}Use the following table to provide the information required for the credentials file:
Field
Description and value
URLSpecify BMC Helix Portal URL.
For more information, see Access and authentication for the REST API.
access_keySpecify the access key generated for BMC Helix Operations Management.
access_secret_keySpecify the access secret key generated for BMC Helix Operations Management.
use_proxy
(Optional)
Specify whether to use a proxy server to communicate between the BMC Helix Operations Management or the Generic REST API connector and the endpoint automation tool.
Valid values: true, false
Important: You can specify the use_proxy parameter only while configuring credentials for a connector by using a JSON file. Also, support for a proxy server is available if the endpoint automation tool supports Bearer or API Key authentication mechanism.
Create credentials for BMC Helix Operations Management.
Microsoft Windowscredential.bat create -n event_forward -i "https://<hostname>.ade-labs.bmc.com" -p bhom -a bearer -f "C:\Users\Administrator\Downloads\bhomConnector.json"Linux./credential.sh create -n event_forward -i "https://<hostname>.ade-labs.bmc.com" -p bhom -a bearer -f "C:\Users\Administrator\Downloads\bhomConnector.json"Create a credentials file with relevant credentials for the target third-party application:
Sample JSON file for creating credentials for a third-party application{
"auth": {
"access_token": "$.json_web_token",
"bearer_parameter": "Bearer",
"login_action": {
"http://<hostname:port>": {
"post": {
"parameters": [],
"body": {
"content": {
"application/json": {
"username": "<username>",
"password": "<password>"
}
}
}
}
}
}
}
}Create credentials for the target third-party application.
Microsoft Windows./credential.bat create -n event_consumer -i "http://<hostname:port>" -p generic_rest -a bearer -f "<filepath>"Linux./credential.sh create -n event_consumer -i "http://<hostname:port>" -p generic_rest -a bearer -f "<filepath>"- Continue with Task 4: To provide a server-side SSL certificate.
Task 4: To provide a server-side SSL certificate
BMC Helix Intelligent Automation requires certificates to establish a secure connection with the endpoint automation tool. If your automation tool runs on CA-signed certificates, skip this step. However, if you are using self-signed certificates, you must perform these steps for a secure and trusted connection.
To configure the plug-in to connect to any of the automation tools running on HTTPS/SSL, do the following steps:
- Download the server-side certificate and convert it into a .PEM format.
For multiple products, convert and merge all individual certificates into a single .PEM file. - Copy and place the certificate in the server-certs directory located in the remote-restapi-plugin directory.
- Continue with Task 5: To start and run the plug-in as a service.
Task 5: To start and run the plug-in as a service
If a remote plug-in is installed as a service, you can start, stop, or restart it as any other service. We recommend that you run the plug-in as a service instead of running it as a batch or shell process.
Before running a plug-in as a service, make sure that the following prerequisites are fulfilled:
- The host where the plug-in is available is also accessible from the host where the application is installed.
(For Linux-based operating systems) Provide the execute permission:
chmod +x install.sh
To run the plug-in as a service:
- Navigate to the directory where you have extracted the remote-restapi-plugin.zip file.
Run the install.bat install (Microsoft Windows) or install.sh install (Linux) command.
The following table lists the commands used to perform service-related actions:Command
Microsoft Windows
Linux
Install
install.bat install./install.sh installStart
install.bat start./install.sh startStop
install.bat stop./install.sh stopStatus
install.bat status./install.sh statusUninstall
install.bat uninstall./install.sh uninstallWhen prompted, type the location for the credentials database.
If skipped, the database is stored at the default location.- Start the service:
- Microsoft Windows: install.bat start
- Linux: ./install.sh start
In the Microsoft Windows Service Manager, the remote restapi plugin service is displayed. On Linux-based servers, if you run the install.sh status command, a system process with the name BMC remote-restapi-plugin is displayed.
- Continue with Task 6: Verify the connection.
Task 6: Verify the connection
After installing and configuring the connection, verify it by following these steps:
- Navigate to the BMC Helix Intelligent Automation console and click Connectors.
On the Configured Connectors page, the following connectors are displayed:


(Optional) Configuring the connectors for high availability
You set up on-premises connectors in a high-availability deployment to make sure that your connection with the automation tool is maintained in case of failure. You configure a minimum of two instances of the BMC Helix Operations Management connector and specify a primary and a secondary instance. When the primary host fails, the secondary host verifies whether the primary host is active for a few seconds, and if the connection is not established, the secondary host acts as a primary host and the policy starts running by using the connection.
To configure the connectors for high availability:
- Perform tasks 1 to 4 on a primary host to download and run the BMC Helix Operations Management connector.
The credentials for the BMC Helix Operations Management and Generic REST API connectors are configured as part of the connection. On the host that you want to designate as a primary host, navigate to the config/plugin.properties file and specify the following values in the HA configuration options section:
Field
Description and values
config.enableHASpecify whether to enable high availability for the connector.
Value values: true, false
config.primaryPortSpecify the high availability port number of the primary host.
Important: Make sure that the config.port and the config.primaryPort values are different.
- Start the plug-in as a service.
- From the primary host, copy the ia_remote_plugins folder from the following location to a similar location on the secondary host:
- Microsoft Windows: C:/ProgramData/BMC/ia_remote_plugins
- Linux: {USER_HOME}/bmc/ia_remote_plugins
On the secondary host, navigate to the config/plugin.properties file and specify the following values in the HA configuration options section:
Field
Description and values
config.enableHASpecify whether to enable high availability for the connector.
Value values: true, false
config.primaryHostnameSpecify the host name of the server designated as the primary host.
config.primaryPortSpecify the high availability port number of the primary host.
Important: Make sure that the config.port and the config.primaryPort values are different.
- Start the plug-in as a service.
- To verify whether both instances are configured successfully:
- Navigate to the BMC Helix Intelligent Automation console and click Connectors.
- On the Configured Connectors page, click the information
 icon on the BMC Helix Operations Management connector.
The primary and the secondary hosts are displayed.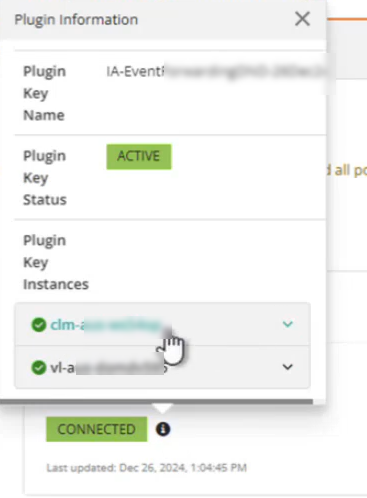
Where to go from here
To create an automation policy to forward events from BMC Helix Operations Management to the target third-party application, see Forwarding-events-from-BMC-Helix-Operations-Management-to-third-party-applications.