Creating a Remediation operation for TrueSight Network Automation
A Remediation operation uses information that a vulnerability management system gathers to create a corrective operation in TrueSight Network Automation. When using TrueSight Vulnerability Management, you launch a Remediation operation from the Operator Dashboard.
This topic contains the following sections:
Overview
In TrueSight Vulnerability Management, security personnel typically use the Security Dashboard to assess the vulnerabilities affecting their network environment, spot historical trends, and project days needed to close all vulnerabilities. Operations personnel use the Operator Dashboard to identify vulnerabilities on network devices and filter those vulnerabilities down to a set with the highest priority for remediation.
When you are done using the Operator Dashboard to identify a set of vulnerabilities that require remediation, you can launch the Remediation operation wizard directly from the dashboard. After you complete the wizard, TrueSight Vulnerability Management schedules an operation that runs a job in TrueSight Network Automation that performs corrective actions associated with network rules. You can view the progress of the operation on the home page.
To create a Remediation operation
- Open the Operator Dashboard by selecting TrueSight Vulnerability Management > Operator Dashboard.
- Use the filtering tools to identify a set of vulnerabilities that require remediation.
Launch the Remediation wizard by clicking Remediate. The wizard opens and shows the Definition page.
The Remediate button is only enabled when a set of conditions are satisfied, as illustrated in the following flowchart.
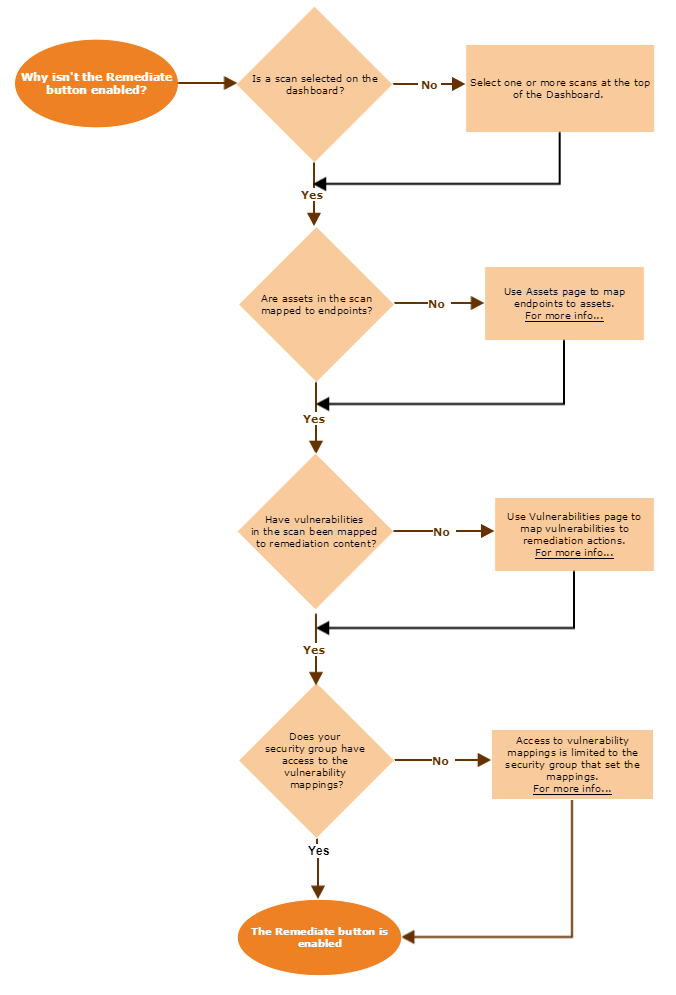
If you answer yes to all the questions in the flowchart and the Remediate button is still not enabled, contact BMC Support.Perform the following steps:
Complete each page in the Remediation Operation wizard. The pages are listed below. Each page corresponds to one of the following sections on this page.
After you provide all required information for a page, proceed to the next page by clicking Next (at bottom) or clicking the next chevron in the ribbon at top. At any time you can click Back (at bottom) to display the previous page in the process. Do not use the browser's Back button.When you have finished defining the operation, click Finish.
You can click Finish to save the operation, even if you have not visited all the pages in the wizard.
When you have finished defining the operation and you click Finish, a placeholder message appears on the home page. The placeholder states that an operation is being created. You can follow link in the message to check the status of the operation being created. Refreshing the page shows the updated status of the operation. When creation of the operation is complete, you can refresh the page so the operation appears on the home page and is ready to run according to its defined schedule.
The following sections describe in detail each step in the Remediation Operation wizard.
Definition
The Definition page provides general information about the operation.

The Definition page includes the following options:
| Option | Description |
|---|---|
| Name | Name of the operation. When the wizard creates an operation, it uses the following scheme to generate a name: <text entered in Name field>_<TSNA_jobID> For example, if you name this operation RouterConfig and TrueSight Server Automation generates a job ID of BNA0000008432, the operation is named RouterConfig_BNA0000008432 |
| Description | Optional descriptive text for the operation. By default, descriptive text is added that lists the filters in effect and the scan files being used when you launched this wizard. |
| Security Group | Specifies your current security group. If you are assigned to more than one group, this option is available. If you are assigned to only one group, this option defaults to that group and you cannot edit this option. |
The boxes at right summarize the information provided for each page in the wizard.
Remediations
The Remediations page consists of a list of vulnerabilities requiring remediation. Each row represents a separate vulnerability that has been discovered on an endpoint and mapped to remediation content.
To appear on the Remediations page, a vulnerability must appear in the Actionable Vulnerabilities list of the Operator Dashboard. You can use filters on the Operator Dashboard to control the contents of the Actionable Vulnerabilities list.
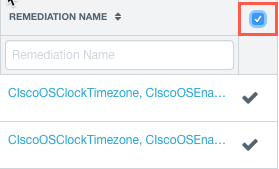
Using the Remediations page, you can remove remediations from the list of those being deployed by clearing checkmarks on each row.
If necessary, you can sort the list of remediations by clicking on header names. You can also filter the items displayed in the list using the search boxes at the top of each column. Be aware that filtering items so they do not appear in the list does not remove those items from the list of remediations to be corrected. To remove a vulnerability, you must explicitly deselect that row so it does not include a check mark.

Modifying contents of the list
To remove a target from the list, click on a row representing a server. Clicking the row again, selects the target.
To remove all targets from the list, click the deselect all option, shown below. Clicking the option again, selects all targets.
Sorting data in columns
Sort columns of data on this page by clicking on column headers.
Filtering data in columns
Using the text boxes at the top of each column, enter any number of characters. As you enter characters, the list narrows its results to show only items with data that includes the text string you have entered. Clear all text from the search box to show all items. You can enter data in multiple columns to show only results that match all criteria.
Some columns provide a list of choices that you can select. The columns are filtered to show only the values you select.
Operation
The Operation page lists the operation being created by the Remediation operation wizard. When you are using TrueSight Network Automation, the Remediation wizard only creates a single remediation operation.
This page lets you define a schedule and perform other types of configuration for the operations you are about to perform. If you have configured a connection to TrueSight Orchestration and set up job approval in TrueSight Network Automation, you can also use the Operation page to configure the job approval request, as described in Requesting job approvals.

Defining a schedule
- Click With Schedule.
- Click the clock icon
 beside Run Once At.
An interface similar to a digital clock appears.
- Set the hour and time for the operation. Then click AM or PM to toggle between those choices.
- Select the date when the operation runs.
- Select a time zone for the operation.
Requesting job approvals
If you set up job approval and change tracking, you can request a job approval through a change management system, such as BMC Remedy ITSM and execute the Change Automation use case. For an overview of the use case, see Change Automation.
To request job approval
Under the Change Approval Information section, select the change template and various approval parameters, as described in Job approval options.

Job approval options
| Option | Description |
|---|---|
| Template | Select Default Template from the list. When you choose this option, change request will be created in BMC Remedy ITSM based on the default template. |
| Urgency | Enter the urgency of the change being requested.
|
| Impact | Select the scope of the change being requested. For example, is the job targeted for one server or a large number of servers? The default value is Minor/Localized.
|
| ReasonForChange | Select the reason to be specified in the change request. Valid values are:
|
| ChangeClass | Select the class for the change request. Valid values are:
|
Executing operations immediately
You can schedule the operation to run immediately after you finish the Remediation operation wizard by clicking Execute Now.
Note
You cannot request for job approval if you choose to execute an operation immediately.
Where to go next
After you have launched a remediation operation, it appears on the home page. There you can use the capabilities of TrueSight Vulnerability Management for ongoing management of operations, such as executing the operation again, deleting the operation, or viewing its results.
For information about viewing the results of an operation, see Using TrueSight Network Automation Remediation operation results.
Comments
Log in or register to comment.