Installing and configuring the Chat Alerts application
Chat Alerts is a standalone application that runs on the support agent’s computer. Chat Alerts is used to notify the support agent of incoming chat messages in the chat session queue (in the Support Agent Console). Chat Alerts is also used to notify a support agent if a message in the Support Agent Console exceeds the Service Level Agreement (SLA).
The following sections give the steps to install and configure Chat Alerts.
To configure ChatAlerts.xml file
Before chat administrators run the ChatAlerts.exe file for the first time on the service agent's computer, chat administrators must configure the ChatAlerts.xml file. After configuring the ChatAlerts.xml file, the configuration settings are saved in the windows registry for further use.
Perform the following steps to configure the ChatAlerts.xml file:
- From the mid-tier server where BMC Virtual Chat is installed, copy the following two files to a folder in the support agent's computer:
- <VirtualAgentInstallDirectory>\VirtualAgentComponents\chatalerts\ChatAlerts.exe
<VirtualAgentInstallDirectory>\VirtualAgentComponents\chatalerts\ChatAlerts.xml
Note
If the files are already present, replace the earlier ChatAlerts.exe file with the later ChatAlerts.exe file.The following image shows the path to access the ChatAlerts files:

In the ChatAlerts.xml file, configure the server name in the appropriate XML parameters:
Sample code with default values:
<eschat serverbasepath="http://<SERVER>:8080" />
<agentshorcut shortcut="http://<SERVER>:8080/arsys/forms/<SERVER>/ES_Chat%3ASACLauncher/User+View/?" />
<slatimeout>2</slatimeout>
<autologin>on</autologin>
<debug>off</debug>
The following table gives the description for each XML parameter in the sample code and the value to be configured:
| XML parameter | Description | Value to be configured |
|---|---|---|
<eschat serverbasepath> | The base path to access the eschat servlet on the mid tier. | Replace <SERVER> with the mid-tier server name where BMC Virtual Chat is installed. |
<agentshortcut shortcut> | The full mid tier path to open the Support Agent Console. | Replace Tip: The second |
<slatimeout> | The number of minutes after which an SLA warning is displayed in Chat Alerts. | (Optional) Change the default value, if required. |
<autologin> | To enable single sign on for Chat Alerts application on the agent's computer. | (Optional) Change the default value, if required. If configured as |
<debug> | This setting is read every time the Chat Alerts application starts. | (Optional) Change the default value, if required. If set to on, a debug window opens with an events log, which is updated every time the Chat Alerts application starts. |
To install Chat Alerts
- Log in to Virtual Chat Administration Console.
- Navigate to Self Service Portal > Configuration and select the Show Disabled check box.
- From the list of entries, select Authentication - Chat Alerts and click Modify.
In the Self Service Configuration window, set the Status to Enabled and click Save.
To refresh the settings without restarting Apache Tomcat, on the Virtual Chat Administration Console, click Refresh Servlets.
The new refresh time appears in the Registered Servlets table.
To configure Chat Alerts
To start Chat Alerts on the service agent's computer, run the ChatAlerts.exe file. This procedure is for BMC Virtual Chat versions 9.1.00 and earlier or for users of version 9.1.01 who are configuring without single sign-on.
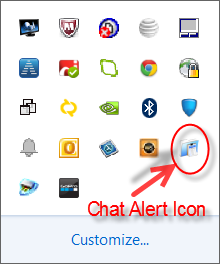
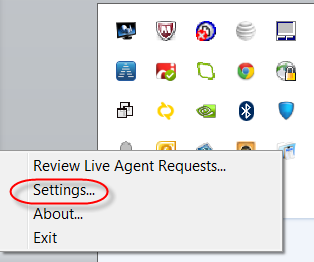
- Right-click the Chat Alerts icon in the taskbar.
- Click Settings.
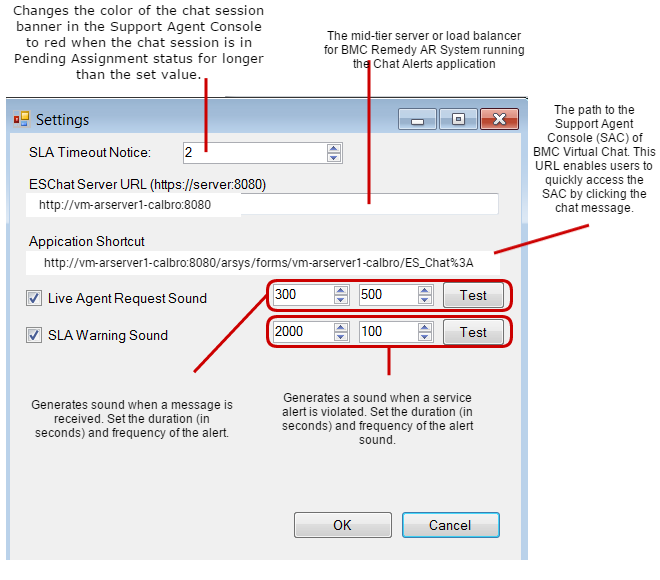
- ln the Settings window, configure Chats Alerts as shown in the following figure:
- Click OK to save the updated settings.
To configure Chat Alerts for single sign-on
Note
The single sign-on capability is available in BMC Virtual Chat version 9.1.01 and later.
The Chat Alerts application can be configured to use the BMC Virtual Chat Single Sign-On (BMC Virtual Chat SSO) method that relies on the BMC Remedy Mid Tier (the mid tier) authentication. If the mid tier is configured for single sign-on, then support agents do not need reauthentication for logging in to BMC Virtual Chat and Chat Alerts. For more information about enabling the mid-tier single sign-on, see Enabling single sign-on for BMC Virtual Chat.
If the mid-tier single sign-on is not enabled, perform the following steps to configure Chat Alerts for single sign-on:
- Log in to the Virtual Chat Administration Console.
- Select Self Service Portal > Configuration.
- Select Show Disabled.
- Select the entry Authentication-Chat Alerts SSO and click Modify.
- In the Self Service Configuration window, set the Status to Enabled and click Save.
- Navigate to Self Service Portal > Configuration, select the Authentication-Single Sign On (People Form) entry, and click Modify.
- In the Self Service Configuration window, set the Status to Enabled and click Save.
- To refresh the settings without restarting Apache Tomcat, on the Virtual Chat Administration Console, click Refresh Servlets.
The new refresh time appears in the Registered Servlets table.
When you run the Chat Alerts application for the first time after enabling Remedy SSO, the standard login dialog will appear. To apply single sign-on, select the settings button on the login dialog and select the Single Sign On checkbox. Click OK and the login dialog automatically changes to the single sign-on mode.
Note
Enabling Authentication-Chat Alerts SSO does not require enabling Authentication-Single Sign On (People Form). If both are enabled, both Chat Alerts and BMC Virtual Chat and use single sign-on.
To activate or deactivate single sign-on for Chat Alerts
When running chat alerts for the first time, the standard Login dialog box appears. Perform the following steps in the Login dialog box to activate single sign-on:
- To start Chat Alerts on the service agent's computer, run the ChatAlerts.exe file.
- Right-click the Chat Alerts icon in the taskbar.
- In the Login dialog box, click Settings.
- Select the Auto Login check box and click OK. The Login dialog box automatically switches to SSO mode.
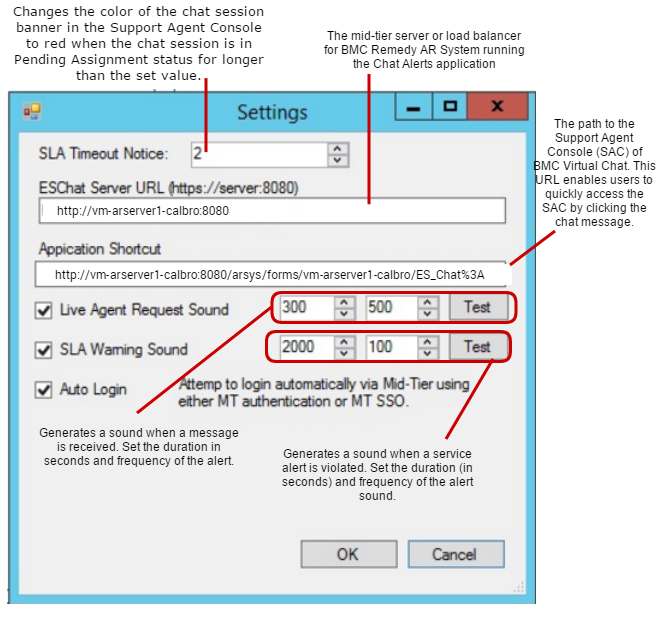
- To deactivate SSO, clear the Auto Login check box. The single sign-on is deactivated from the next instance when Chat Alerts is run.
Related topic
Overview of the Support Agent Console
Comments
Log in or register to comment.