Adding and editing components
The following sections describe how to add a component, edit component properties, or delete a component from the TrueSight Presentation Server:
Before you begin
To perform these procedures, you must have
Deployment Administrator-level
 privilege, or higher.
To add TrueSight Infrastructure Management Server
Note
It is important that the class definitions in the cell Knowledge Base (KB) must be identical across all the Infrastructure Management servers connected with the Presentation Server.
Also, to see events in the TrueSight console for any remote cells including those cells for Integration Service(s), the remote cells must have all their class definitions present on all Infrastructure Management servers.
- Compare the cell KB class definitions across all Infrastructure Management servers and remote cells including Integration Service cells.
- Add the missing classes on the new Infrastructure Management server and ensure all cell KBs contain all of the same class definitions.
- Use the mccomp command to compile the KB for any cell where the class definitions are added.
- Restart the Infrastructure Management server or remote cell where the KB is updated and compiled.
- Log in to the host computer running the Presentation Server and run the
tssh event reinitializecommand. For details about how to run this command, see Reinitializing events in the Presentation Server
In the TrueSight console, go to Administration > Components, select the action menu
 next to Components, and select Add Component.
Select Infrastructure Management Server as the component type.
Enter a valid Host Name in the FQDN format.
Notes
- If you have installed TrueSight Infrastructure Management in the high-availability or disaster recovery mode, ensure that you specify a common alias name for both the primary and secondary servers.
- If the "Invalid Host Name or IP Address" message appears, re-enter a valid FQDN hostname. The name cannot start or end with a dash ( - ), contain any spaces, or exceed 63 characters.
- Adding an IP address of the TrueSight Infrastructure Management Server is no longer supported. With an IP address, the cross-launch to the TrueSight Infrastructure Management from the TrueSight console fails. Therefore, you must edit the hostnames of all the Infrastructure Management Servers that were added in the past after you upgrade the TrueSight Presentation Server.
- In an Infrastructure Management Server high-availability deployment, ensure that the configured cluster name and host names of the primary and secondary Infrastructure Management servers are resolved with the proper FQDN host name and reachable from the computer that hosts the TrueSight Presentation Server.
- Select the protocol.
Accept the default port number (443), or enter a new value.
Select any of the listed tenants.
The list includes all the tenants defined in the Remedy Single Sign-On system.Enter a value between 1 and 10 for the Component Initialization Timeout (minutes) period.
This is the time period for which the TrueSight Presentation Server tries to initialize a connection to the component. If the connection is not completed within this time, the connection fails.Tip
If the Infrastructure Management server contains a large number of groups, set the Component Initialization Timeout (minutes) period to 5 minutes.
Clear the Propagate Events box to stop propagation of events from the Infrastructure Management server to the TrueSight Presentation Server.
Note
To enable propagation of events at a later time, delete the Infrastructure Management server and re-add it with the Propagate Events box checked.
Click Save.
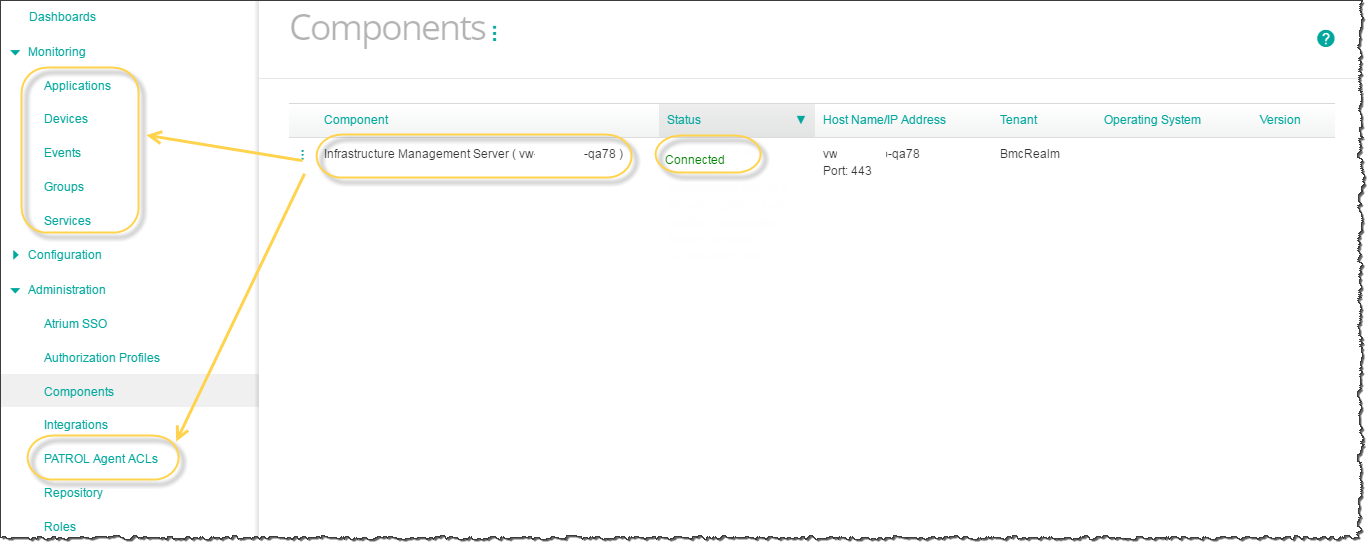
- Do the following to verify that the registration is successful:
a. Expand Monitoring and Administration menus and verify the options are displayed as shown in the figure:
b. From Dashboards > Add Dashboard > Add Dashlets, you can see the Infrastructure Management Server dashlets listed as shown in the figure:

To add an App Visibility Portal
Add an App Visibility portal for each tenant that you monitor with the TrueSight console. In a high-availability environment, the connection to a portal is through its load-balancing server.
Notes
- The App Visibility portal cannot be moved from one TrueSight Presentation Server in a tenant to the same TrueSight Presentation Server in another tenant.
- After you register or move an App Visibility portal to the TrueSight console, the application synchronization may take several minutes.
In an integrated system, to see the App Visibility events in the TrueSight console, associate the App Visibility portal with an Infrastructure Management Server cell.
In the TrueSight console, go to Administration > Components, select the action menu
next to Components, and select Add Component.Select App Visibility Portal as the component type.
Enter the valid host name in the FQDN format.
In a high-availability environment, enter the FQDN of the load-balancing server.
Note
If the
Cannot add App Visibility Portal using IP address or host name. Use fully qualified domain name instead. message appears, re-enter a valid FQDN.- The name cannot start or end with a dash ( - ) or contain any spaces.
- The name must be at least 3 segments separated by periods (.).
- Each segment must not exceed 63 characters.
- The name cannot be an IP address.
Examples:
 localhost is not a legal FQDN bmc.com is not a legal FQDN
 hostname.bmc.com is a legal FQDN
Accept the Port number (default value 8100), or enter a new value.
In a high-availability environment, enter the port number of the load-balancing server.Select any of the listed tenants.
The list includes all the tenants defined in the Remedy Single Sign-On system, and each tenant can have only one App Visibility portal.Under Custom Setting, choose one of the following event destinations:
Select an Infrastructure Management Server.
The list displays the Infrastructure Management Servers that are associated with the tenant that you selected.- Select Customize Cell Details, and enter the Cell Host, Cell Port (default value 1828), and Encryption Key for the cell.
These settings are for the administration cell of an Infrastructure Management Server that is connected to the Presentation Server, or a remote cell that is connected to the administration cell of an Infrastructure Management Server that in turn is connected to the TrueSight Presentation Server. Only customized cells connected to an Infrastructure Management Server 10.x or later are supported. - Select No Event Channel Selected.
With this option, no events are reported from the App Visibility portal.
Click Save.
- Do the following to verify that the registration is successful:
- The following changes are observed on the TrueSight console after you add the App Visibility portal component as shown in the figure:

- Also, from Dashboards > Add Dashboard > Add Dashlets, you can see the App Visibility manager dashlets listed as shown in the figure:

- The following changes are observed on the TrueSight console after you add the App Visibility portal component as shown in the figure:
To add a Real User Analyzer
In the TrueSight console, go to Administration > Components, select the action menu
next to Components, and select Add Component.Select Real User Analyzer as the component type.
Enter a valid Host Name or IP Address.
Note
If the "Invalid Host Name or IP Address" message appears, re-enter a valid name or address. The name or address cannot start or end with a dash ( - ), contain any spaces, or exceed 63 characters.Accept the Port default value (443), or enter a new value.
Select any of the listed tenants.
The list includes all the tenants defined in the Remedy Single Sign-On system.Under Custom Setting, enter a Username and Password for the Real User Analyzer.
Note
The user name must have the Security role privileges.
Click Save.
To add IT Data Analytics
- In the TrueSight console, go to Administration > Components, select the action menu next to Components, and select Add Component.
- In General Settings, select TrueSight IT Data Analytics Server as the component type.
Enter a valid Host Name.
Note
- If the "Invalid Host Name or IP Address" message appears, re-enter a valid name or address. The name or address cannot start or end with a dash ( - ), contain any spaces, or exceed 63 characters.
- Adding an IP address of the TrueSight IT Data Analytics Server is no longer supported. With an IP address, the cross-launch to TrueSight IT Data Analytics Server from the TrueSight console fails. Therefore, you must edit the hostnames of all the TrueSight IT Data Analytics Servers that were added in the past after you upgrade the TrueSight Presentation Server.
Select HTTP or HTTPS protocol.
Accept the Port default value (9443), or enter a new value.
- Select any of the listed tenants.
The list includes all the tenants defined in the Remedy Single Sign-On system. Click Save.
Data Collectors for Event AnalyticsFor event analytics the Data Collectors are automatically created when IT Data Analytics is registered with the Presentation Server. The Data Collectors are created only when the Infrastructure Management server has been registered with the Presentation Server. The name of the Data Collector created is in this format <
DC_TSPS_TSIM_TSIMCellname>. This can be viewed from TrueSight IT Data Analytics > Administration > Data Collectors. These Data Collectors are created for collecting the events from the Presentation Server. For the automatically created Data Collectors, Admin, Appadmin, and Troubleshooter roles have permissions to search on the Data Collectors.The Index block used for this type of Data Collector is large Index block and by default it is set to 30 days.
The collection station used for this Data Collector is the first collection station available in the database. The data collectors created are in the started state by default, which is configurable. For more information see Modifying the configuration files.
Note
If you remove the IT Data Analytics or the Infrastructure Management server from the Presentation Server, this Data Collector is automatically removed from the IT Data Analytics server.
- Do the following to verify that the registration is successful:
- From the TrueSight console > Administration > Components, you can see the TrueSight IT Data Analytics component added as shown in the figure:

- From the TrueSight console > Monitoring > Events, select the action menu on an event, you can see the Launch IT Data Analytics option as shown in the figure:

- From the TrueSight consoleDashboards > Add Dashboard > Add Dashlets, you can see the TrueSight IT Data Analytics dashlet listed as shown in the figure:

- From the TrueSight console > Administration > Components, you can see the TrueSight IT Data Analytics component added as shown in the figure:
To add TrueSight Capacity Optimization
- Log in to the TrueSight console.
- Click Administration > Components.
In the Components page, select the action menu
next to Components, and select Add Component.For Component Type, select Capacity Optimization.
Enter the Host name of the Application Server component of TrueSight Capacity Optimization . In case of multiple Application Servers, enter the host name of the Application Server that runs the Data Hub.
Note
Adding an IP address is no longer supported. With an IP address, access to the TrueSight Capacity Optimization console, which is hosted on the Application Server, from the TrueSight console fails. You must edit the host name of the Application Server that was added in the past after you upgrade the Presentation Server.
- Select the Protocol as HTTPS or HTTP. The default is HTTPS.
Accept the Port default value (8280 for Data Hub or 8380 for Service Container).
Information
In order to have a successful integration, the following backend services of the Application Server must run on the same generic service container or Data Hub:API Providers - Agent Data service
API Providers - Data Provider service
API Providers - Search service
If you decide to relocate a backend service, you must relocate all three of them to the new container, re-register the TrueSight Capacity Optimizationcomponent, and enter the port value according to the current container (Data Hub - 8280, Service Container - 8380).
Accept * as the default tenant, or select any of the listed tenants. The list includes each tenant defined in the Remedy Single Sign-On system.
Click Save.
The Capacity Optimization component is added and is listed in the Components page.
The Capacity folder is available in the left navigation pane of the console and you can start accessing it.

If you have installed TrueSight Cloud Cost Control, the Cloud Cost Control folder is also available in the left navigation pane.
To add TrueSight Smart Reporting
Important
- If you use a single instance of TrueSight Smart Reporting for all tenants on the TrueSight Presentation Server, you must unregister and reregister TrueSight Smart Reporting every time a new tenant is added in the TrueSight Presentation Server.
- If TrueSight Presentation Server is installed in the high-availability mode, the TrueSight Presentation Server must be configured with the load balancer.
In the TrueSight console, go to Administration > Components.
Select the action menu
, and select Add Component.In the Component Type field, select TrueSight Smart Reporting Server.
Type the host name or IP address of the TrueSight Smart Reporting instance. The host name must be a Fully Qualified Domain Name (FQDN).
- Type the TrueSight Smart Reporting port number. The default port number is 8443.
Select a tenant. * is selected by default.
Click Save. The Smart Reporting link appears in the left navigation pane.
Click the Smart Reporting link, and then click Open to launch TrueSight Smart Reporting.

- Verify that the users appear correctly in TrueSight Smart Reporting by doing the following:
- Navigate to Administration > Admin Console.
Click Users, and ensure that all users are visible.

To add TrueSight Orchestration
In the TrueSight console, go to Administration > Components. From the action menu
next to Components, select Add Component.Select TrueSight Orchestration as the component type.
Note
You can only integrate with TrueSight Orchestration version 8.2.00 or later.
Provide the following general settings information:
Enter a valid fully-qualified host name of the TrueSight Orchestration configuration distribution peer (CDP) server.
Note
The host name name cannot start or end with a dash ( - ), contain any spaces, or exceed 63 characters.Specify the port for TrueSight Orchestration, where the Configuration Distribution Peer is installed. You can retain the default port value, 38080, or change it if you are using a port other than the default value.
Retain the default * selection or select one of the listed tenants.
The list includes all the tenants defined in the Remedy Single Sign-On system.
Provide the following custom settings information:
Username: Name of the TrueSight Ochestration user. This information is required to log on to TrueSight Orchestration. The specified user must be part of the AoAdmin group on Remedy Single Sign-On.
Password: TrueSight Orchestration password for the specified user.
Click Save.
The peer details are displayed in this format: Peer Type : Peer Count (Number of peers running | Number of peers not running).
Even if one of the peers is running, the Component displays the status as Connected.
Example: Suppose the component displayed is Lightweight Activity Peer : 3 (2 | 1). In this scenario, the component details indicate that Presentation Server obtained a total of three Lightweight Activity Peer details, out of which two peers are running and one peer is not running. After saving the changes, TrueSight Presentation Server logs on to TrueSight Orchestration and obtains details of all the peer servers. These details are displayed on the Components page, under the Component column.

To secure the communication between TrueSight Orchestration and TrueSight Presentation Server, ensure that you import TrueSight Orchestration signed certificate into the Presentation Server truststore. For details, see Securing communication between TrueSight Presentation Server and other BMC products.
For more information about the use cases for using TrueSight Orchestration to triage and remediate events, see Using Orchestration actions to enable triage and remediation of events.
To edit a component's values
- In the TrueSight console, go to Administration > Components . From the Component list, select the action menu next to the component's name and select Edit.
- Complete the changes in the component's settings and click Save.
Note
To delete a component from the TrueSight Presentation Server
Warning
When you delete a component, the configuration information for dashlets related to that component is lost. You need to reconfigure the dashlets after re-adding the component.
- In the TrueSight console, go to Administration > Components. From the Component list, select the action menu next to the component's name and select Delete.
- To begin the deletion process, click OK.
The component's status is changed to Deleting. The process to delete the component can take several minutes, and is removed from the list after the deletion process is completed.
When you delete a component, you are also deleting the relevant
devices
and
groups
that are used in a
monitored application.
You must also
delete the application or delete empty nodes from the application.
Note
When you delete a component whose status is not connected, the deletion fails and an error is displayed. Select the action menu again, and select Force Delete to ensure deletion.
Restart any component that you force delete before re-adding it.
When you force delete an Infrastructure Management server, the TrueSight Presentation Server entry in the mcell.dir file of the Infrastructure Management server is not deleted. Manually delete the TrueSight Presentation Server entry and restart the Infrastructure Management server.
If you delete a tenant from the Remedy SSO, you must also delete any component configured to use that tenant.
If you delete an App Visibility portal, App Visibility retains all of its configurations and data, and continues to collect data. The
Execution Plans
for synthetic transactions continue to run as scheduled.
- To stop Execution Plans from running, stop the
App Visibility portal service.
The TEA Agents will gradually stop all Execution Plans associated with the portal.
- If you reconnect the portal to the same TrueSight Presentation Server, you will see all of your data as before.
Troubleshooting registration issues
If the cross-launching of the Infrastructure Management server fails,
see this
.
Comments
Log in or register to comment.