Configuring automated assignment of records to queues
You can configure automated assignment of records to queues based on specific conditions. Automated assignment of records can be defined based on different conditions, such as category or priority of the records. For example, you can configure a rule to automate assignment of records with the Network category to the IT Group - Network Issues queue.
Note
The automated assignment of records to queues and staff members works independently. You can configure automated assignment of records to staff members without configuring queue auto assignment and the converse is also true. You can configure automated assignment of records to queues without configuring staff auto assignment.
Automated assignment of records to both, queues and staff members, is supported for the Incidents and Service Requests modules only.
How automated assignment of records to queues works
Consider the following points about how the automated assignment of records to queues works:
- Automated assignment of queues works only if you have enabled the queue and user assignment feature, configured rules for the automated assignment of records, and started assignment automation.
- Records are not assigned to queues as soon as they are created. The Assignment Automation process runs every few minutes and checks for new records. Only records that meet one of the following conditions are considered for further processing:
- New records in which the Queue field is not populated.
- New records in which the Queue field is populated but stores the default queue that is configured for Self Service, Ticket layout, or email.
- If a record meets the defined rules or conditions for automated queue assignment, the queue is populated in the Queue field even if the role, account, or profile of the staff member assigned to the record is not entitled to that queue. For information about queue entitlement, see Managing queues availability and assignment.
- If a record meets multiple rules (or sets of conditions) for automated queue assignment and different queues are configured in each of these rules, any one of the rules is applied and the corresponding queue is assigned to the record.
- In some cases, the Staff field might already be populated in records before they are automatically assigned to queues. After the automated assignment of a record to a queue, only a staff member that belongs to the assigned queue is retained in the Staff field. Otherwise, the Staff field is cleared.
- The automated assignment of records to queues does not work if a queue is no longer active after automated assignment is configured.
The following figure summarizes how the automated assignment of records to queues works:

Before you begin
The following table lists the actions that you must perform before configuring the automated assignment of records to queues.
| Step | Action | Details |
|---|---|---|
| 1. | Make a list of the most common incidents and service requests that users in your organization submit. You might want to automate the assignment of such incidents and service requests to queues so that they are quickly and effectively resolved. For the same set of conditions, you can configure suggested owners, automated assignment of records to queues, or both. Consider the following scenarios for determining when to configure either suggested owners or automated assignment of records to queues:
| None |
| 2. | Create queues and make them available for the Incidents and Service requests modules | |
| 3. | Enable assignment of records to both queues and staff members simultaneously by selecting the Enable Queue and User Assignment check box (Remedyforce Administration > Application Settings > Record Assignment). Ensure that you also update existing QuickViews, email alerts, reports, and other settings to use the Queue and Staff fields instead of the Owner field. Note: Automated assignment of records to queues is supported only if you enable shared ownership of records (queue and user assignment feature). | Enabling assignment of records to both queues and staff members |
To configure the automated assignment of records to queues
- Click the Remedyforce Administration tab.
On the Home page, click the Configure Application tile, and from the menu select Suggested Owners & Queue Auto Assignment.
- On the Suggested Owners & Queue Auto Assignment tab, click New
 .
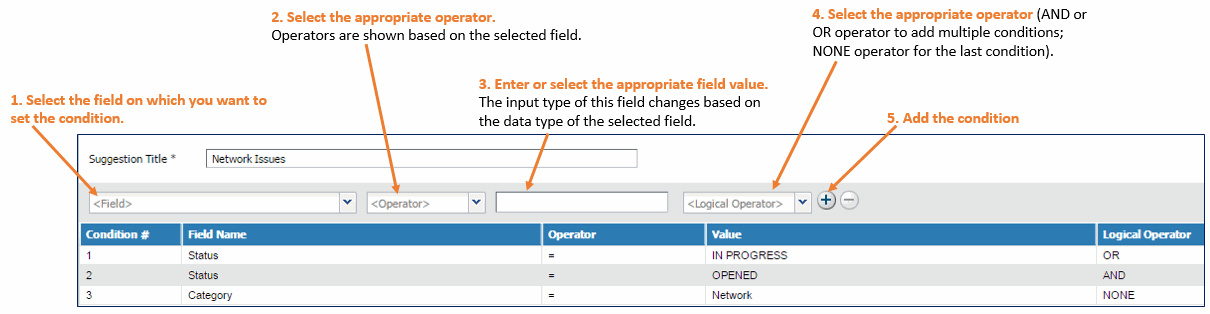
. - On the Suggested Owner & Queue Assignment Rules form, in the Suggestion Title field, enter a unique title.
Define the set of conditions for assigning records to a queue.
Best practice
Ensure that the set of conditions you define is unique. If you create multiple queue auto assignment records with the same set of conditions but different queues, any one of the queues is assigned to the records that meet the defined conditions.
In the Queue Auto Assignment section, in the Queue field, select the queue to which you want to automate the assignment of records that meet the defined conditions.
All incident queues that are active are displayed in the Select From Queue lookup window.(Optional) In the Suggested Owners section, select the suggested owners (queues, staff, or both) for records that meet the defined conditions.
Based on your requirements, you can also select the queue that is selected for automated assignment. When records meet the defined conditions, staff members can assign these records to one of the suggested owners. For more information, see Configuring suggested owners.- Click Save
 .
.
After you have configured rules for the automated assignment of records to queues, you must start the Assignment Automation process.
Note
If you are using workflows for the automated assignment of records to queues, inactivate the workflows that correspond to the conditions that have been configured for the automated assignment of records to queues. Workflow rules are given precedence over the automated assignment conditions that you define on the Suggested Owner & Queue Assignment Rules form.
Moving to the Queue Auto Assignment feature might help you to more easily manage the limits for workflow rules in your organization. For more information about workflows, see Salesforce Help.
To manage the automated assignment of records to queues
You can modify the conditions that you have defined for automated assignment of a queue, copy the conditions of a queue configured for automated assignment, and delete a queue configured for automated assignment.
- Click the Remedyforce Administration tab.
- On the Home page, click the Configure Application tile, and from the menu select Suggested Owners & Queue Auto Assignment.
The Suggested Owners & Queue Auto Assignment list view displays both the queue auto assignment and the suggested owners records. For the queue auto assignment records, the Assigned Queue column displays the queue to which records that meet the defined criteria are automatically assigned. In case of the suggested owners records, this column does not display any value. Perform one of the following actions:
Goal
Step
Modify conditions defined for the automated assignment of records to a queue.
- Click the queue auto assignment record that you want to modify and click Edit
 .
. - Click the condition that you want to modify.
- Make the required changes in the condition and click Update
 .
. - (Optional) In the Queue Auto Assignment section, in the Queue field, select a different queue.
- Click Save.
Copy conditions defined for the automated assignment of records to a queue.
- Click the queue auto assignment record whose conditions you want to copy and click Copy
 .
. - In the Suggestion Title box, enter a unique name.
- Update the required condition and click Update.
- (Optional) In the Queue Auto Assignment section, in the Queue field, select a different queue.
- Click Save.
Delete a queue auto assignment record.
Click the queue auto assignment record that you want to delete and click Delete
 .
.Temporarily inactivate a queue auto assignment record. - Click the queue auto assignment record that you want to inactivate, and click Edit.
- Click the Inactive check box.
- Click Save.
- Click the queue auto assignment record that you want to modify and click Edit
To start or stop assignment automation
After you have configured rules for the automated assignment of records to queues, you must start the Assignment Automation process. This process runs every few minutes and applies all assignment rules to new records. For more information, see How automated assignment of records to queues works.
- Click the Remedyforce Administration tab.
- On the Home page, click the Application Settings tile, and from the menu select Record Assignment.
In the Assignment Automation section, perform one of the following actions:
- To start assignment automation, click Start.
- To stop assignment automation, click Stop.
Best practice
BMC recommends that you do not stop the Assignment Automation process once the automated assignment of records has been initiated. If you stop and restart this process, any incidents or service requests created in the interim are not considered for automated assignment to queues.
Related topics
Configuring automated assignment of records to staff members
Troubleshooting issues when configuring automated assignment of records
Comments
Log in or register to comment.