Enabling prebuilt integration with AWS
You can configure BMC Helix Multi-Cloud Broker to create an incident with AWS (Amazon Web Services) when a service desk agent creates an incident in Remedy IT Service Management Suite (Remedy ITSM Suite) or BMC Helix ITSM.The trigger conditions defined in BMC Helix Multi-Cloud Broker determine when incidents are created in AWS. For more information about incident management, see Incident brokering.
Before you begin
Complete all preconfiguration tasks before you configure AWS integration.
To select the integration option for AWS
- Launch BMC Helix Platform by using the URL provided in the email sent to you from BMC, and log in as an administrator.
- From the list of applications, select Workspace > Applications > Multi-Cloud Service Management.
To launch BMC Helix Multi-Cloud Broker, on the top-right corner of the page, click Visit Deployed Application.
Tip
You can access BMC Helix Multi-Cloud Broker directly by entering the URL https://hostName:portNumber/innovationsuite/index.html#/com.bmc.dsm.mcsm and logging in as a tenant administrator.
- To open the configuration page, click Settings
 .
. - Select Start Here > Quick Configuration Guide.
BMC Helix Multi-Cloud Broker lists the features available to you.
6. For the incident management feature, select Remedy Incident to AWS under Incident Brokering, and click Done.
The Configuration Links page displays a list of the common configurations, connectors, flows, and connector targets and processes that you need to configure. The following sections describe these configurations in detail.
To map AWS vendor data to ITSM or Smart IT
Configuring vendor data includes setting up a vendor organization and defining vendor mappings for the technology provider. Vendor mapping ensures that your vendor is notified about changes to the Remedy ITSM fields by sending updates as a comment to the corresponding vendor ticket.
If you have not already done so, to set up the vendor organizations, on the Configuration Links page, click Manage Vendor Organizations. For instructions, see Performing preconfiguration tasks.
- To add or update the vendor mapping, on the Configuration Links page, click Map Vendors.
On the Map Vendors screen, click
 to open the Map New Vendor page.
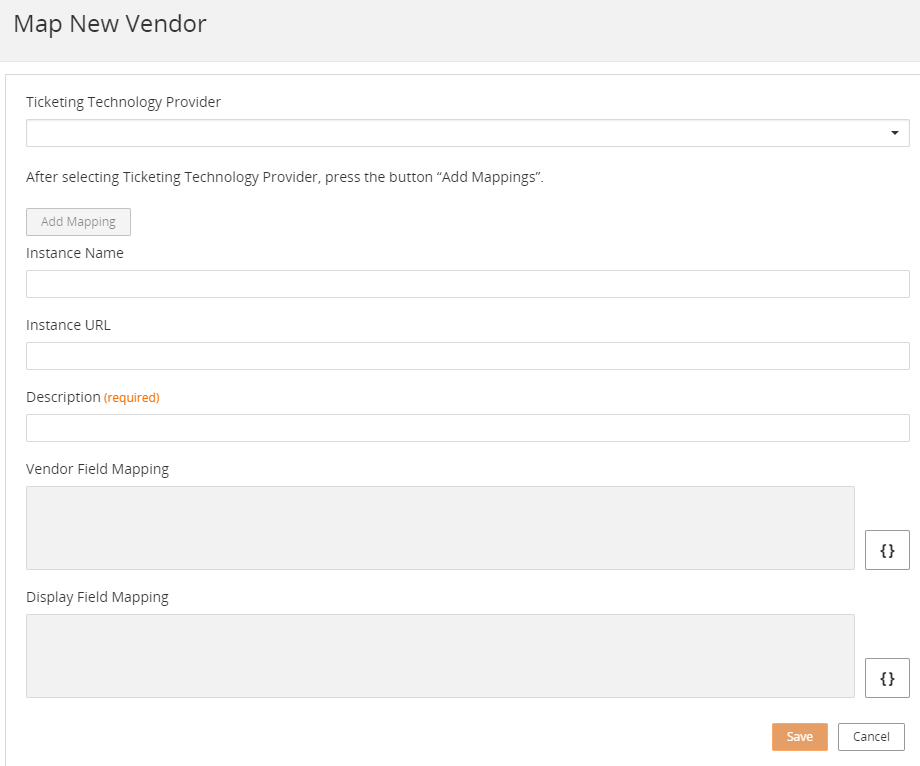
Enter a Description that makes it easy for you to identify the vendor metadata configuration.
Select the Ticketing Technology Provider.
The Ticketing Technology Provider is the application the vendor uses to manage tickets.Vendor Ticketing Technology Provider Amazon AWS JIRA Software JIRA Salesforce Service Cloud Service Cloud CA Agile Central Agile Central Remedy ITSM Vendor Remedy ITSM JIRA Software Service Desk JIRA Service Desk Microsoft Azure Devops Azure DevOps Azure Monitor Azure Alerts IBM QRadar QRadar BMC TSOM TrueSight Ops Mgmt for PSR Click Add Mapping.
BMC Helix Multi-Cloud Broker displays the default Instance URL, Vendor Field Mapping and Display Field Mapping.- Update the Instance URL with the ticketing technology provider server and port details.
To add or delete mapped field values, click Click { } to open the JSON editor, and modify Vendor Field Mapping and Display Field Mapping.
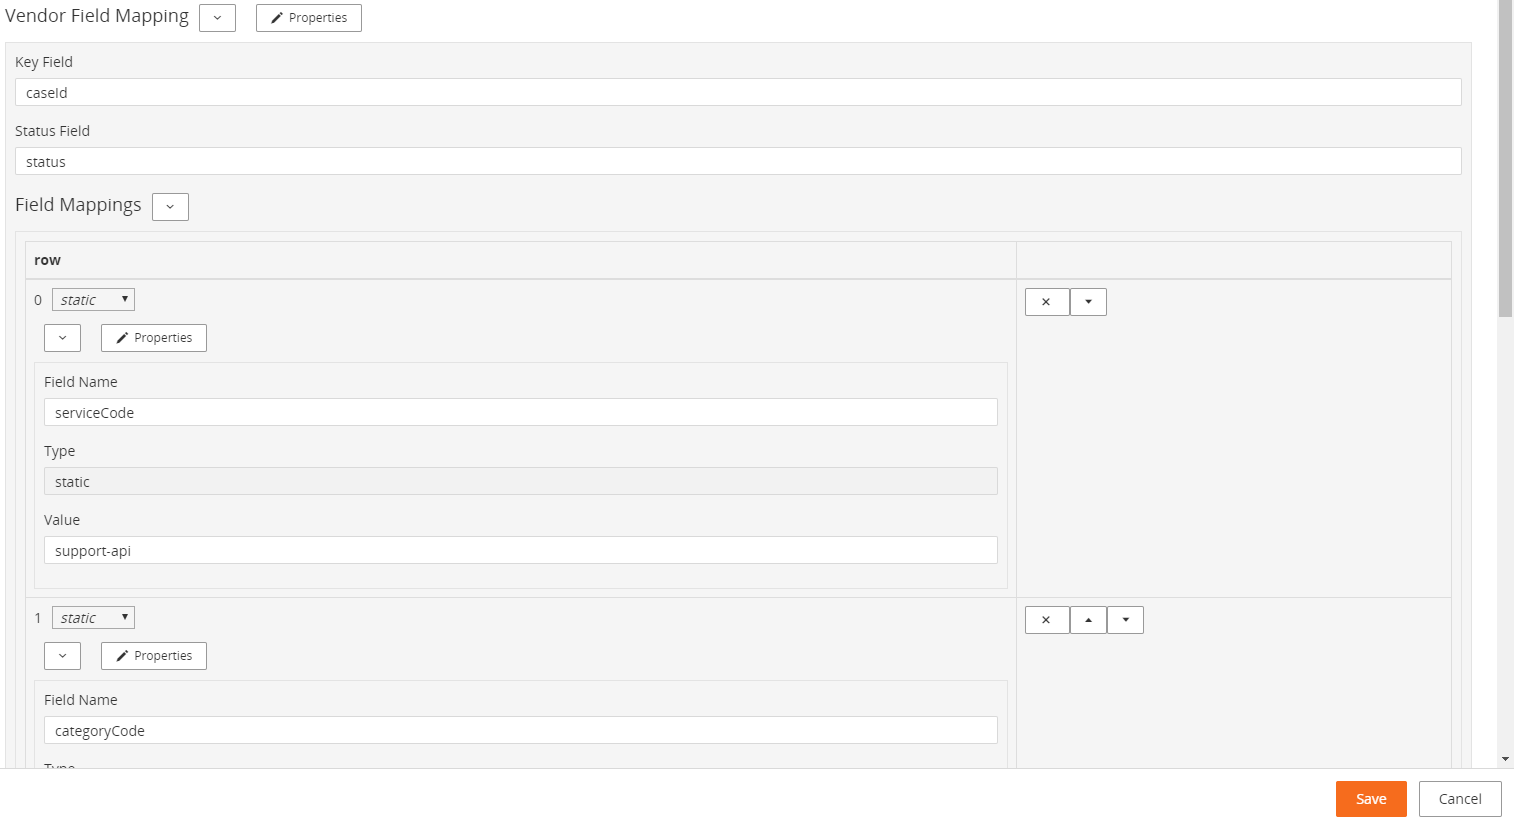
If required, update the existing Vendor Field Mapping.
Vendor field mapping defines how BMC Helix Multi-Cloud Broker maps Remedy ITSM fields to vendor ticket fields.
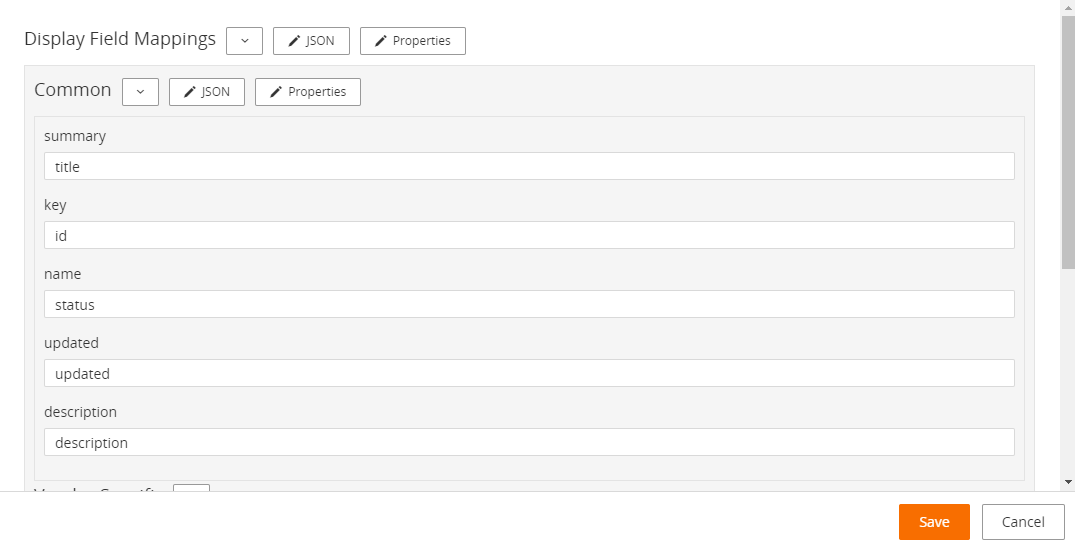
If required, update the existing Display Field Mapping.
Display field mapping defines how vendor ticket fields map to the fields on the Smart IT console.
Important
If you do not want the ITSM ticket to be automatically resolved when the corresponding ticket is closed by your vendor, select ![]() . By default, BMC Helix Multi-Cloud Broker resolves the ITSM ticket when the corresponding ticket is closed by the vendor.
. By default, BMC Helix Multi-Cloud Broker resolves the ITSM ticket when the corresponding ticket is closed by the vendor.
To configure connectors for integrating ITSM and AWS with BMC Helix Multi-Cloud Broker
For each feature you selected, complete the following procedure for the connectors listed on the Configuration Links page.
To navigate to BMC Helix Integration Service, on the Configuration Links page, click Configure connectors in Integration Studio under Required Common Configurations.
You must configure the connectors listed for each feature, in addition to the connectors listed under Required Common Configuration.To enter field values, select a connector, such as ITSM, and click Configuration.
You might need to click the arrow on the ribbon in the lower section of the screen to open the Configuration pane.- To update the configuration defaults, enter the appropriate field values by referring to the list of connectors at the end of this procedure.
- To add or update the user account that is used to access the vendor application, click Accounts.
List of connectors and configuration values for integration with AWS
- Configuration
While activating BMC Helix Multi-Cloud Broker, BMC configures the Multi-Cloud connector. Do not modify the default Multi-Cloud connector configuration.
- Account
BMC sets up the account for the Multi-Cloud connector.
Click to re-authenticate after you have changed the password for your tenant administrator user account in BMC Helix Innovation Studio.
For information about changing the user password, see Creating or modifying Person data .
.
To configure flow triggers and field mappings between ITSM, BMC Helix Multi-Cloud Broker, and AWS
For each feature you selected, complete this procedure for the flows listed on the Configuration Links page.
To navigate to BMC Helix Integration Service, on the Configuration Links page, click Configure flows in Integration Studio under Required Common Configurations.
You need to configure the flows listed for each feature, in addition to the flows listed under Required Common Configuration.
To open the flow template page, on the Catalog tab in Integration Studio, click the flow you want to configure.

- To create a copy of the flow template, click
 .
.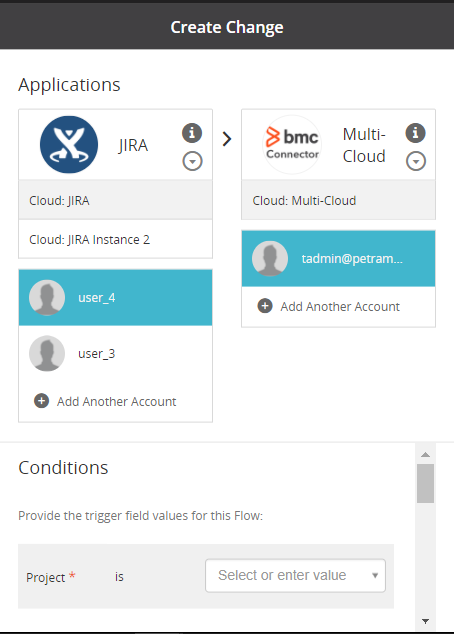
- Select the appropriate accounts for the end-point connectors of the selected flow.
You specify the connector accounts when configuring connectors. - To update the name of the flow that you have copied from the flow template, select My Flow, open the flow that you copied, and update the title.
Specify the trigger Conditions and Field mapping, and click OK.
For more information about trigger conditions and field mappings, see the list of flows at the end of this procedure.- Click My Flows and select the flow that you created from the flow template.
- To verify the target values for the trigger conditions and the field mappings, in the right pane, click Details.
List of flows and configuration values for integration with AWS
Trigger
In the Service field, specify the name of the Remedy business service for incident brokering. Incidents will not be brokered as expected if you do not specify the Service.
Note
The business service is the Technology Provider value that you specified when you configured the vendor data.
Field Mapping
Do not change the value of the following out-of-the-box field mappings:
Field Value Company Company Service Service incidentNumber Incident Number Note
You can change the following out-of-the-box field mappings:
- Summary
- Priority
However, we recommend that you retain the existing mappings. If you change the Priority field mapping, you need to set the transformations for source and target field values in the flow.
Trigger
Field Value Service Specify the name of the Remedy Business Service for incident brokering in the Service field:
.Note: Business Service is the value that you provide when specifying the Technology Provider while configuring vendor data
Status Set status to one of the following values:
- Resolved
- Closed
- Cancelled
Field Mapping
Do not change the following out-of-the-box field mappings.
Field Value Status Status incidentNumber Incident Number
To define connector targets for AWS integration
BMC preconfigures the out-of-the-box connector targets for all BMC Helix Multi-Cloud Broker features. If you want to update the connector configuration or account information, update the connector target for the feature.
Warning
Do not delete the out-of-the-box connector targets.
- To navigate to BMC Helix Platform, in the Configuration Links page, click Configure Connector Targets in Innovation Studio under Required Common Configurations.
You need to configure the connector targets listed for each feature on the Configuration Links page, in addition to the ones listed under Required Common Configuration. - Click the connector target you want to configure or click
 to configure a new connector target.
 Enter or update the following values and save the configuration.
Field Instructions Name Enter a unique name for the configuration.
The name is associated with the process that is related to the connector you are configuring.Connector Type Select the connector type from the list of connectors available to you in BMC Helix Integration Service.
Configuration Select a configuration from the list.
For example, if you select qradar as the Connector Type, all the configurations that you have made for qradar are displayed in the Configuration list.
Profile Select a profile. For example, if you select qradar as the Connector Type, all the profiles that you have created for qradar are displayed in the Configuration list.
List of connector targets for integration with AWS
When you complete the configuration for all the components, verify the incidents are being brokered from ITSM to AWS.
To configure connectors for enabling integration with AWS
Related topic
Configuring BMC Helix Multi-Cloud Service Management
Comments
Log in or register to comment.