Performing the installation
The BMC Virtual Chat installer automates the installation process and provides a faster and easier installation experience.
Important
The upgrade process for BMC Virtual Chat is different than the installation process. If you are upgrading from an earlier version, see Upgrading.
Before you begin
- Review the compatibility matrix, and ensure that BMC Virtual Chat is compatible with your system.
- Review the requirements for BMC Remedy AR System, BMC Atrium CMDB, and any supporting BMC Remedy ITSM applications.
- Review Known and corrected issues for installation and upgrade issues and workarounds.
- Review BMC Virtual Chat deployment .
- Download the installer files.
- Back up the BMC Remedy AR System database. This important step enables you to restore BMC Remedy AR System to its preinstallation state if you encounter problems.
- Ensure that no application is using ports 6225 and 6226, which BMC Virtual Chat requires for successful operation. Open both directions between the BMC AR System and Mid Tier servers.
- If you are installing in an AR System server group, complete the installation and configuration for the primary and secondary servers. For more information, see Installing and Verifying server group configuration in the BMC Remedy ITSM deployment online documentation.
- If you need support double-byte languages in chats, you must install BMC Remedy AR System with Unicode support. See Unicode support and Unicode compatibility considerations in the BMC Remedy ITSM deployment online documentation.
Best Practice
In an enterprise environment, BMC recommends that the BMC Remedy Mid Tier be installed on a separate computer from the BMC Remedy AR System server. In this environment, you would run the BMC Virtual Chat installer multiple times in the following sequence:
- Install BMC Virtual Chat on the primary AR System server.
- If your environment has an AR System server cluster, install BMC Virtual Chat on the secondary AR System server or servers.
- Install BMC Virtual Chat on the Mid Tier server. If you have multiple Mid Tier servers, you can install BMC Virtual Chat simultaneously on all the mid tiers. However, it is recommended that you complete installation on the first Mid Tier server before you start installing on the next Mid Tier server. This ensures that during connection check, all mid-tiers provide a reply and no warning messages are displayed.
To install BMC Virtual Chat on the AR System server
Best Practices
- To reduce installation time significantly, do not install the products over the wide area network (WAN).
- To avoid configuration problems, accept the default values displayed in the installer unless you have a valid reason to modify them.
Warning
Do not unzip, or uncompress, any subfolders in the Installer package. If these subfolders are uncompressed, the installer will display a popup during installation asking the user to insert Disk 1 or browse to its location, Because neither is possible, the installation cannot be completed.
- Extract the compressed installation file on the computer running the AR System server.
- Navigate to the Disk 1 folder.
Example:C:\downloadDirectory\BMCVirtualAgent9_1_00\Disk1. - Run the installer.
In Microsoft Windows, run setup.exe.
On Linux and UNIX servers, run setup.sh. - In the lower-right corner of the Welcome page, click Next.
- Review the license agreement, click I agree to the terms of license agreement, and then click Next.
- In the BMC Remedy AR System Server User Inputs page, perform the following actions:
- Type the logon name for the AR System Server Administrator.
- Type the password for the AR System Server Administrator.
- Set the appropriate TCP port.
- Verify the AR System server name.
- In the Directory Selection field, click Browse to navigate to the directory in which to install BMC Virtual Chat, or use the default location.
The default location is C:\Program Files\BMC Software\BMCVirtualAgent. - Click Next.
In the Server Selection page, select one of the following options, and click Next.
For this scenario Select these options BMC Remedy AR System Server and Mid-Tier are installed on different machines (non-server group). 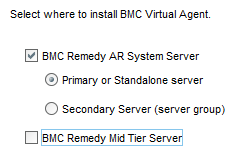
In an AR System server group, the primary BMC Remedy AR System Server.
Note: You must repeat the installation on the secondary AR System Servers.
In an AR System server group, the secondary BMC Remedy AR System Server. 
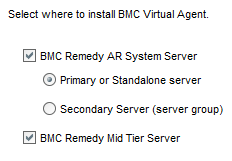
BMC Remedy AR System Server and Mid Tier are installed on the same machine.
Note: This is for a proof-of-concept installation. This configuration is not recommended for production use.
Select additional localized views and data to install, and click Next.
This installs the selected localized views only for the Self Service Portal.Note
To change the localized views after installation or upgrade, you must run the installer again.
In the Configure Virtual Chat Dedicated Proxy User page, specify or create an account for Virtual Chat.
- If you have created a proxy user before performing the installation, type that proxy user's credentials. It should not be an employee's account but one dedicated for Virtual Chat. It should have a fixed license and the Administrator and Incident Master permissions.
- If you have not created a proxy user before performing the installation, create a new user by specifying the user name and password.
- Specify the following details for the server to which users connect. This server can be either the load balancer server or a single Mid Tier server.
- Specify the name and port of this server. The default port for HTTP option is 8080 and the default port for HTTPS is 443.
- Select the protocol user for this server.
- If multiple mid-tier servers are load-balanced, select Configure Load Balance Environment, complete the following steps, and click Next.
- In a comma-separated list, enter the names of all the Mid Tier servers.
- Enter the port number for the Mid Tier servers.
- Select the protocol used for the Mid Tier servers
On the integrations page, select the BMC products to integrate.
To enable the virtual agent to search knowledge articles, you must integrate with BMC Knowledge Management by specifying or creating a dedicated account for this integration.
To enable creation of incidents after a chat session is initiated, you must integrate with BMC Remedy ITSM.Note
The installer can only configure the BMC Knowledge Management integration if installed on a Mid Tier-only-server or on any server when load-balancing settings are provided. Otherwise, the installer does not know the Tomcat path and cannot define the protocol type (HTTP or HTTPS. Thus, it cannot configure the Knowledge Management Integration.
When you install Virtual Chat on the Mid Tier server, it can automatically configure the Knowledge Management integration.- If you have created an integration user before performing the installation, type that integration user's credentials. It should not be an employee's account but one dedicated for Virtual Chat. It should have a fixed license.
- If you have not created an integration user before performing the installation, create a new user by specifying the user name and password.
After the installer validates your inputs, verify the product features that will be installed, and click Install.
- In the Installation Summary page, click View Log to review the SEVERE error messages or warnings in the product installer log.
- See whether errors are due to network, host, or other environment-related issues. You can view a log file of the installation at
C:\Documents and Settings\Administrator\Local Settings\Temp\bmcvirtualagent_install_log.txt and C:\Users\Administrator\AppData\Temp\1\bmcvirtualagent_install_log.txt. - Close the log when you finish.
- Click Done to exit the BMC Virtual Chat installer on the AR System server.
- To install BMC Virtual Chat on secondary AR System servers, copy the installer directory to the other servers, and repeat steps 3-16.
- Install BMC Virtual Chat on the BMC Remedy Mid Tier server.
To install BMC Virtual Chat on the Mid Tier server
After installing BMC Virtual Chat on the BMC Remedy AR System server, install it on the BMC Remedy Mid Tier server.
- Extract the compressed installation file on the computer running the BMC Remedy Mid Tier server.
- Navigate to the Disk 1 folder.
Example: C:\downloadDirectory\ BMCVirtualAgent9_1_00 \Disk1. - In Microsoft Windows, run setup.exe.
- In the lower-right corner of the Welcome page, click Next.
- Review the license agreement, click I agree to the terms of license agreement, and then click Next.
- In the BMC Remedy AR System Server User Inputs page, perform the following actions:
- Type the logon name for the AR System Server Administrator.
- Type the password for the AR System Server Administrator.
- Set the appropriate TCP port.
- Verify the AR System server name.
- In the Directory Selection field, click Browse to navigate to the directory in which to install BMC Virtual Chat, or use the default location.
The default location is C:\Program Files\BMC Software\BMCVirtualAgent. Click Next.
Note
When you install BMC Virtual Chat on the Mid Tier server, you might be presented with the following error message: "The installer could not find the armonitor.conf file at null. Before you continue, make sure that the configuration is available." You can ignore this error message, and click Next to continue.
In the Server Selection page, select BMC Remedy Mid Tier, and click Next.
- In the Mid Tier Server Information page, perform the following actions.
- Navigate to the location where the Apache Tomcat web server is installed, for example, C:\Program Files\Apache Software Foundation\Tomcat7.0.
- Navigate to the location where the JRE is installed.
- (Optional) Navigate to the location where to install Program D, or use the default location.
- Click Next .
The installer validates your inputs, and then the Installation Preview page appears, listing the product and product features that will be installed.
In the Configure Virtual Chat Dedicated Proxy User page, specify or create an account for Virtual Chat.
Tip
If you created a dedicated user when you installed Virtual Chat on the AR System server, you should use the same user and not create a new one.
If using an existing account, it should not be an employee's account but one dedicated for Virtual Chat. It should have a fixed license and the the Administrator and Incident Master permissions.
If creating an account, specify the user name and password.
- Specify the following details for the server to which users connect. This server can be either the load balancer server or a single Mid Tier server.
- Specify the name and port of this server. The default port for HTTP option is 8080 and the default port for HTTPS is 443.
- Select the protocol user for this server.
- If applicable, select Configure Load Balance Environment, complete the following steps, and click Next,
- In a comma-separated list, enter the names of all the Mid Tier servers.
- Enter the port number for the Mid Tier servers.
- Select the protocol used for the Mid Tier servers.
After the installer validates your inputs, click Install.
- In the Installation Summary page, click View Log to review the SEVERE error messages or warnings in the product installer log.
See whether errors are due to network, host, or other environment-related issues. You can view a log file of the installation at
C:\Documents and Settings\Administrator\Local Settings\Temp\bmcvirtualagent_install_log.txt and C:\Users\Administrator\AppData\Temp\1\bmcvirtualagent_install_log.txt. - Close the log when you finish.
- Click Done to exit the BMC Virtual Chat installer on the Mid Tier server.
- After completing the BMC Virtual Chat installation or upgrade, flush the Mid Tier cache.
- After you complete the configuration and integration procedures, perform the post-installation fixes.
Comments
We do not receive steps 13 and 14 when installing Virtual Chat on Mid-Tier Servers. Please update the section -
To install BMC Virtual Chat on the Mid Tier server
Thanks Shekhar. Let me investigate and get back to you.
Hello Shekhar,
Could you tell me which version of Virtual Chat were you installing, for which steps 13 and 14 did not show up.
Thanks,
Aaditi
Log in or register to comment.