Integrating with XMPP instant messaging clients
You can integrate BMC Virtual Chat with IM clients that use the Extensive Messaging and Presence Protocol (XMPP). Clients can use these IM clients to chat with a virtual agent.
Note
Google Talk was an IM client that supported XMPP. However, the Google Hangouts replacement does not use XMPP. This integration does not work with Google Hangouts.
Before you begin
Create the IM accounts for the virtual agent.
To enable and configure the connectors for XMPP instant messaging clients
- From the IT Home Page, select Virtual Chat > Administration Console > Self Service Portal > Configuration.
- Click Show Disabled to view all the configuration items.
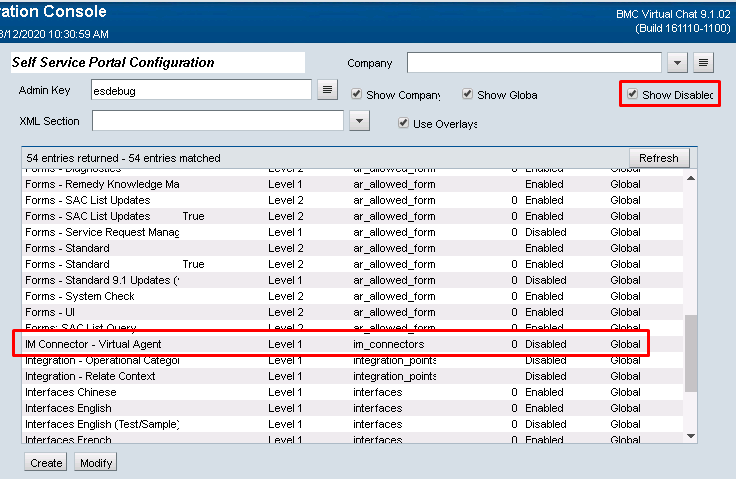
- Select the IM Connector - Virtual Agent entry and click Modify.
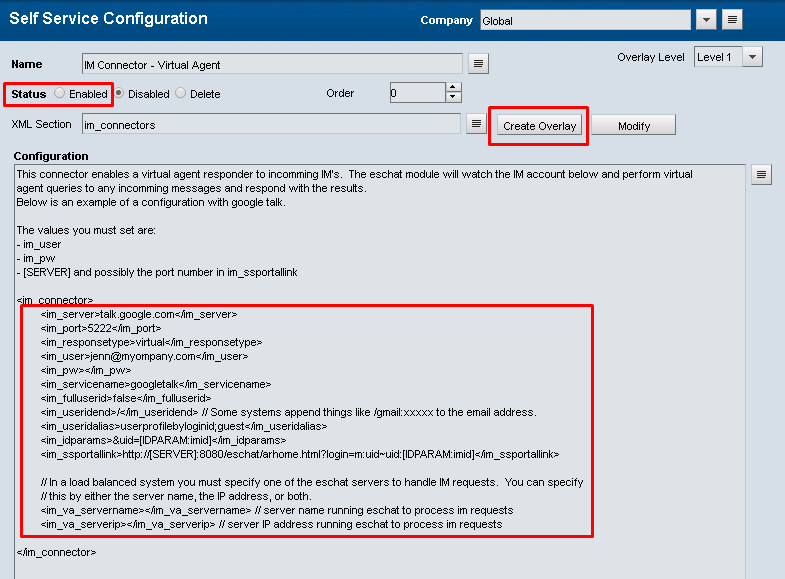
Select Enabled.
Verify that the parameters are set to the correct values as described in the Parameter values for IM Connector table.
If the correct parameters are not listed, you can replace the existing XML configuration with the following example.<im_server>talk.google.com</im_server> <im_port>5222</im_port> <im_responsetype>virtual</im_responsetype> <im_user>jenn@myompany.com</im_user> <im_pw></im_pw> <im_servicename>googletalk</im_servicename> <im_fulluserid>false</im_fulluserid> <im_useridend>/</im_useridend> // Some systems append things like /gmail:xxxxx to the email address. <im_useridalias>userprofilebyloginid;guest</im_useridalias> <im_idparams>&uid=[IDPARAM:imid]</im_idparams> <im_ssportallink>http://[SERVER]:8080/eschat/arhome.html?login=m:uid~uid:[IDPARAM:imid]</im_ssportallink> // In a load balanced system you must specify one of the eschat servers to handle IM requests. You can specify this by either the server name, the IP address, or both. <im_va_servername></im_va_servername> // server name running eschat to process im requests <im_va_serverip></im_va_serverip> // server IP address running eschat to process im requests
Parameter values for IM ConnectorParameter Description <im_server> Set to the IM server name. <im_port> Googltak used port 5223, but your instant messaging service might use a different port. <im_responsetype> Set to virtual. <im_user> Set the instant messaging account to virtual agent. <im_pw> Set the password for the specified instant messaging account. This password is not encrypted. <im_servicename> Set to googletalk. Specifies the name of the instant messaging service. <im_fulluserid> Set to true. Specifies whether BMC Virtual Chat must use the complete User ID. <im_useridend> Set to /. Specifies the separator used for User IDs in message code. This is necessary to ensure that the user ID is correctly displayed. <im_useridalias> Set to userprofilebyemailid. Specifies the authentication type alias to be used to authenticate a user in BMC Virtual Chat. <im_idparams> Set to &emailid=[IDPARAM:imid]. Specifies the URL parameters to send user data for authentication. In the above value, the emailid URL parameter value is taken from the imid user attribute. <im_ssportallink> Set to http://midTierServer:port/eschat/arhome.html? Specifies the Self Service Portal URL for a link that can be displayed to the instant messaging service user. Note: The Self Service Portal new UI is accessed by using the http://midTierServer:port/eschat URL. However, the value above is set to a different URL so that the instant messaging user can open Self Service Portal in the classic UI. <im_security_mode> Set to enabled. Specifies whether BMC Virtual Chat should enable security mode. <im_allow_self_signed_certs> Set to true. Specifies whether BMC Virtual Chat allows the instant messaging service to use self-signed certificates for SSL/ TLS. <im_va_servername>
In a load balanced system, set the name of the server running eschat to process im requests.
<im_va_serverip>
In a load balanced system, set the IP address of the same server that you set in the <im_va_servername> parameter.
- Click Save.
- In the Registered Servlets area, click Apply.
- Click Refresh Servlets.
If the registered servlets are successfully refreshed, in the Registered Servlets table, the Refreshed column displays the current timestamp and the Refresh Status column displays the status as success.
Comments
Can you please elaborate what these options are?
Hello Vignesh,
Thank you for your feedback on this topic. We shall address your request as soon as possible.
-Aaditi
Hello Vignesh,
We have updated the description of these IM connector parameters. Do let us know if you need further information.
Thanks,
Aaditi
Thanks Aaditi. That definitely helps.
I do need some further help. We've used the exact steps mentioned here to configure BMC Virtual Chat 9.1 to connect to one of our XMPP servers. However, we see no login into the XMPP server upon saving the configs and refreshing servlets. But I can assure its not an issue with the XMPP server credentials, since we are able to use them to log in directly into the XMPP server.
Are there any other configurations required to Virtual Chat to get this integration working?
Log in or register to comment.