Configuring self-service user file uploads
To help users resolve issues, you can allow users to upload files from the Self-Service Portal. You can limit the types and sizes of files that they can upload.
To configure file uploads
- From the Virtual Chat Administration Console, select Self Service Portal > Configuration.
- To view all configurations, select the Show Disabled checkbox.
- Select File Transfer, and click Modify.
- Set Status to Enabled.
In XML window, you can modify the following parameters.
Parameter Description <xfer_types>
In a comma-separated list, specify the file type extensions that users can upload. Users can upload disallowed file types, but the files are added to and attached as .zip files. <xfer_basepath>
Specify the location of the xfer folder created while installing Apache Tomcat .
Example: C:\Program Files\Apache Software Foundation\Tomcat7.0\webapps\eschat\xferNote
In load-balancing environment, ensure that the location of xfer folder is same for all the BMC RemedyMid Tier servers.
<xfer_baseurl>
Specify the IP address of the server where Apache Tomcat and the xfer folder is located.
Example: http://<IPaddress>:8080/eschat/xfer.<xfer_allow_client_upload>
Set to True to allow self-service users to upload files. Set to False to disallow uploads. These values are not case sensitive. <xfer_max_attachment_size>
In kilobytes, specify themaximizefile size for uploads, such as 1024, 100k,100kb,100kilobytes, 1m, 1mb, 1megabyte. Zero or not including this parameter, means no limit other than the BMC Action Request System file attachment limit. The default value is 1000kb. <xfer_allow_client_executables_upload>
Set to False to disallow self-service users to upload executable files, such as .exe files. Set to True to allow executable file uploads. These values are not case sensitive. An empty or incorrect value is equal to False. <xfer_executable_signatures>
In a comma-separated list, specify the signatures for executable files that users cannot upload. This setting overrides the value in the <xfer_types> and <xfer_allow_client_executables_upload>parameters. Example:<xfer_executable_signatures>4d5a,25504446</xfer_executable_signatures>disallows the user to upload .exe and PDF files.<xfer_filepathchar>If required, specify the character used to separate the directory names on the mid tier.
Set to<xfer_filepathchar>\</xfer_filepathchar>for separating directory names on the mid tier with Windows operating system.
Set to<xfer_filepathchar>/</xfer_filepathchar>for separating directory names on the mid tier with Linux or Solaris operating systems.Note
The
<xfer_filepathchar>is used to separate directories on the mid tier server, and not on the BMC Remedy Action Request System server.<xfer_auto>If the value is true, the BMC Virtual Chat installer will not re-configure the File Transfer entry during an upgrade. If the value is false, the BMC Virtual Chat installer will configure the following xml elements of the File Transfer entry: <xfer_basepath> <xfer_filepathchar> <xfer_baseurl><xfer_max_attachment_size>to 1000k<xfer_auto>to true- Click Save.
- In the Self Service Portal Configuration screen, click Apply.
- In the Registered Servlets table, select the ESChat servlet, and click Refresh Servlets.
Example
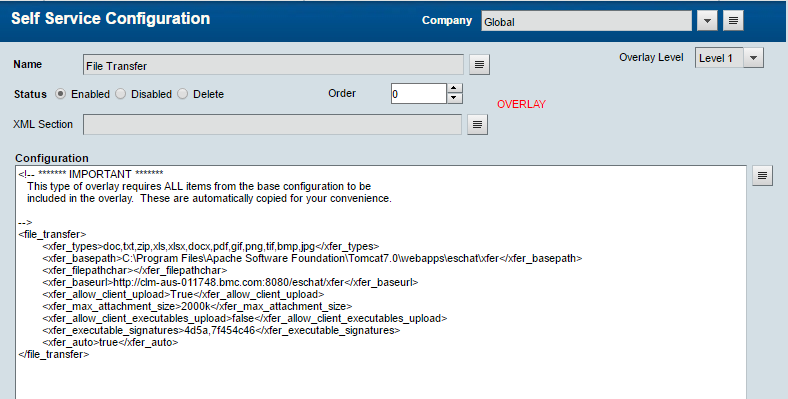
The following is an example of the XML code for the File Transfer configuration.
<file_transfer>
	<xfer_types>doc,txt,zip,xls,xlsx,docx,pdf,gif,png,tif,bmp,jpg</xfer_types>
	<xfer_basepath>C:\Program Files\Apache Software Foundation\Tomcat7.0\webapps\eschat\xfer</xfer_basepath>
	<xfer_baseurl>http://cal-midtierserver:8080/eschat/xfer</xfer_baseurl>
	<xfer_allow_client_upload>True</xfer_allow_client_upload>
	<xfer_max_attachment_size>1000k</xfer_max_attachment_size>
	<xfer_allow_client_executables_upload>false</xfer_allow_client_executables_upload>
	<xfer_executable_signatures>4d5a,7f454c46</xfer_executable_signatures>
</file_transfer>

Comments
(case -1) End user send file to support agent
what about HA with LB Scenario. what to write in case of Xfer_BaseUrl ?
is it the LB IP or how to separate more than one Mid Tier servers in xfer_baseurl tag for LB/HA scenario
<xfer_basepath>C:\Program Files\Apache Software Foundation\Tomcat6.0\webapps\xfer</xfer_basepath><xfer_baseurl>http://cal-midtierserver:8080/xfer</xfer_baseurl><xfer_basepath>tag, specify the location of the xfer folder created previously. For example:C:\Program Files\Apache Software Foundation\Tomcat7.0\webapps\eschat\xfer.<xfer_baseurl>tag, specify the IP address of the server where Apache Tomcat and the xfer folder is located. For example, http://192.168.101.22:8080/eschat/xfer.how to separate the xfer_basepath here for (1) and (2) as all configurations are suppose to be done in self service portal - file transfer option.
same goes for xfer_base url tag
please clarify - document is very vague and unclear. improve it for HA scenario and for above two file transfer configurations.
Thanks Rahul for your questions. Please allow us some time to get back to you on this.
Hi Rahul,
In load balancing, the Apache Tomcat should should be installed in the same directory on all mid tiers. That is the value of x'fer_basepath has to be the same for all BMC Remedy Mid Tiers.
Log in or register to comment.