Configuring Self Service on Salesforce Mobile App
The
Salesforce Mobile App
 is a platform for hosting mobile applications and enables you to access data in real time on hand-held devices. Here, you can configure the Self Service on Salesforce Mobile App (Self Service mobile app), which is for clients. The mobile app makes it easy for Self Service users to navigate and read through the data on their mobile devices thereby facilitating faster review and information update.
The image represents an overview of how to enable the Self Service on Salesforce Mobile App for client users:
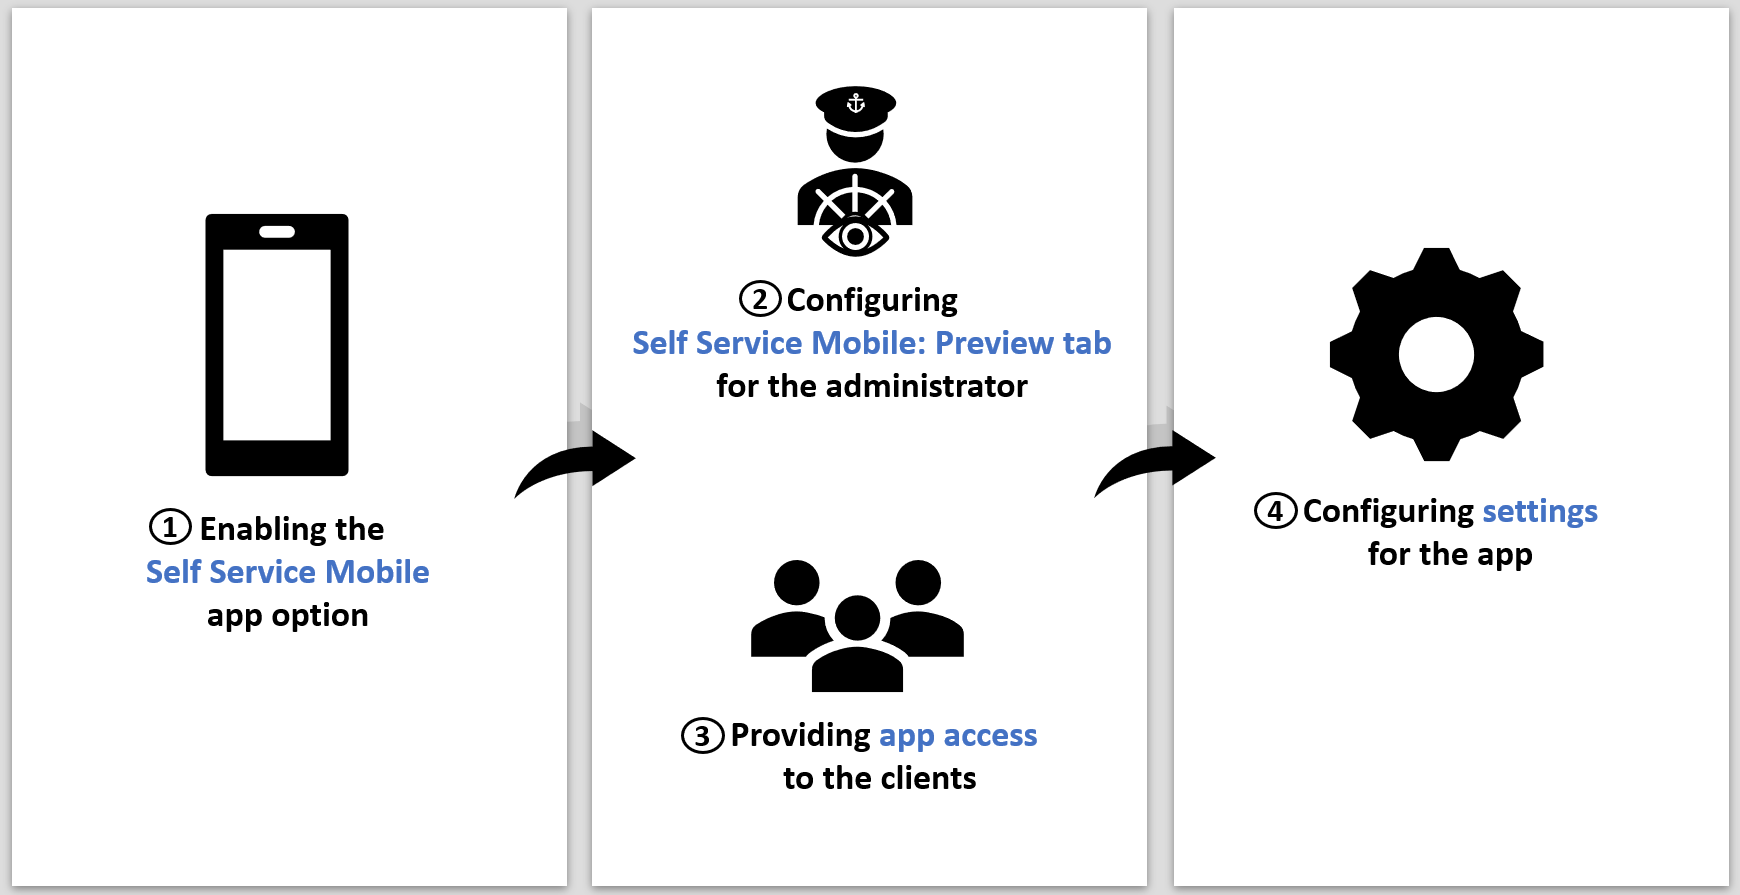
To enable the Self Service mobile application for your organization
Clients must use the Remedyforce Mobile tab in the Salesforce Mobile App to access Self Service on Salesforce Mobile App (Self Service mobile app). This topic explains the settings for enabling the Self Service mobile app.
If you have previously enabled Service Desk on Salesforce Mobile App (Service Desk mobile app), which is for staff members, then skip the following steps:
- To enable Salesforce Mobile App for your organization, navigate to the required path:
- For Salesforce Classic, navigate to Setup > Administer > Mobile Administration > Salesforce > Salesforce Settings.
- For Salesforce Lightning, navigate to Setup > Platform Tools > Apps > Mobile Apps > Salesforce > Salesforce Settings.
- On the Salesforce Settings page, under the Mobile Browser App Settings section, select the Enable Salesforce mobile web check box.
- Click Save.
- To add the Self Service mobile app to Salesforce Mobile App, navigate to the required path:
For Salesforce Classic, navigate to Setup > Administer > Mobile Administration > Salesforce Navigation.
For Salesforce Lightning, navigate to Setup > Platform Tools > Apps > Mobile Apps > Salesforce > Salesforce Navigation.

On the Mobile Navigation page, under the Navigation Menu Items section, select Remedyforce Mobile from the Available list and use the right arrow key to move this application to the Selected list.
(Optional) To set Remedyforce Mobile as the landing application after clients log on to the Salesforce Mobile App, move it to the top of the Selected list.
Based on the network bandwidth, when a client logs on for the first time, Remedyforce Mobile might take a little longer than usual to load.
Click Save.
Tip
You can customize the landing page for the Salesforce Mobile App platform to display your custom branding. For more information, see
Salesforce Help
.
Also, the field names specified in the procedure might not match with the latest Salesforce user interface. For more information about enabling the Self Service mobile application, see
Salesforce Help
.
Configuring the Self Service Mobile: Preview tab for system administrators
By default, the system administrators can view the Service Desk mobile app.
Perform the following steps to preview the Self Service mobile app before enabling it for the clients.
| Step | Description | Reference |
|---|---|---|
| 1. | Adding the Self Service Mobile: Preview tab to the Salesforce Mobile App. | |
| 2. | Making the Self Service Mobile: Preview tab visible to the system administrators. |
To enable the Self Service Mobile: Preview tab to the system administrators
You can configure the Self Service Mobile: Preview tab visibility in the profile that is assigned to the system administrators.
Alternatively, you can also create a permission set and assign it to system administrators. In the permission set, select the Available and Visible check boxes for the Self Service Mobile: Preview tab.
- Navigate to the required path:
- For Salesforce Classic, go to Setup > Administer > Manage Users > Profiles.
- For Salesforce Lightning, go to Setup > Administration > Users > Profiles.
- Click Edit for the System Administrator profile and under Custom Tab Settings, for the Self Service Mobile: Preview option, select Default On from the drop-down list.

- Click the System Administrator profile.
- On the Profile Overview page, in the Apps section, click Object Settings.
- In the Object Name column, click Self Service Mobile: Preview.
- On the Self Service Mobile: Preview page, click Edit and from the Tab Settings list, select Default On.
Click Save.
Tip
The following procedure is based on the enhanced profile user interface provided by Salesforce. For more information, see the Salesforce Help
.
Enabling clients to access the Self Service mobile app
For information about previewing the Self Service mobile app before enabling it for clients, see Configuring the Self Service Mobile: Preview tab for administrators.

| Step | Action | Reference |
|---|---|---|
| 1. | Enabling Salesforce Mobile App for clients. | |
| 2. | Making the Remedyforce Mobile tab visible to clients. | |
| 3. | Ensuring that clients can access the Self Service mobile app. | |
| 4. | Informing clients that they must download the Salesforce Mobile App from the Apple App Store or the Google Play Store. |
To enable Salesforce mobile app for clients

- Go to Remedyforce Administration > Manage Users > Add and Edit User+.
- In the Action column, click Edit next to the user name.

- In the General Information section (User Layout) or the User Detail section (Remedyforce User Layout), select the Mobile User check box.
Note that, by default, the Mobile User check box is selected for new users. - Select the API Enabled check box from Remedyforce Administration > Manage Users > Profiles+ for the client's profile.
By default, this check box is selected for the ServiceDesk Client profile. Click Save.
- Repeat step 3 to step 5 for all the clients for whom you want to enable Salesforce Mobile App.
To make the Remedyforce Mobile tab visible to clients

You can configure the Remedyforce Mobile tab visibility in the profile that is assigned to clients. Alternatively, you can create an additional permission set and assign that permission set to the clients.
To update the profile assigned to clients
- Click the Remedyforce Administration tab.
- On the Home page, click the Manage Users tile, and from the menu select Profiles+.
- Click Edit the profile that you have assigned to your clients.

- In the Tab Settings section, select Default On for Remedyforce Mobile.
- Click Save.
To create an additional permission set and assign it to clients
- Click the Remedyforce Administration tab.
- On the Home page, click the Manage Users tile, and from the menu select Edit Permission Sets+.
- Create a new permission set:
- Open the newly created permission set and in the Apps section, click Object Settings.
- Click Remedyforce Mobile and then click Edit.
- In the Tab Settings section, select the Available and Visible check boxes.
- In the Setup tab, navigate to the required path:
- For Salesforce Classic, go to Administer > Manage Users > Users and select the required user.
- For Salesforce Lightning, go to Administration > Users > Users and select the required user.
- Click Permission Set Assignments and then click Edit Assignments.
- Select the permission set that you created in step 3 and then, using the arrow key, add it to Enabled Permission Sets.
- Click Save.
To grant mobile app access to clients

Ensure that you do not select any of following check boxes for the clients:
- The Remedyforce Administrator and ServiceDesk Staff checkboxes under the Salesforce Classic or Salesforce Lightning paths respectively.
- For Salesforce Classic, go to Setup > Administer > Manage Users > Users.
- For Salesforce Lightning, go to Setup > Administration > Users > Users.
- The Modify All Data checkbox under the Salesforce Classic or Salesforce Lightning paths respectively.
- For Salesforce Classic, go to Setup > Administer > Manage Users > Profiles.
- For Salesforce Lightning, go to Setup > Administration > Users > Profiles.
If any of these check boxes are selected, clients cannot access the Self Service mobile app. Instead, they get access to the Service Desk mobile app.

Configuring settings for Self Service on Salesforce mobile app
You can configure additional settings for the Self Service mobile app. Many of these settings are common across the Self Service mobile app and Self Service for the web browser.
The following interactive graphic provides information about configuring settings for Self Service on Salesforce Mobile App (Self Service mobile app).
(The graphic may take a few seconds to load. Also, the graphic is best viewed in the enlarged mode, by clicking the![]() icon.)
icon.)
Configuring field sets for list views and forms
The following table lists the fieldsets that control the fields that are shown in the list views and forms in the Self Service mobile app.
| List view or form | Field Set |
|---|---|
| Tickets and Requests list view | View Tickets and Service Requests (in the Incidents object) |
| Ticket form | Self Service - Ticket Layout (in the Incidents object) |
| Request form | Remedyforce Mobile (Self Service) - Service Request Panel (in the |
| CIs, assets, and services list view | Remedyforce Mobile (Self Service) - List View (in the Base Element object) |
| CIs, assets, and services detail view | Remedyforce Mobile (Self Service) - BaseElement Details (in the Base Element object) |
To configure field sets for list views and forms
- Click the Remedyforce Administration tab.
- On the Home page, click the Manage Objects tile, and from the menu, select Create and Edit Objects.
- On the Create and Edit Objects, from the Objects list, select the appropriate object and then click Field Sets.
- In the Field Sets section, in the Action column for the appropriate field set, click Edit.
- Perform the following actions:

- To add a field, drag the preferred fields from the object palette to the In the Field Set list.
- To remove a field, click the field and then click
 .
.
You can rearrange the fields by dragging them to the appropriate position. The order in which fields are displayed in the list view depends on the order in which the fields are arranged in the In the Field Set list.
- Click Save.
To disable quick submission of tickets for clients
- Click the Remedyforce Administration tab.
- On the Home page, click the Application Settings tile, and from the menu, select Custom Settings.
- In the Action column of Remedyforce Settings, click Manage.
- In the Action column of the Allow submit ticket from Superbox, click Edit.
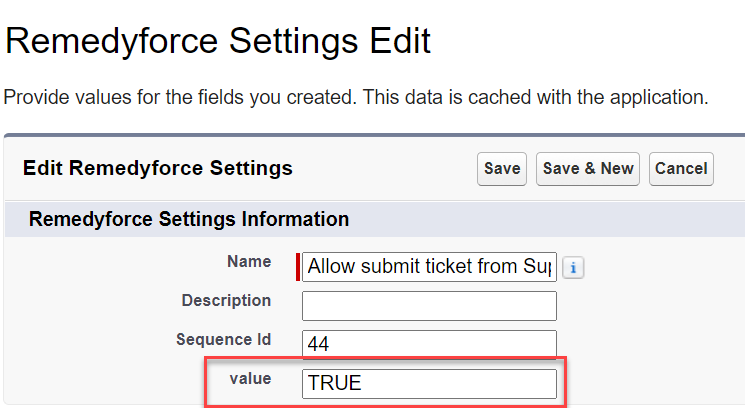
- To disable the quick submission of tickets, in the Value field, type False.
Click Save.
Tip
If the ticket form contains mandatory fields, submitting a ticket from the Superbox automatically opens the Ticket form with the Description and Request for fields populated.
To enable clients to submit tickets and service requests of behalf of other users
- Click the Remedyforce Administration tab.
- On the Home page, click the Configure Self Service tile, and select General Self Service Settings.

- Select from the following options for the Submit Tickets/Requests On Behalf Of setting:
- All users in the organization
- Users who are below in the role hierarchy
- Users who belong to the same account
For more information, see Considerations for Submit Tickets/Requests On Behalf Of settings.
To set picklist values to identify the incident source for Self Service Mobile application
You can identify the incidents created on Self Service Mobile application by adding distinctive values for it in the picklist. If you add only one of the two Mobile values to the picklist, then the updated incident source value will be reflected only for that respective application.
For example, if only Mobile Self Service is added in the picklist value then records created from Self Service Mobile application will have the incident source as Mobile Self Service and records created through Self Service Analyst application will show a blank value in the Incident Source field.
To add picklist values, perform the following steps:
- Click Setup.
- Go to Objects > Incident > Incident Source.
- In the Value section, add the picklist values Mobile Self Service and Mobile.
Click Save.
Tip
For Non-English users, first add the English picklist values and then use the translation workbench for the Mobility source to translate to the required native language.
Comments
Log in or register to comment.