Mapping custom fields for integrations by using BMC Helix iPaaS, powered by Jitterbit
As an administrator, use BMC Helix iPaaS, powered by Jitterbit, to integrate BMC Helix ITSM with vendor (third-party) applications. Use the out-of-the-box integration templates that are available for supported integrations and deploy them to your BMC Helix iPaaS environment. The integration templates contain predefined project variables that you update based on your system details. The project variables help you establish a connection and data transfer between BMC Helix ITSM and a third-party application.
Out of the box, some fields between BMC Helix ITSM and third-party applications are mapped so that you can start integrating the applications. However, you can map custom fields between BMC Helix ITSM and a third-party application.
The following image shows the steps to map a custom field in third-party application with a BMC Helix ITSM field:

The following image shows the steps to map a custom field in BMC Helix ITSM with a field in the third-party application:

Mapping a custom field from a vendor (third-party) application to BMC Helix ITSM
Perform the following tasks to map a custom field from a third-party application to a BMC Helix ITSM field. Also, in the third-party application field mapping for the required BMC Helix ITSM ticket type, update the fields in the Remedy to Vendor Sync Fields or Vendor to Remedy Sync Fields section. This ensures that the mapped fields are updated when you update tickets.
Task 1: To add a custom field in a third-party application
In your third-party application, add the required type of custom field.
To learn about the steps to add a custom field, refer to the documentation of the third-party application that you use.
Task 2: To add a corresponding field in BMC Helix Multi-Cloud Broker record definition
After you add a custom field in your third-party application, add a corresponding field in a BMC Helix Multi-Cloud Broker record definition.
- Log in to BMC Helix Innovation Studio.
- On the Workspace tab, open Ticket Brokering Library.
- On the Records tab, open the record with which you want to integrate your third-party application ticket.
For example, open the Incident record. - Click New field and complete the fields.
To learn more about completing the fields, see Creating or modifying regular record definitions .
.
Task 3: To map a custom field in a third-party application with a BMC Helix Multi-Cloud Broker field
After you add a field in BMC Helix Multi-Cloud Broker that corresponds to the custom field in your third-party application, you must map the fields with each other to ensure that the field data is passed from the third-party application to BMC Helix Multi-Cloud Broker.
- Log in to BMC Helix iPaaS and navigate to Cloud Studio.
- Select your organization and the environment in which you have imported the integration template.
- Open the required project.
For example, open the Sync BMC Helix ITSM incident and Atlassian Jira issue project. - On the Workflows tab, open the workflow for ticket creation from a third-party application to BMC Helix Multi-Cloud Broker.
For example, open Jira Issue to MCSM Incident. - Under the main workflow, open the workflow that creates a record in BMC Helix Multi-Cloud Broker.
For example, under the Jira Issue to MCSM Incident main workflow, open Create MCSM Incident. - Select the transformation that creates a BMC Helix Multi-Cloud Broker record from a third-party application ticket and click View/Edit.
For example, in the Create MCSM Incident workflow, click the Jira Issue to Incident Create transformation. - In the Target section, click the settings icon
 and then, click Refresh Schema, as shown in the following image:
This action fetches the custom fields from the BMC Helix Multi-Cloud Broker record definition. - In the target schema, open the BMC Helix Multi-Cloud Broker custom field with which you want to map the custom field in Jira.
For example, you open MCBIncCustomField. Depending on whether the source and target applications use connectors or JSON objects, perform one of the following steps:
- If the source application uses webhooks to pass information, perform the following steps to map the custom fields:
To fetch the custom field data from the webhook request object for the third-party application, click the angle brackets icon <> and add a script. The webhook request object name is jsonObj.
For example, add the following script to fetch the custom field from Jira:$jsonObj["issue"]["fields"]["customfield_10190"]
- If the source and target applications use connectors to pass information, perform the following steps to map the custom fields:
- Refresh the source and target schemas to update them with new custom fields.
- From the source section, drag the custom field to a field in the target section.
- If the source application uses webhooks to pass information, perform the following steps to map the custom fields:
Task 4: To create a field in BMC Helix ITSM
After you map the custom field in third-party application with a BMC Helix Multi-Cloud Broker field, make sure that you also create a custom field in BMC Helix ITSM.
For steps to create the field, see
Creating and managing fields
.
Task 5: To map a custom field in BMC Helix Multi-Cloud Broker with BMC Helix ITSM
After you create a field in BMC Helix ITSM, you map it with the custom field that you created in BMC Helix Multi-Cloud Broker to ensure that the field data is passed from BMC Helix Multi-Cloud Broker to BMC Helix ITSM.
- Log in to BMC Helix Innovation Studio.
- On the Workspace tab, click Ticket Brokering Library.
- On the Processes tab, click Remedy ITSM Operations.
- On the process designer canvas, select the element to create an ITSM ticket for the required ticket type.
For example, select Create ITSM Incident. - In Properties, on the Elements tab, click Add/Remove Input Map Fields and add the required custom field from the available list.
For example, add the CustomLabel field. - Click Edit next to the custom field that you added.
- On the Edit Expression dialog box, under Available Values, expand the ticket type for which you are mapping the custom field.
For example, expand Incident Record. - From the ticket type that you expanded, add the custom field.
For example, from Incident Record, add CustomLabel. - Click OK.
- On the process designer, click Save.
You can perform the same steps for updating the BMC Helix ITSM tickets. In step 4, select an element that updates a BMC Helix ITSM ticket, such as Update ITSM Incident.
The custom field in your third-party application is mapped with the custom field in BMC Helix ITSM.
Mapping a custom field from BMC Helix ITSM to a vendor (third-party) application
Perform the following tasks to map a custom field from BMC Helix ITSM with a field in a third-party application.
Task 1: To create a custom field in BMC Helix ITSM
First, you must create a custom field in BMC Helix ITSM. For steps to create the field, see
Creating and managing fields
.
Task 2: To create a corresponding field in BMC Helix Multi-Cloud Broker record definition
After you create a custom field in BMC Helix ITSM, you then create a corresponding field in a BMC Helix Multi-Cloud Broker record definition.
- Log in to BMC Helix Innovation Studio.
- On the Workspace tab, open Ticket Brokering Library.
- On the Records tab, open the record with which you want to integrate your third-party application ticket.
For example, open the Incident record. - Click New field and complete the fields.
To learn more about completing the fields, see Creating or modifying regular record definitions
.
Task 3: To map a custom field in BMC Helix ITSM with a BMC Helix Multi-Cloud Broker field
After you create a field in a BMC Helix Multi-Cloud Broker record definition for a custom field in BMC Helix ITSM, you map the fields with each other to ensure that data is passed from the BMC Helix ITSM field to the BMC Helix Multi-Cloud Broker field.
- Log in to BMC Helix Innovation Studio.
- On the Workspace tab, click Ticket Brokering Library.
- On the Processes tab, select the following operations based on the ticket type and then click Edit:
- Incident Operations
- Change Operations
- Known Error Operations
- Problem Operations
- Work Order Operations
- On the process designer canvas, select the element to create a ticket for the required ticket type.
For example, select Create Incident. - In Properties, on the Elements tab, click Add/Remove Input Map Fields and add the required custom field from the available list.
For example, add the CustomITSMLabel field. - Click Edit next to the custom field that you added.
The Edit Expression dialog box is displayed. - On the Edit Expression dialog box, under Available Values, expand the ticket type for which you are mapping the custom field.
For example, expand Incident Record. - From the ticket type that you expanded, add the custom field.
For example, from Incident Record, add CustomITSMLabel. - Click OK.
- On the process designer, click Save.
You can perform the same steps for the updating the third-party application tickets. To do this, in step 4, select an element that updates a ticket. For example, select Update Incident Values.
Task 4: To create a custom field in a third-party application
After you map the fields from BMC Helix ITSM and BMC Helix Multi-Cloud Broker, make sure that you create a custom field in your third-party application.
To learn about the steps to add a custom field, refer the documentation of the third-party application that you use.
Task 5: To map a custom field in BMC Helix Multi-Cloud Broker with a third-party application field
- Log in to BMC Helix iPaaS and navigate to Cloud Studio.
- Select your organization and environment in which you have imported the integration template.
- Open the required project.
For example, open Sync BMC Helix ITSM incident and Atlassian Jira issue project. - On the Workflows tab, open the workflow that creates a ticket from BMC Helix Multi-Cloud Broker to the third-party application.
For example, open MCSM Incident to Jira issue. - Under the main workflow, open the workflow that creates a ticket in the third-party application.
For example, under the MCSM Incident to Jira issue main workflow, open Create Jira Issue. - Select the transformation that creates a third-party application ticket from the BMC Helix Multi-Cloud Broker record and click View/Edit.
For example, in Create Jira Issue, click the Incident to Jira Issue Create transformation. - To refresh the schemas, in the Source and Target sections, click the settings icon .
After the schemas are refreshed, the custom fields are displayed in both the sections. - From the Source section, drag the required custom field to the custom field in the Target section, as shown in the following image:
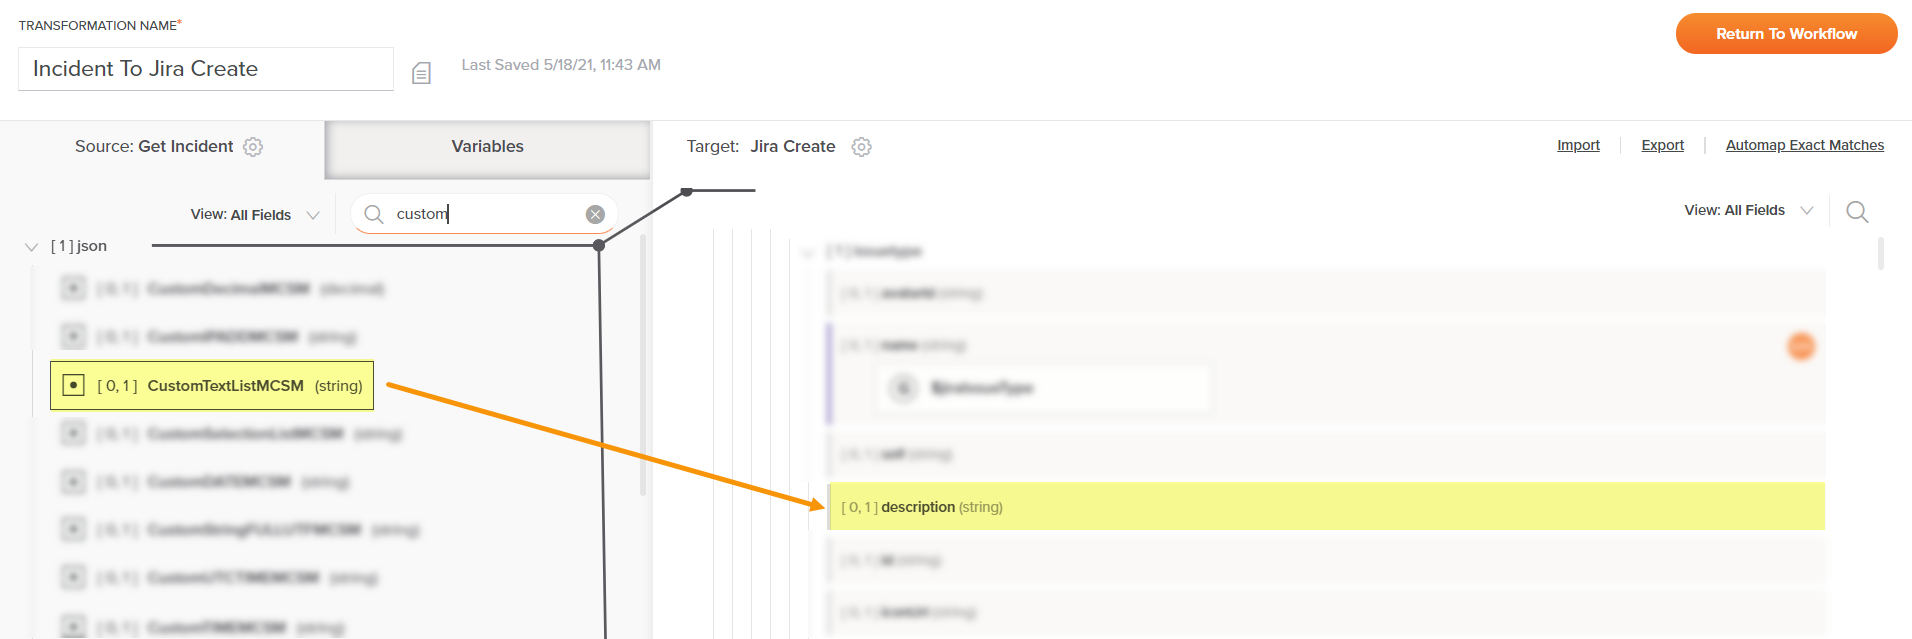
The custom field in BMC Helix ITSM is mapped with the custom field in your third-party application.
Comments
Log in or register to comment.