This walkthrough is an exercise that you can perform to understand how you can leverage the BMC Release Process Management (RPM) and BMC Release Package and Deployment (RPD) integration to automate your application release workflow. The steps include the building blocks to configuring an application topology, defining the release processes, and automating continuous deployments of the application. You will complete the tasks that apply to the daily responsibilities of both administrator and regular users.
This example assumes that you are developing the JPetStore application and using Jenkins for continuous deployments. JPetStore uses the MySQL database and is hosted on the Apache Tomcat server with three environments:
Testing (JP-QA-1)
Development (JP-DEV-1)
Production (JP-PROD-1)
You are using one localhost server running RedHat 7 and the following components installed on it:
ACL (Access Control Lists). Used to specify which hostnames or IP addresses have access to a target machine via the BMC RSCD client.
How do I define an application topology in RPD
Application topology encompasses such objects as channel templates, channels, environments, and routes. This task assumes that you will configure a topology for a sample JPetStore application.
Log in to RPD as an administrator user.
Add a server
In this walkthrough, you are using only one server (localhost).
#
Step
Example screen (click the image to expand it)
Add a server on which all the required components for the walkthrough are installed.
In the RPD console, go to System > Servers, and then, in the lower-right corner, click New Server.
In the Hostname box, enter localhost.
Skip the Create Channel Template, Zone, and Roles boxes.
In the Agent list, select nsh.
In the Agent Server box, enter localhost.
In the Remote Platform list, select Unix, and then click Create.
Add channel templates
Channel templates define the basic building blocks of the application. For JPetStore, these are the MySQL database and Apache Tomcat server. You can add properties to the channel template that later will be inherited by the channels created from the appropriate channel template.
#
Step
Example screen (click the image to expand it)
1
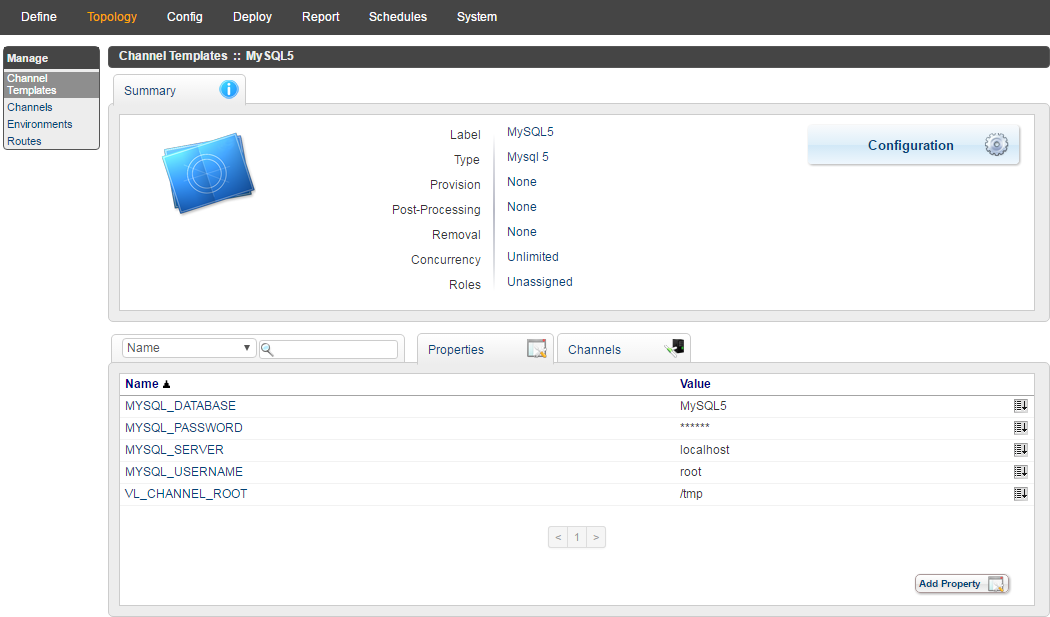
Create a channel template for the MySQL database.
In the RPD console, go to Topology > Channel Templates, and then, in the lower-right corner, click New Channel Template.
In the Label box, enter MySQL5.
In the Type list, select Mysql5, and then click Create.
2
Add the properties and their values that will be used to access the database.
On the MySQL5 channel template details page, go to the Properties tab, and then, in the lower-right corner, click Add Property.
In the Name column, enter the property name.
Note: Enter the exact property names as provided in the tip below. These properties are used by the MySQL actions in RPD.
In the Value column, enter the appropriate value of the property, and then click .
Tip: Add the following properties for the MySQL5 database:
MYSQL_DATABASE: Name of the database that is used by the application (for example, MySQL5)
MYSQL_PASSWORD: Password to access the database
MYSQL_SERVER: Server that hosts the database (for example, localhost)
MYSQL_USERNAME: Database user name (for example, root)
VL_CHANNEL_ROOT: Directory level for channel access (for example, /tmp)
(Optional) On the Channels tab, you can view channels that use the appropriate channel template.
3
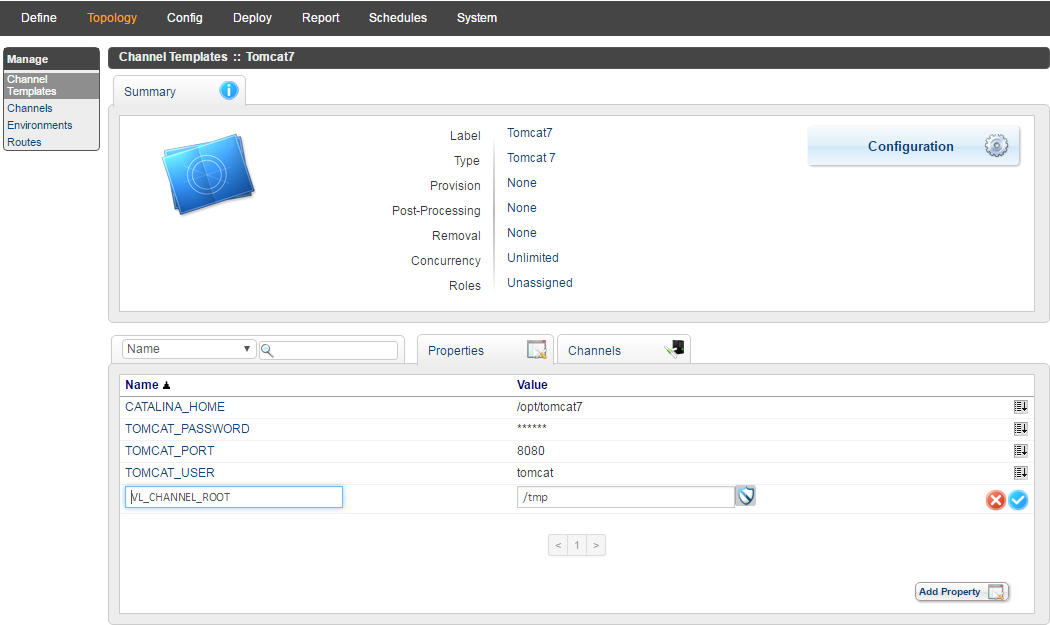
Create a channel template for the Tomcat server (Label: Tomcat7, Type: Tomcat 7).
4
Add properties with the values that will be used in the Tomcat7 channel template.
On the Tomcat7 channel template details page, go to the Properties tab, and then, in the lower-right corner, click Add Property.
In the Name column, enter the property name.
Note: Enter the exact property names as provided in the tip below. These properties are used by the Tomcat actions in RPD.
In the Value column, enter the appropriate value of the property, and then click .
Tip: Add the following properties for the Tomcat7 server:
CATALINA_HOME: Tomcat location (for example, /opt/tomcat7)
TOMCAT_PASSWORD: Password to access the Tomcat server
TOMCAT_PORT: Port that is used to access the Tomcat server (for example, 8080)
TOMCAT_USER: Tomcat user name (for example, tomcat)
VL_CHANNEL_ROOT: Directory level for channel access (for example, /tmp)
(Optional) On the Channels tab, you can view channels that use the appropriate channel template.
Using RPD channels, you can outline the topology of the JPetStore application. In this example, you will need channels for each application component (database and web server) per each environment.
#
Step
Example screen (click the image to expand it)
1
Create the JP-DEV-APP-1 channel that will be used for the Tomcat in the development environment.
In the RPD console, go to Topology > Channels, and then, in the lower-right corner, click New Channel.
In the Label box, enter JP-DEV-APP-1.
In the Channel Template list, select Tomcat7.
In the Available Servers section, select localhost, and then click Create.
2
After the channel is created, you must override some of the properties that are inherited by the channel from the channel template.
Click the JP-DEV-APP-1 channel.
In the Channel Template section, next to the CATALINE_HOME property, point to , and then click Override.
In the Channel section, in the Value column for the CATALINA_HOME property, enter the location of the Tomcat DEV environment (for example, /opt/tomcat7/DEV), and then click .
Override the value for the TOMCAT_PORT property from the default 8080 to 9180 (port number used for the Tomcat development environment).
3
Repeat steps 1–2 to create the JP-QA-APP-1 andJP-PROD-APP-1channels from the Tomcat7 channel template.
Override channel template properties as follows:
For the JP-QA-APP-1 channel:
CATALINA_HOME: /opt/tomcat7/PROD
TOMCAT_PORT: 9280
For the JP-PROD-APP-1 channel:
CATALINA_HOME: /opt/tomcat7/PROD
TOMCAT_PORT: 9380
4
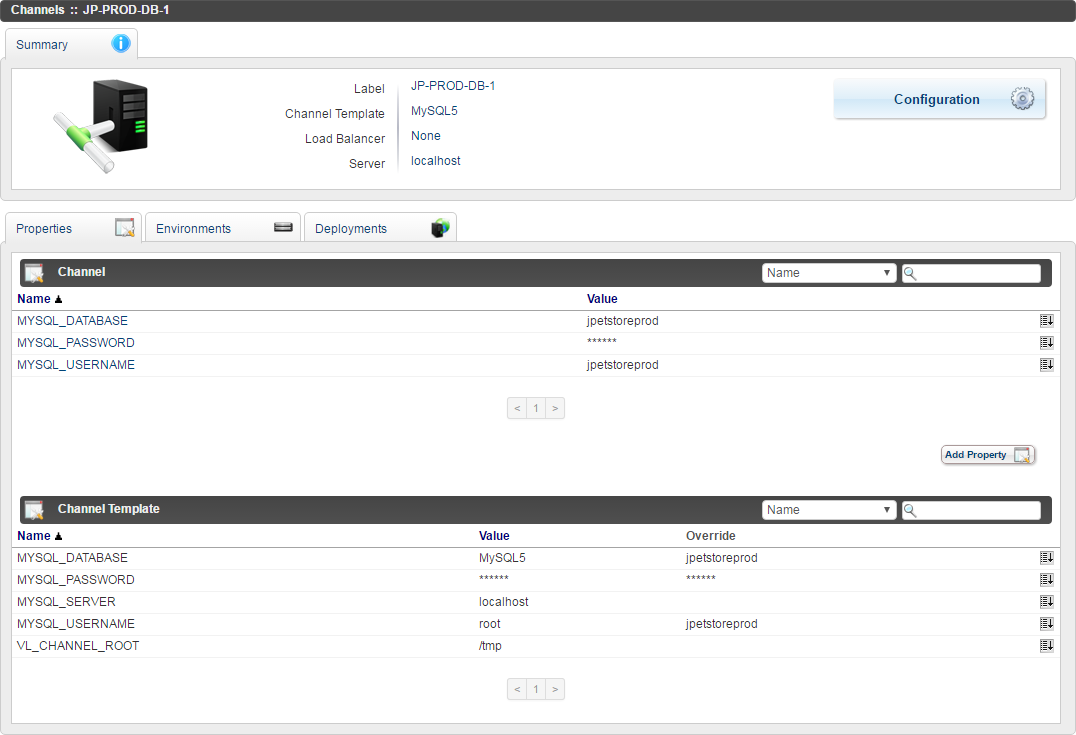
Create the JP-DEV-DB-1 channel that will be used for the database in the development environment.
In the RPD console, go to Topology > Channels, and then, in the lower-right corner, click New Channel.
In the Label box, enter JP-DEV-DB-1.
In the Channel Template list, select MySQL5.
In the Available Servers section, select localhost, and then click Create.
5
Override the required properties for the JP-DEV-DB-1 channel.
Click the JP-DEV-DB-1 channel.
In the Channel Template section, next to the MYSQL_DATABASE property, point to , and then click Override.
In the Channel section, in the Value column for the MYSQL_DATABASE property, enter the name of the database for the DEV environment (for example, jpetstoredev), and then click .
Override the MYSQL_PASSWORD property with the value used by your database.
Override the MYSQL_USERNAME property with the value used by your database (for example, from root to jpetstoredev).
6
Repeat steps 4–5 to create the JP-QA-DB-1 and JP-PROD-DB-1 channels from the MySQL5 channel template.
This walkthrough assumes that you are using three environments for development, testing, and production.
#
Step
Example screen (click the image to expand it)
1
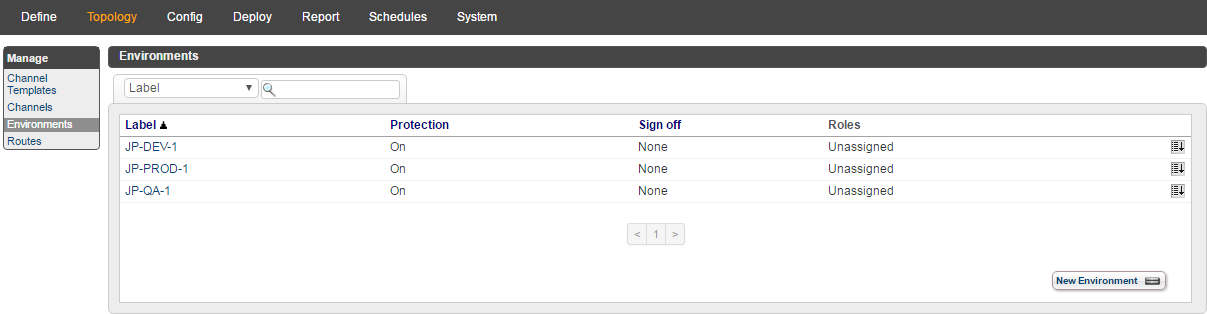
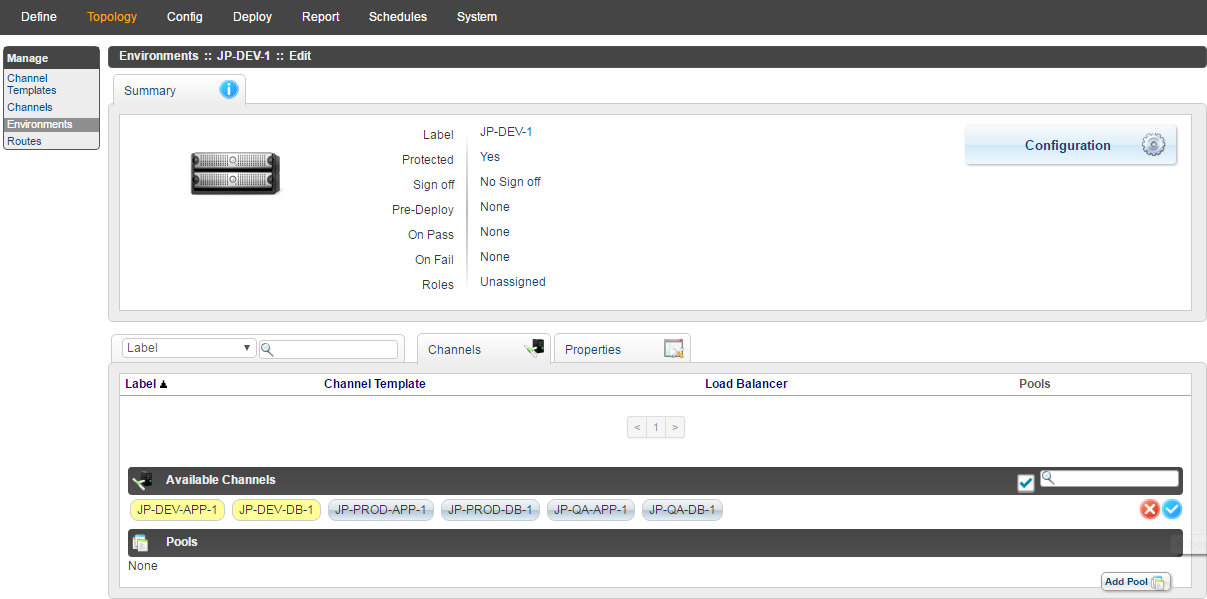
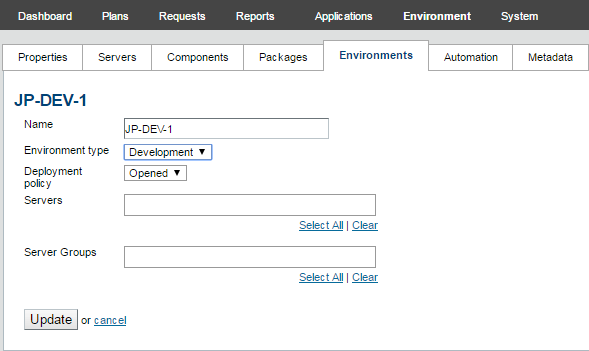
Create the JP-DEV-1 environment.
In the RPD console, go to Topology > Environments, and then, in the lower-right corner, click New Environment.
In the Label box, enter JP-DEV-1, and then click Create.
In the Available channels section, select JP-DEV-APP-1 and JP-DEV-DB-1, and then click .
2
Repeat step 1 to create two more environments:
JP-QA-1 with the JP-QA-APP-1 and JP-QA-DB-1 channels
JP-PROD-1 with the JP-PROD-APP-1 and JP-PROD-DB-1 channels
Create a route
You create a route to describe the progression of a release through various stages. It enforces the environments through which an application build must go before it can be promoted to production. In this example, for a smoother intergration of RPD with RPM, you will create a route with an Open type. The final progression of a release through stages will be defined later in this walkthrough using RPM.
#
Step
Example screen (click the image to expand it)
Create the JPetStore-Open route.
In the RPD console, go to Topology > Routes, and then, in the lower-right corner, click New Route.
In the Name box, enter JPetStore-Open, and then click Create.
Drag the Available Environments to the Environments section in the required order.
The next stage of this walkthrough shows you how to configure the JPetStore application in RPM.
Log in to RPM as an administrator user.
Adjust initial settings
First, you must enable certain settings in RPM.
#
Step
Example screen (click the image to expand it)
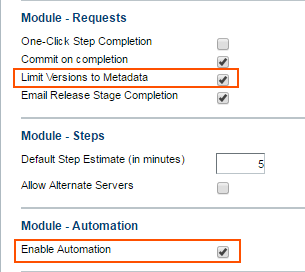
In the RPM console, go to System > Settings > General.
In the Module - Requests section, select the Limit Version to Metadata check box.
In the Module - Automation section, select the Enable Automation check box.
Click Save.
Create users
You will create three groups of users in RPM.
#
Step
Example screen (click the image to expand it)
1
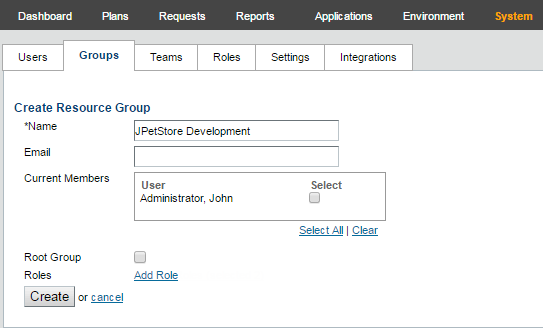
Create three groups of users JPetStore Development, JPetStore Tester, and JPetStore Operator that will be assigned to the application.
In the RPM console, go to System > Groups and then, on the right side, click Create Group.
In the Name box, enter JPetStore Development.
Note: User roles will be added later in this walkthrough in the Update Roles section.
Click Create.
Repeat steps 1.1–1.3 to create the JPetStore Tester and JPetStore Operator groups.
2
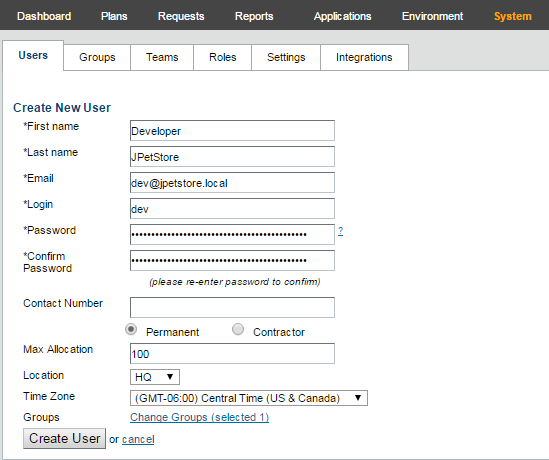
Create three users: Developer, Tester, and Operator, and then add them to the appropriate groups.
Go to the Users subtab, and then, on the right side, click Add New User.
Enter the first and last names, email address, login name, and password for the user.
In Groups, click Add Group, and then select the appropriate group. For Developer: JPetStore Development For Tester: JPetStore Tester For Operator: JPetStore Operator
Click Create User.
3
Add a group to the team.
Go to the Teams subtab, and then, on the right side, click Create Team.
In the Team Name box, enter JPetStore.
On the Add Group to Team bottom tab, select the JPetStore Development, JPetStore Tester, and JPetStore Operator groups.
In this section, you will update the role permissions to add support for the RLM Requester UI objects.
#
Step
Example screen (click the image to expand it)
1
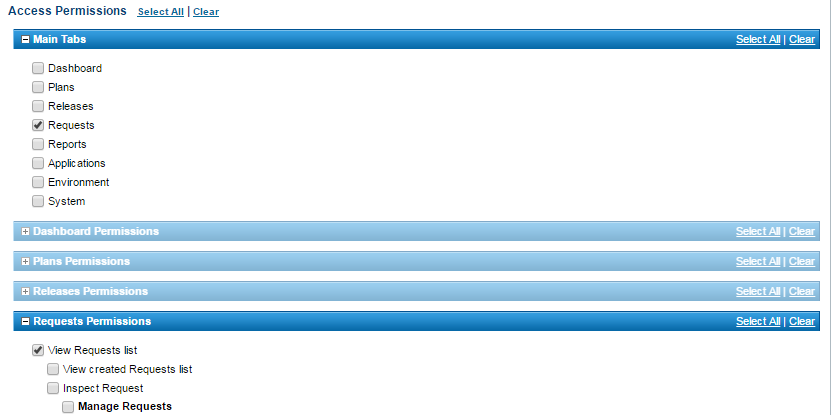
Create a new Read Only role that allows only to view requests list on the RLM Requester UI.
In the RPM console, go to System > Roles, and then click Create Role.
In the Name box, enter Read Only.
In the Access Permissions section, clear all permissions, and then add only the following:
Expand Main Tabs and select Requests.
Expand Request Permissions and clear View created Requests list and Inspect Request. Therefore, only View Requests list is selected.(see the example screen).
Click Create.
2
Edit permissions for the Requestor role.
In System > Roles, click Requestor.
In the Access Permissions section, do the following:
To grant full permissions for the releases, do the following:
Expand Main Tabs, and then select Releases.
Expand Releases Permissions, and then select View Releases.
To allow viewing version tags, do the following:
Expand Main Tabs, and then select Environment.
Expand Requests Permissions, and then select Start Request and Start Automatically.
Expand Environment Permissions, click Clear, and then select only View Version Tag list. Note: Make sure you clear the Manage Version Tags permission.
Click Update.
3
Assign roles to groups. Thus, users of the group will inherit the permissions of their correspondent group.
Go to System > Groups, and then click the JPetStore Development group.
Click Add Role.
In the Select Roles dialog, hold down Shift while selecting the Read Only and Requestor roles, and then click .
Click Select Roles, and then click Update.
Add the same roles to the JPetStore QA group.
Repeat steps 3.1–3.4 for the JPetStore Operations group to add the Executor and Requestor roles.
4
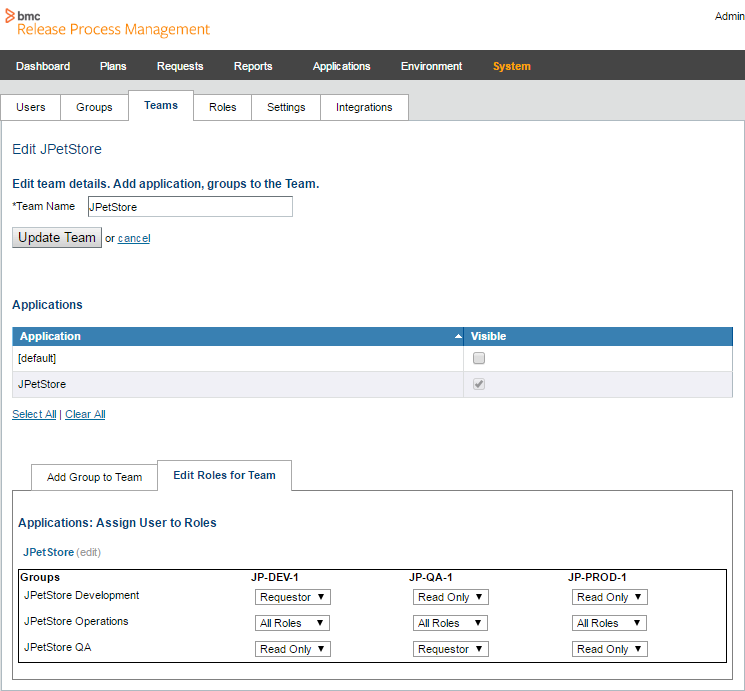
Now you must assign roles for the groups per different environment within the team.
Go to System > Teams, and then click the JPetStore team.
Go to the Edit Roles for Team tab, and then click edit.
Next to the JPetStore Development group, select the following roles:
For the JP-DEV-1 environment, select Requestor.
For the JP-QA-1 environment, select Read Only.
For the JP-PROD-1 environment, select Read Only.
Next to the JPetStore Operations group, select All Roles for all environments. Note: All Roles means that both Executor and Requestor roles are assigned.
Next to the JPetStore QA group, select the following roles:
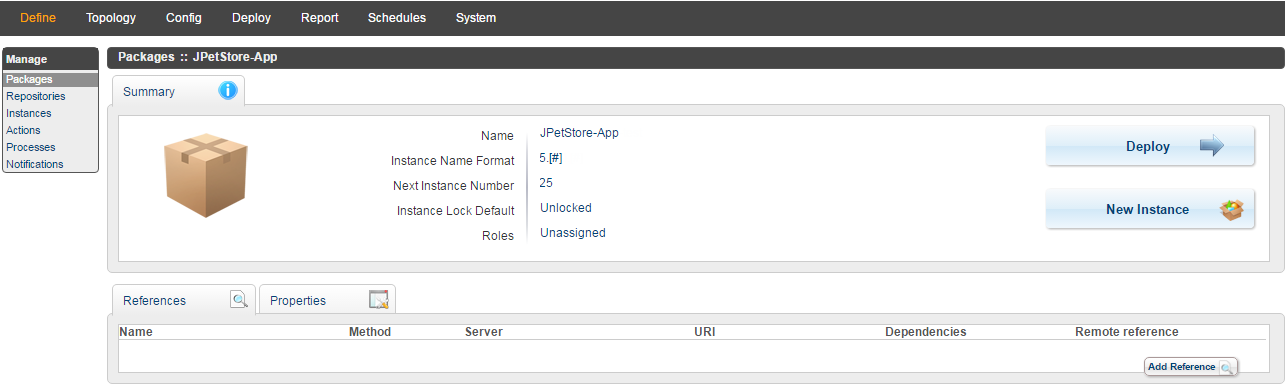
After you defined the application topology in RPD, as an administrator user, you must create a package for the JPetStore application. A package defines the files of which the application consists and which you will later deploy into the environments. The package for the JPetStore application will include a version tag analyzer with which you can deploy the specified package instance from RPD using RPM.
Create a package
A package represents a deployable application or content. It contains URIs, properties, and configuration data that help define how the application is constructed and deployed.
#
Step
Example screen (click the image to expand it)
1
Create the JPetStore-App package.
In the RPD console, go to Define > Packages, and then, in the lower-right corner, click New Package.
In the Name box, enter JPetStore-App, and then click Create.
In the Instance Name Format box, specify the versioning format for package instances (for example, 5.[#]).
In the Next Instance Number box, enter the number from which the instance versioning will start (for example, 25).
2
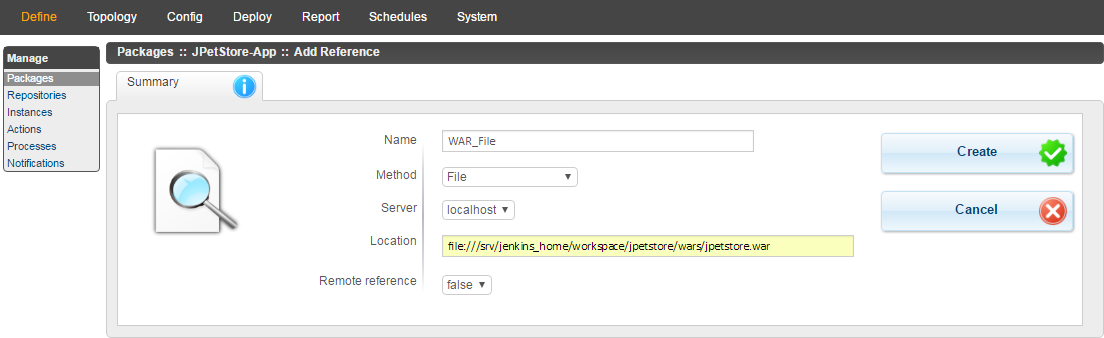
Add a reference to the WAR file on Jenkins.
In the References section, click Add Reference.
In the Name box, enter WAR_File.
To specify the method for collecting the reference files, in the Method list, select File.
In the Server box, enter localhost.
In the Location box, enter the path to the WAR file of the application (for example, file:///srv/jenkins_home/workspace/jpetstore/ wars/jpetstore.war), and then click Create.
Create a package instance
A package instance is a local copy of the resources that the package references. In this step, you will test whether everything is configured correctly and whether the instance is created successfully.
#
Step
Example screen (click the image to expand it)
1
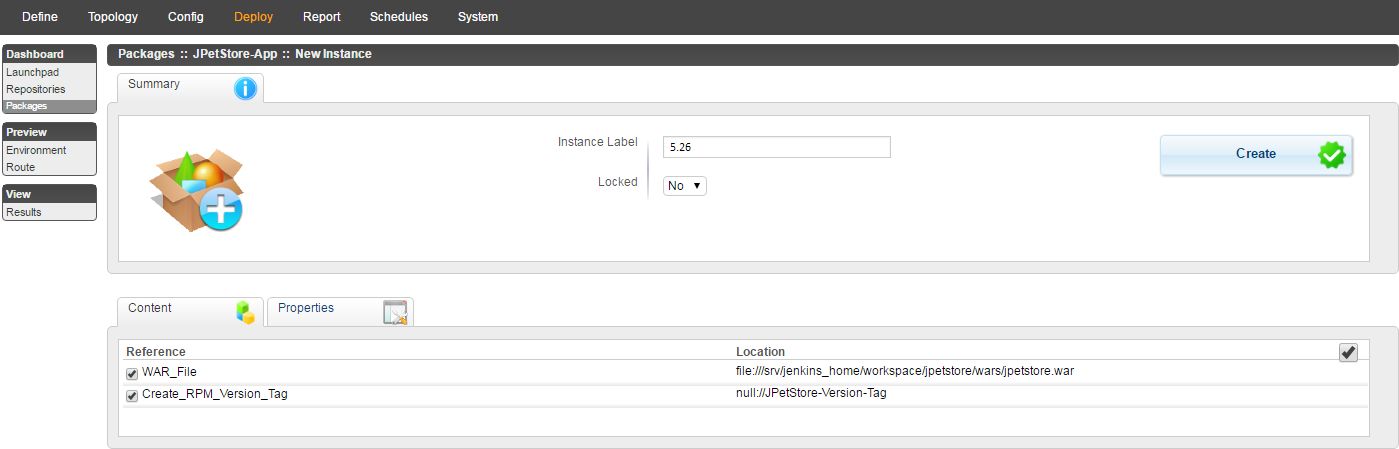
Create an instance of the JPetStore-App package.
In the RPD console, go to Define > Packages, and then click the JPetStore-App package.
Click New Instance, and then click Create.
2
The JPetStore-App:5.25 instance is created successfully.
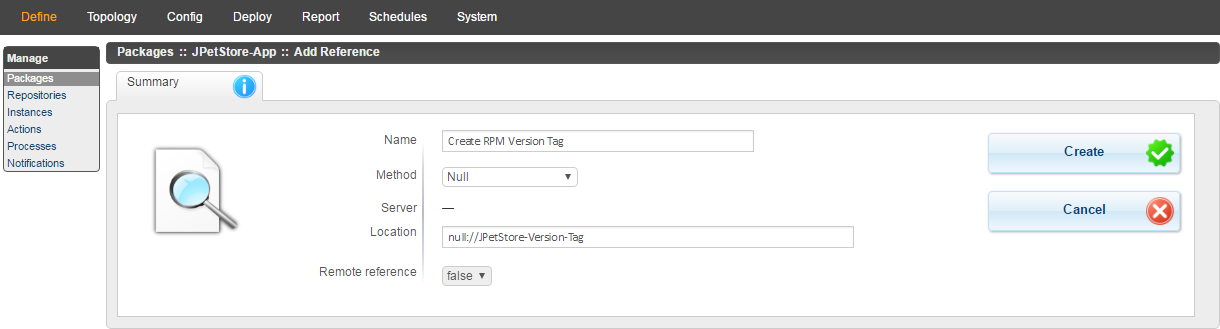
In the Location box, enter a placeholder text for associating RPM Version Tag (for example, null://JPetStore-Version-Tag).
Click Create.
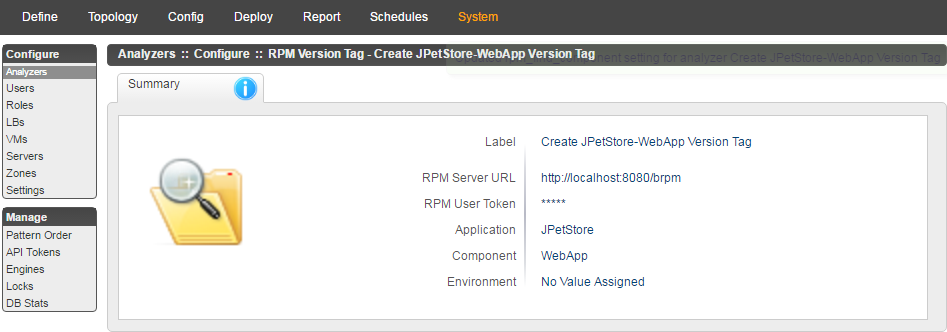
2
Add the analyzer to the reference.
Go to the Analyzers tab, and then click Add Analyzer.
In the Type list, select Create JPetStore-WebApp Version Tag, and then click .
3
Test the creation of the package instance with the RPM version tag analyzer.
Go to Define > Packages.
Click the JPetStore-App package, click New Instance, and then click Create.
4
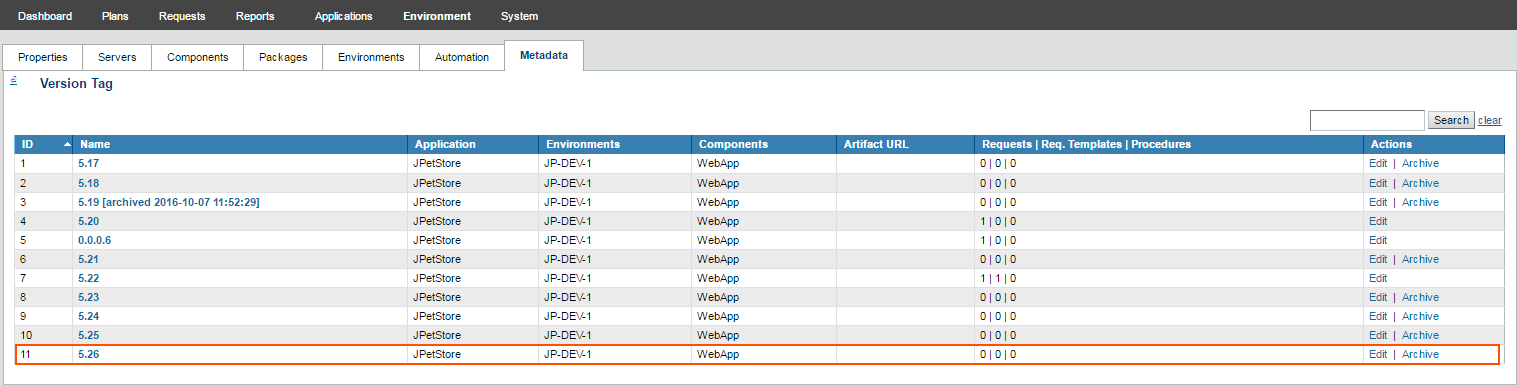
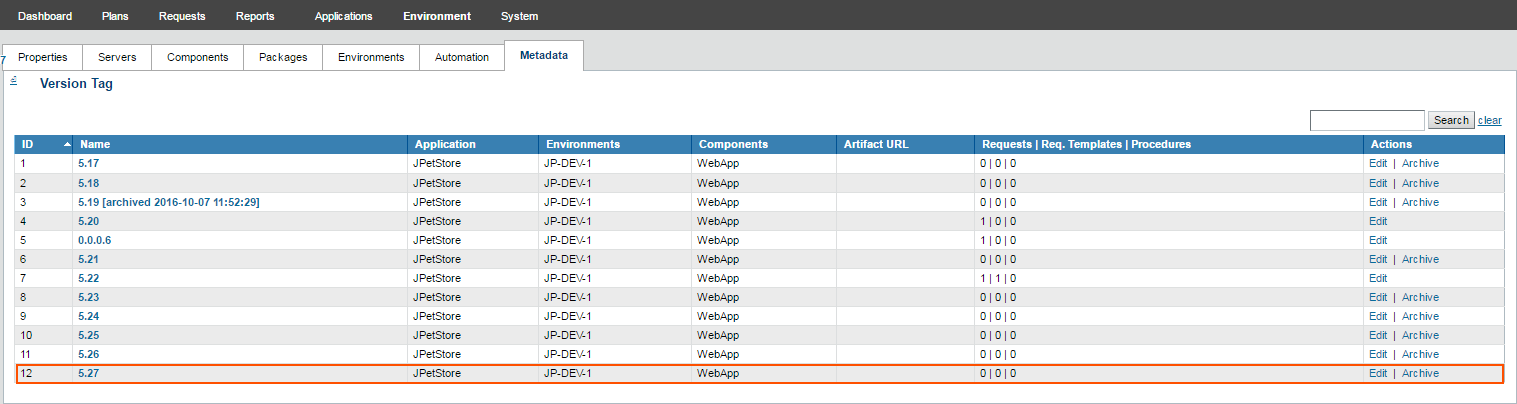
To verify that the corresponding version tag was created successfully, in the RPM console, go to Environment > Metadata, and then click Manage Version Tags.
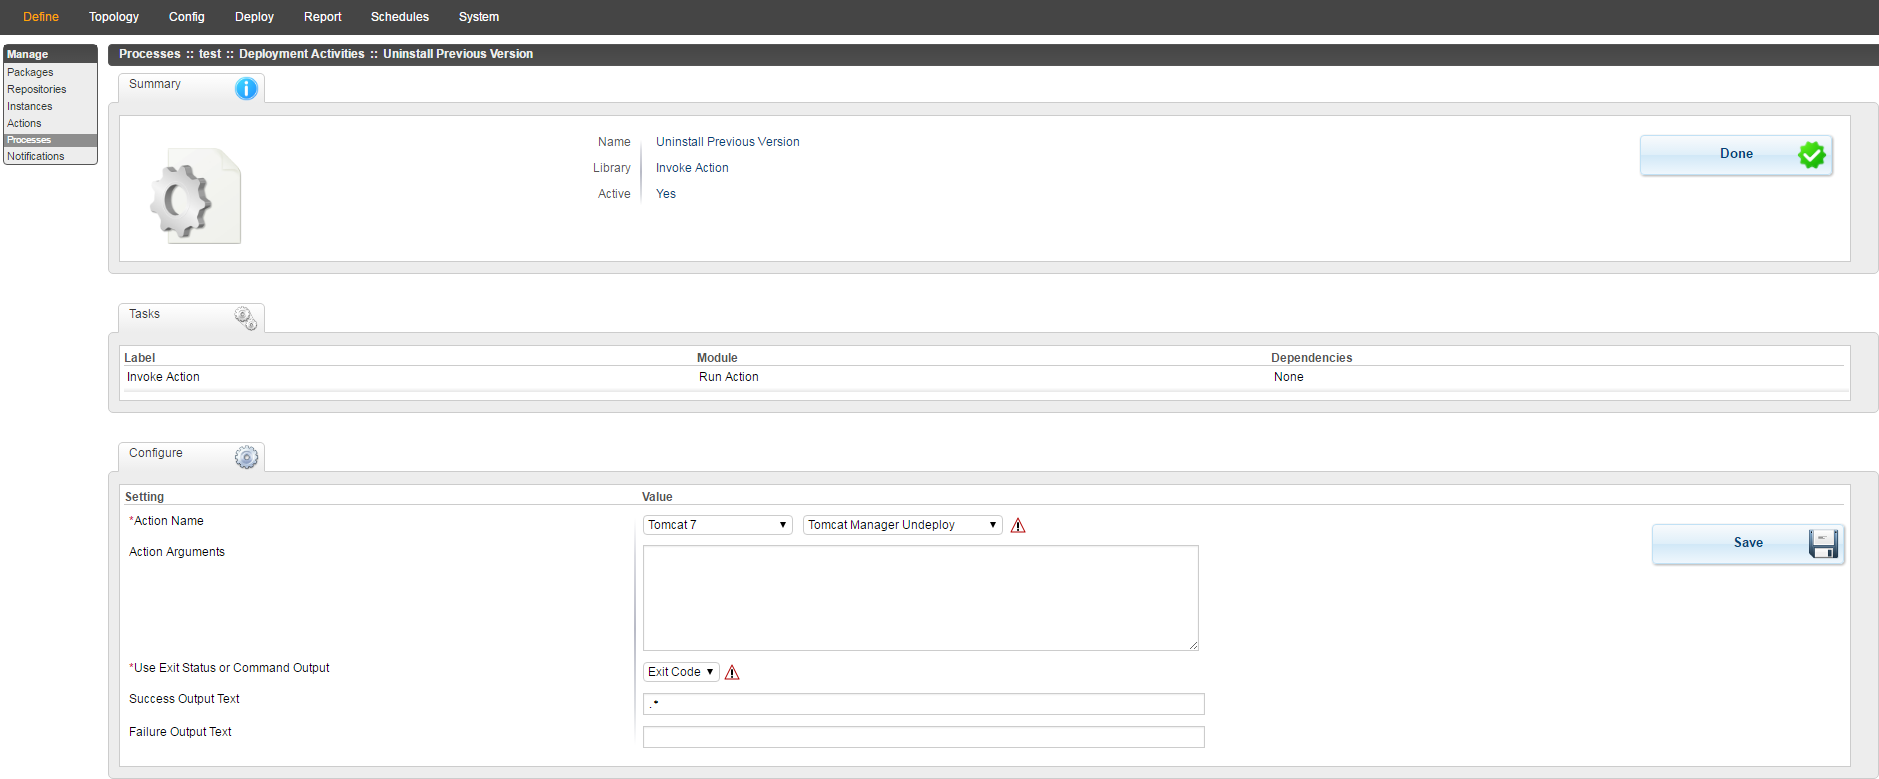
Processes in RPD define the activities that you need to perform with the content, namely a package instance. As an administrator user, you will create a deployment process that copies the WAR file to the target server (localhost), uninstalls the previous version, and deploys a new version of JPetStore. In addition, the deployment of a new version will be dependent on the copy and uninstall activities that can be performed in parallel in this walkthrough. The process is initiated by a trigger.
#
Step
Example screen (click the image to expand it)
1
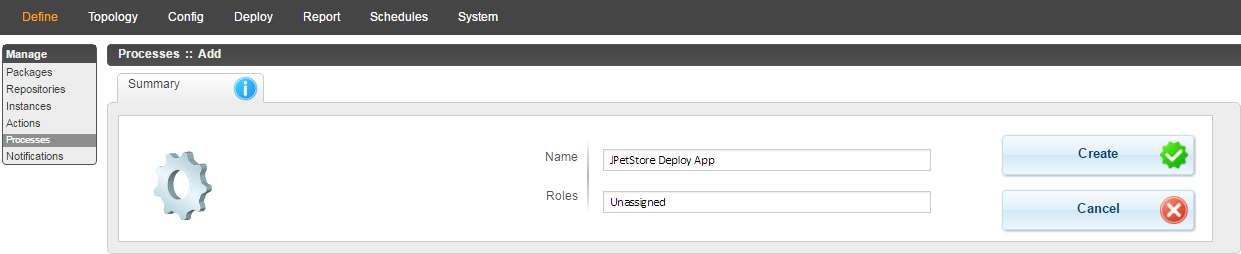
Create the deployment process and add the required activities to it.
In the RPD console, go to Define > Processes.
On the Content tab, in the lower-right corner, click New Process.
In the Name box, enter JPetStore Deploy App, and then click Create.
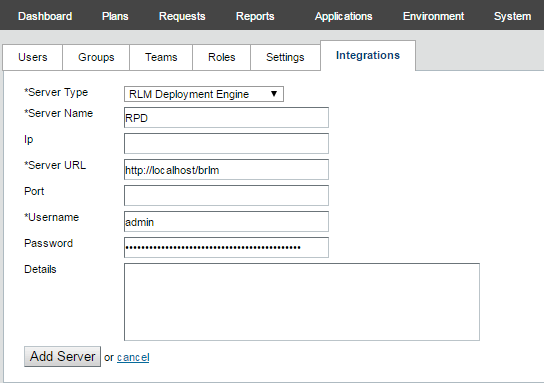
You can integrate Jenkins with RPD using BMC Release Package and Deployment plugin, which adds two build and post-build actions to your Jenkins build configuration.
#
Step
Example screen (click the image to expand it)
1
Install the plugin.
Log in to the Jenkins server.
Go to Manage Jenkins > Manage Plugins.
On the Available tab, enter RPD in the Search box.
Select BMC Release Package and Deployment plugin, and then click Install without restart.
After the plugin is installed, select Restart Jenkins when installation is complete and no jobs are running.
Wait while Jenkins restarts.
2
Test the connection.
After restart is complete, log in to the Jenkins server again.
Go to Manage Jenkins > Configure system.
In the BMC Release Package and Deployment Configuration section, click Add, and provide the following information:
Select Set as Default Server Profile.
In the Server Profile Name box, enter Production RPD Instance.
In the RPD Server URL box, enter the URL that identifies the RPD Server on which the processing will occur (for example, http://54.196.76.39/brlm).
In the RPD User Token box, enter the user token that will be used to authenticate against RPD.
(Optional) To verify connection to the RPD server, click Test Connection.
Click Save.
3
Add the RPD create package instance action to the jpetstore job and verify that the job successfully creates a new RPD package instance.
In the Jenkins console, click Jenkins in the upper-left corner.
Click the jpetstore job, and then click Configure.
Go to the Post-build Actions section, and then, in the Add post-build action list, select RPD Create Instance.
In the Package Name box, enter JPetStore-App.
In the Instance Name box, enter 5.${BUILD_NUMBER}.
Click Save.
4
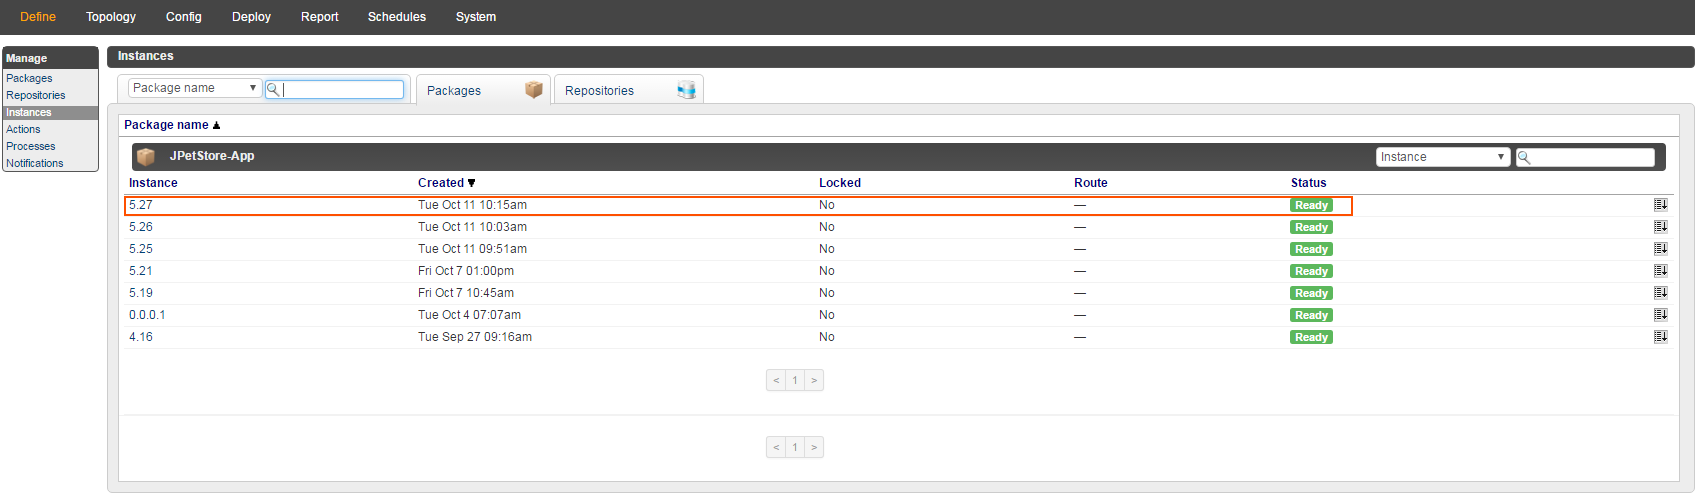
Test if the plugin is configured correctly.
To build a new instance, click .
In the RPD console, go to Define > Instances to verify that a new 5.27 instance is created.
5
Verify the version tag has been created.
In the RPM console, go to Environment > Metadata, and then click Manage Version Tags.
Verify that the 5.27 version tag is successfully created.
As an administrator user, you proceed to creating a release for the JPetStore application.
Create a request template
In RPM, request template is used as a model for creating recurring requests in the future. A request template that you create is used for the release creation.
#
Step
Example screen (click the image to expand it)
1
Create a request from which the template will be created.
In the RPM console, go to the Requests tab, and then click Create Request.
In the Name box, enter Deploy JPetStore WebApp.
In the Application list, select JPetStore.
In the Environment list, select JP-DEV-1.
Click Create Request.
Once a request is created, you must add steps to it.
2
Add an automation step that will deploy a specific version of the JPetStore application.
In the Steps section, click New Step.
In the Name box, enter Deploy WebApp Package.
In the Type list, select Component.
In the Owner list, select JPetStore Operations.
In the Component list, select WebApp.
In the Version list, select the most recent build from Jenkins, 5.27.
Select the Commit on completion box.
Go to the Automation tab, and then do the following:
In the Step Action list, select RLM Deployment Engine.
In the Task list, select Rlm deploy package instance by component version.
In the Package list, select JPetStore-App.
In the Route list, select JPetStore-Open.
The Environment parameter is populated automatically as the environment names both in RPM and RPD are the same (JP-DEV-1).
To use all channels within the environment, leave the Channels check boxes clear.
In the Log format list, select Old Format.
Click Add Step & Close.
3
Deploy a request to verify that the step parameters are set correctly and the deployment will be successful.
Click Plan Request.
Click Start Request.
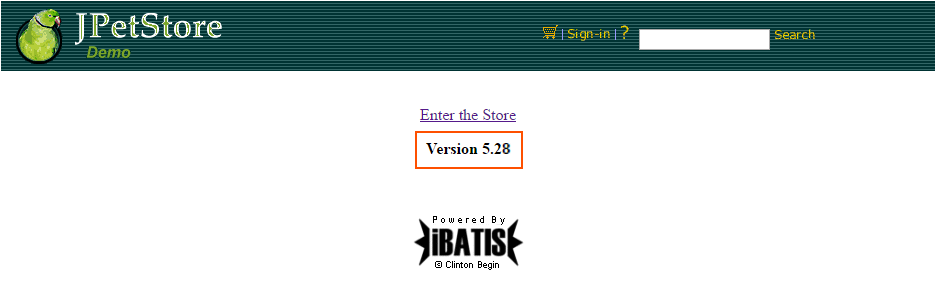
When the request is Complete, go to http://localhost:9180/jpestore (the JP-DEV-1 environment) and verify that the most recent version of the JPetStore application is installed (5.27).
4
Create a request template.
Go back to the RPM console, and then, on the right side of the Deploy JPetStore WebApp request page, click Create Template.
In the Name of Template box, enter Deploy JPetStore WebApp, and then click Create Template.
5
Set the status of the request template to Released.
Go to Environment > Metadata, and then click Manage Request Templates.
In the Actions column, next to Deploy JPetStore WebApp, click Pending, and then click Released.
Create a plan template
Before creating a release, you must create a plan template that is a blueprint of a release. A plan template includes information about the release stages, route gates, request templates, and the security properties.
#
Step
Example screen (click the image to expand it)
1
In the RPM console, go to Environment > Metadata, and then click Manage Plan Templates.
On the right side, click Create Plan Template.
In the Name box, enter Standard Release.
In the Template type box, select Deploy.
Click Create.
2
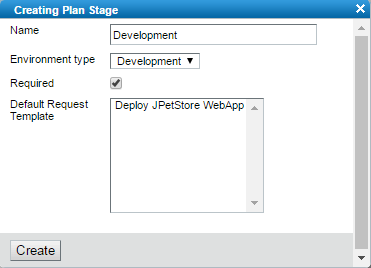
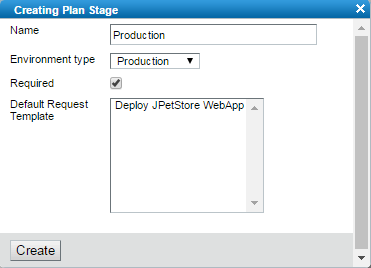
Add a stage for development.
Click Add stage.
In the Name box, enter Development.
In the Environment type list, select Development.
Select the Required check box. Note: Do not select anything in the Default Request Template list.
Click Create.
3
Repeat step 2 to add stages for testing and production:
Test (the Testing type)
Production (the Production type)
4
Click >> to set the status of the plan template from Draft to Released.
You will create a template for autoincrementing release versions.
#
Step
Example screen (click the image to expand it)
In the RPM console, go to Environment > Metadata, and then click Manage Release Tag Templates.
Click Create Release Tag Template.
In the Name box, enter JPetStore Releases.
In the Application list, select JPetStore.
In the Version template box, enter 1.#.
In the Autoincrement from box, enter 2, and then click Create.
Release a new version of JPetStore
After you configured everything, you can start the application release process using Jenkins and RLM Requester UI.
#
Step
Example screen (click the image to expand it)
1
In Jenkins, click jpetstore, and then click Build Now.
A new build #28 is created.
2
Create a release in the RLM Requester UI.
Log in to the RLM Requester UI as the Developer user, and then click New Release.
In the Application list, select JPetStore.
In the Plan Template list, select Standard Release.
In the Request Template list, select Deploy JPetStore WebApp. Notes: The Release # box is populated automatically according to the release tag template.
For the WebApp component, select the most recent build (5.28), and then click Create.
3
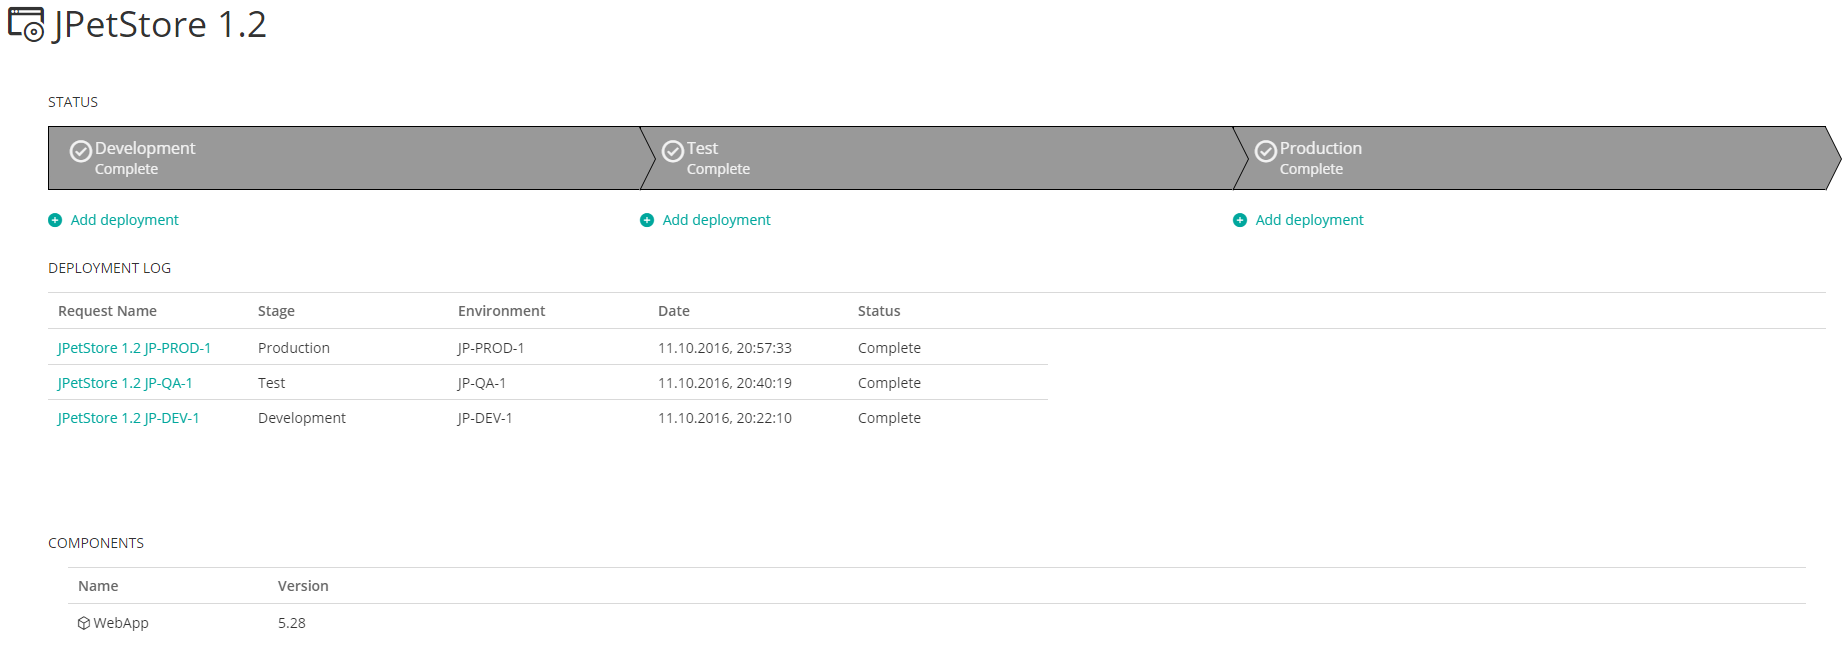
Deploy the 5.28 build in the development environment.
On the JPetStore 1.2 page, under the Development stage, in the Deploy to list, select JP-DEV-1.
In the Schedule on calendar, select Now, and then click Deploy. A new JPetStore 1.2 JP-DEV-1 request is created in the Deployment Log section.
Click the JPetStore 1.2 JP-DEV-1 request to view the associated request details on the RPM Classic UI.
Wait until the request is complete.
4
Go back to the RLM Requester UI tab and refresh it.
The Development stage is Complete.
Note: The Developer user cannot deploy neither in the Test nor Production environment.
5
To view the JPetStore version 5.28, go to the JP-DEV-1 environment.
6
As the Developer user cannot proceed to the Testing stage, you must log out, and then log in as the Tester user.
In the upper-right corner of the RLM Requester UI, click Sign Out, and then log in as the Tester user.
Click JPetStore 1.2, and then, under the Test stage, in the Deploy to list, select JP-QA-1.
In the Schedule on calendar, select Now, and then click Deploy. A new JPetStore 1.2 JP-QA-1 request is created in theDeployment Log section.
Click the JPetStore 1.2 JP-QA-1 request to view the associated request details on the RPM Classic UI.
Wait until the request is Complete.
7
Go back to the RLM Requester UI tab and refresh it.
The Testing stage is Complete.
Note: The Tester user cannot deploy neither in the Development nor Production environments.
8
To view the JPetStore version 5.28, go to the JP-QA-1 environment.
9
As the Tester user cannot proceed to the Production stage, you must log out, and then log in as the Operator user.
In the upper-right corner of the RLM Requester UI, click Sign Out, and then log in as the Operator user.
Click JPetStore 1.2, and then, under the Production stage, in the Deploy to list, select JP-PROD-1.
In the Schedule on calendar, select Now, and then click Deploy. A new JPetStore 1.2 JP-PROD-1 request is created in the Deployment Log section.
Click the JPetStore 1.2 JP-PROD-1 request to view the associated request details on the RPM Classic UI.
Wait until the request is Complete.
10
Go back to the RLM Requester UI tab and refresh it.
The Production stage is Complete.
11
To view the JPetStore version 5.28, go to the JP-PROD-1 environment.
In this walkthrough, you went through the process of automating a release lifecycle starting from creating an application topology in RPD, administering and modeling an application in RPM, configuring the release processes, integrations, and to deploying requests in different environments. As a result, the most recent Jenkins build went through the necessary release stages up to the production.
Where to go from here
Check out Managing automation to see how you can optimize the process of application deployment using different script types and Managing plans to organize the process of deployment more efficiently.
Was this page helpful? YesNoSubmitting...Thank you
For adding server, on BDC environment "Bridges" option is available instead of "Servers".
Sep 14, 2017 09:21
Shweta Hardikar
Thanks for the comment, Suyog. Let me verify the steps and update the documentation as early as possible.
Sep 15, 2017 12:04
Suyog Sawant
For adding channel template, on BDC environment "Blueprints" option is available instead of "Channel Templates".
Sep 14, 2017 09:29
Shweta Hardikar
Hi Suyog,
We researched and found out that the options that are visible to you are configurable. In RPD, one can change the language of the system to eng_VL due to which the Servers tab is seen as Bridges and Channel Template is seen as Blueprints.
If you change the setting to eng, you will be able to see Servers and Channel Templates accordingly.


Comments
For adding server, on BDC environment "Bridges" option is available instead of "Servers".
Thanks for the comment, Suyog. Let me verify the steps and update the documentation as early as possible.
For adding channel template, on BDC environment "Blueprints" option is available instead of "Channel Templates".
Hi Suyog,
We researched and found out that the options that are visible to you are configurable. In RPD, one can change the language of the system to eng_VL due to which the Servers tab is seen as Bridges and Channel Template is seen as Blueprints.
If you change the setting to eng, you will be able to see Servers and Channel Templates accordingly.
For more information, see Managing system settings >
language.Log in or register to comment.