Installing and configuring the Infrastructure Management server for application high-availability using the wizard
Where you are in the Installation process
| Step | Task |
|---|---|
| 1 | Complete the planning activities |
| 2 | Prepare for TrueSight Operations Management installation |
| 3 | Install Remedy Single Sign-On |
| 4 | Install TrueSight Presentation Server |
| 5 | Install TrueSight Infrastructure Management — Phase A (You are here) |
| Install TrueSight Infrastructure Management — Phases B and C | |
| 6 | Install App Visibility Manager (If licensed) |
| 7 | Install Real End User Experience Monitoring Software Edition (If licensed) |
| 8 | Install TrueSight IT Data Analytics (If licensed) |
| 9 | Complete the post-installation activities |
You need to perform the following tasks to install and configure TrueSight Infrastructure Managementin an application high-availability environment.
Step A: Install TrueSight Infrastructure Management on the primary computer
Application high-availability is supported only with the Oracle database. Install theTrueSight Infrastructure Managementserver on the primary computer. If you have a supported earlier version of theTrueSight Infrastructure Managementserver, upgrade it to the latest version. See
Upgrading the Infrastructure Management Server.

Note
- Ensure that there are no Integration Services installed on the computer where the TrueSight Infrastructure Management Server will be installed. If any Integration Services are installed on this computer, the TrueSight Infrastructure Management Server installation fails.
- If you are using the Remote Desktop Connection (RDC) to install the product, put the RDC in console mode.
- If you are installing the Infrastructure Management Server with Oracle, ensure that port 7 is opened between the Server and the Oracle database system. If port 7 cannot be opened due to security restrictions, run the installer using the following option:
- (Windows)
install.cmd -J SKIP_PING_VALIDATION_ERROR=true - (Linux)
./install.sh -J SKIP_PING_VALIDATION_ERROR=true
- (Windows)
- BMC recommends that you use MobaXterm as the UI to install TrueSight Infrastructure Management on Linux computers.
Do the following:
Log in to the host computer on which you want to install the Infrastructure Management Server, and delete all the files from the temporary directory:
- (Windows) %temp%
- (Linux) /tmp
Note
If you are reinstalling the Infrastructure Management Server due to a failure, you must delete all the existing installation directories and files.
Extract the downloaded zip files (the installer) to a temporary location outside the following location to avoid any file sharing conflicts:
- (Windows) C:\Program Files
- (Linux) /opt
(Linux) Apply executable rights to all the installation files by running the following command:
chmod -R 755 installationDirectoryFolderNameinstallationDirectoryFolderName is the name of the folder that contains all the installation files.
For example,
chmod -R 755 Disk1(Linux) Set the DISPLAY environment variable to ensure that the wizard-based installer launches the screens appropriately.
export DISPLAY=<IP address of the host computer>:0.0Note
Ensure that the following system requirements are met. If your target computer does not meet these requirements, you cannot proceed with the installation. However, in a test environment, you can skip the system requirements validation and run the installer by using the
-J MINIMAL=trueargument.- Total RAM (in MB): 32,000
- Available RAM (in MB): 25,000
- Total swap space / page file (in MB): 8,000
- Available swap space / page file (in MB): 8,000
By default, the TrueSight Infrastructure Management Server uses 256-bit encryption. However, AES 256-bit encryption is not allowed in some countries due to import regulations. You can change the default encryption key size when you invoke the installer.
Navigate to the Disk1 directory of the extracted folder, use one of the following options to run the installer.
BMC recommends that you run the installer by using
install.cmdand notsetup.exe.You must right-click on install.cmd and select Run as administrator.
Environment type Command Production environment with the default encryption setting
(Windows)
install.cmd(Linux)
./install.shProduction environment with user-specified encryption setting (Windows)
install.cmd –J BMC_TS_KEY_SZ=<128/256>(Linux)
./install.sh –J BMC_TS_KEY_SZ=<128/256>Test environment with the default encryption setting (Windows)
install.cmd -J MINIMAL=true(Linux)
./install.sh -J MINIMAL=trueTest environment with with user-specified encryption setting
(Windows)
install.cmd –J BMC_TS_KEY_SZ=<128/256> -J MINIMAL=true(Linux)
./install.sh –J BMC_TS_KEY_SZ=<128/256> -J MINIMAL=true- Review the welcome page, and click Next.
- Read the license agreement, agree to the terms, and click Next.
(Windows) Start the Windows Firewall service from services.msc and run the following commands:
- (Microsoft Windows 2008 R2)
netsh advfirewall set allprofiles state on - (Microsoft Windows 2012 R2)
netsh advfirewall set allprofiles state on - (Microsoft Windows 2012)
netsh firewall set opmode mode = ENABLE
- (Microsoft Windows 2008 R2)
Note
If you turn on the firewall when Remote Desktop Protocol (RDP) is running, the RDP session may get disconnected if it is blocked by the firewall.
(Windows) On the Configuring Firewall Rules page, perform one of the following tasks, and click Next.
- Select Automatically configure the Windows Firewall rules.
- The Windows Firewall inbound rules are configured.
- Select I will manually configure Windows Firewall Rules now before proceeding further and configure inbound rules for the pw processes that are listed on the page.
If you prefer to use a third party firewall application that is installed on your computer, you must manually create the firewall inbound rules. For more information about creating firewall inbound rules, refer to the documentation of the third party firewall application.
The default installation directory is:
(Windows) C:\Program Files\BMC Software\TrueSight
(Linux) /opt/bmc/TrueSight
Notes- (Windows) Do not install TrueSight Infrastructure Management Server in the root directory (for example C: or D: ), on a shared drive, or in the Documents and Settings folder.
- (Windows) While installing TrueSight Infrastructure Management Server on a 64-bit Windows computer, ensure that you do not install it in the Program Files (x86) directory path.
- (Linux) Do not install TrueSight Infrastructure Management Server in the root directory.
- (Linux) The directory in which the TrueSight Infrastructure Management Server is installed and all its parent directories must have 755 permissions (read, write, and execute permissions to owner, groups, and others) and must be owned by root as well as the other group. Without these permissions and ownership, you will not be able to log in to the TrueSight Infrastructure Management Server.
- (Linux, as a non-root user) To avoid problems related to user permissions, ensure that you log in to a new session as a non-root user (without using the su command).
- For Chinese, Korean, and Japanese installations, ensure that the system default locale is a UTF-8 locale. This enables the Input Method feature in the administration console.
The installer detects the FQDN of the host computer and populates the FQDN field automatically. Ensure that the FQDN is accessible by the other TrueSight components in your environment.
If you modify the FQDN:Do not manually type any IP address in the FQDN field.
Do not leave this field empty
Confirm this, and click Next.Select the configuration tasks that you want to perform, and click Next.
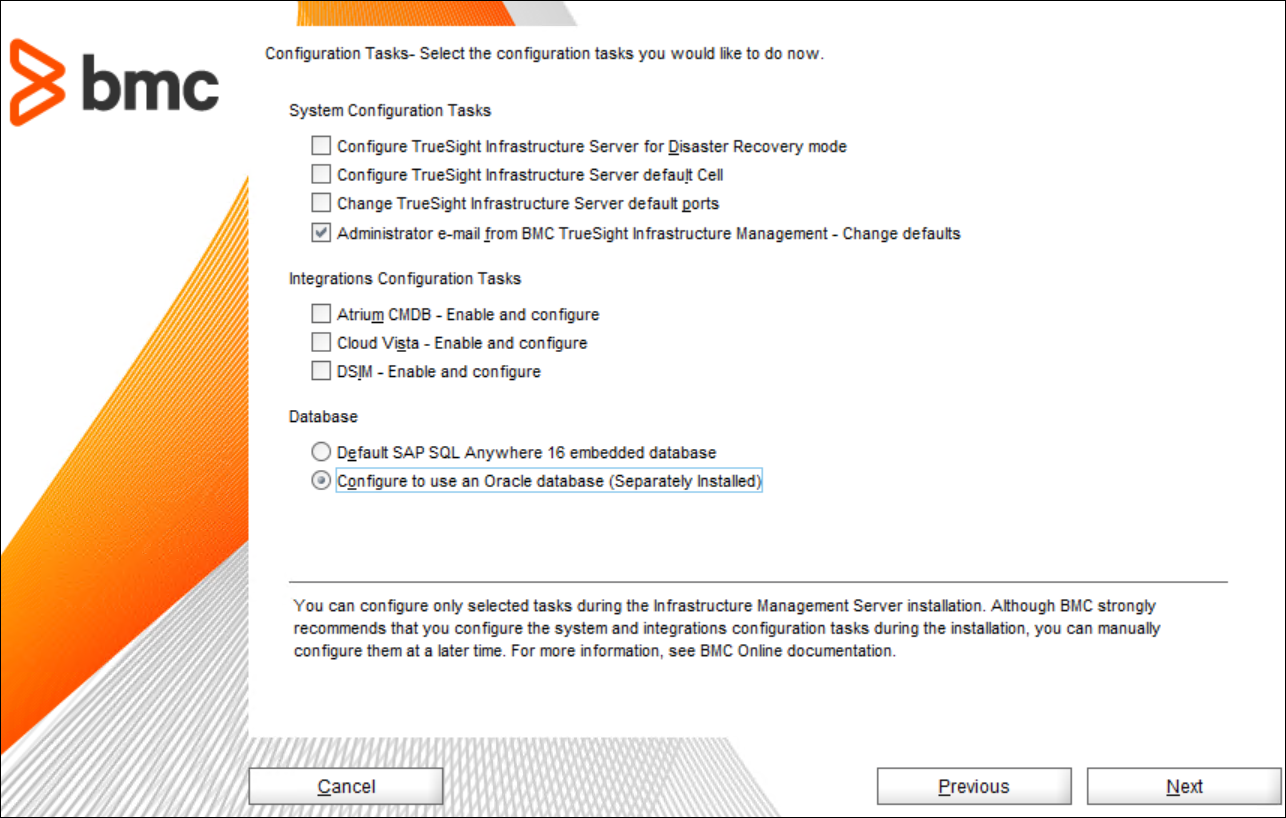
Do not select any of the options under System Configuration Tasks and Integrations Configuration Tasks.
However, you can change the default Administrator email settings.
Field
Description
Sender E-mail ID Email address that you specify as the sender of notification messages. The format must be hostName@company.com The administrator receiving the email message will be able to identify the host that has disk space problems or other issues that send notifications. The default value is blank. Administrator E-Mail ID Fully qualified e-mail address of the administrator of the TrueSight Infrastructure Management Server. The format must be user@company.com. The default value is blank.
Name or IP Address of SMTP Server Name or IP address of the SMTP server. The default value is blank. - Ensure that you select the Configure to use an Oracle database option.
- Specify the Oracle database details, and click Next.
Specify whether to connect to a standalone Oracle database instance or to an Oracle Real Application Cluster (RAC) setup.
- For a Standalone Oracle database provide the following details:
- Host name or IP address of the computer that is running the standalone Oracle database instance.
- Oracle listener port on the computer. The default port is 1521.
- Oracle database SID
- For an Oracle Real Application Cluster (RAC) setup provide the following details:
- Service name of the Oracle server
- Host name of the computer that is running the Oracle RAC setup
When you provide the RAC SCAN host name, the pw dbconfig list displays the node count as 1, and node 1 is the SCAN host. - Port number through which the RAC communicates.
- For a Standalone Oracle database provide the following details:
- Specify whether to use an existing user or create a new user.
Type the user name. Do not use the terms "sys" or "system." The default user name is proact.
Type the password of the database instance, and confirm it.
The system creates a report user to access views in Oracle. The report user name is derived by suffixing "ru" to the Infrastructure Management user and the password is same as the user name. For example, if the Infrastructure Management user name is proact, then the report user name is proactru and the password is proactru.
If you are creating a new user for the Oracle database:
Provide the user name and password of the Oracle Report User, and click Next.
Provide the following details, and click Next:
User name and password of the Oracle database. The user must have SYSDBA privileges.
Type of Infrastructure Management deployment. The size of the tablespace is determined by the type of deployment. The supported values are Small, Medium, and Large.
Names of the main and temporary tablespaces to be created.
- Data file names with the absolute path for the main and temporary tablespaces.
Review the installation details, and click Install.
Note
If the DNS configurations are not correct, a warning message is displayed. You can either correct the DNS configuration and restart the installation, or provide the IP address instead of the host name when you are prompted to enter the host name.
The installation may take upto 30 minutes.
After the installation is complete, the Installation Summary page is displayed.
- Select View Logs to open the installation logs.
(Linux) Verify that the following environment variables are set.
$BPPM_SERVER_HOME
- $BMC_PROACTIVENET_HOME
Run the following command to verify the Infrastructure Management installation:
(Windows)
# pw system status
(Linux)# pw system statusA list of pw server processes is displayed.
If errors occur, restart the BMC TrueSight Infrastructure Management Server by running the following command:
(Windows)
# pw system start
(Linux)# pw system startApply the Infrastructure Management license.
Note
- Applying or updating the license restarts the JServer process and forces all active user sessions on the Infrastructure Management Server to log off.
- You must have root privileges to apply the license.
When you purchased the product, you would have received the following license files in a .zip file from your BMC Software representative:
- proactivenet.lic
- proactivenet.sign
Do not move or delete the license file
- After loading the license, moving or changing the license files can cause a number of errors.
- When the Infrastructure Management is installed, a hidden .pbk file is created. It is recommended to save a back copy of this .pbk file. If the licence directory is removed and then re-created, the .pbk no longer exists. So the .pbk file must be re-added for Infrastructure Management licensing to function properly. This file can be captured from a backup of the installation (if a backup exists) or from another computer where Infrastructure Management is installed.
(Linux) If you installed Infrastructure Management Server as a non-root user, do the following:
Configure the TrueSight Infrastructure Management process to automatically start each time the TrueSight Infrastructure Management server is restarted. To do this, register the process as a service by running the script described in the following procedure. Running this script also results in copying the Integration Service security files required by the PATROL Agent to connect with the Integration Service.
- Locate the script at <Infrastructure-Management-Installation-Directory>/pw/scripts.
- Run the script in the following format:
create_startup_script.sh [<Non-root-User-Name>]
where,<Non-root-User-Name>refers to the non-root user name with which the process must be registered as a service.
Providing the non-root user name is optional. If you do not provide the non-root user name, by default, the script uses the non-root user name used for installing TrueSight Infrastructure Management to register the service.
Step B: Install TrueSight Infrastructure Management on the secondary computer
Note
- Ensure that there are no Integration Services installed on the computer where the TrueSight Infrastructure Management Server will be installed. If any Integration Services are installed on this computer, the TrueSight Infrastructure Management Server installation fails.
- If you are using the Remote Desktop Connection (RDC) to install the product, put the RDC in console mode.
- If you are installing the Infrastructure Management Server with Oracle, ensure that port 7 is opened between the Server and the Oracle database system. If port 7 cannot be opened due to security restrictions, run the installer using the following option:
- (Windows)
install.cmd -J SKIP_PING_VALIDATION_ERROR=true - (Linux)
./install.sh -J SKIP_PING_VALIDATION_ERROR=true
- (Windows)
- BMC recommends that you use MobaXterm as the UI to install TrueSight Infrastructure Management on Linux computers.
Do the following:
Log in to the host computer on which you want to install the Infrastructure Management Server, and delete all the files from the temporary directory:
- (Windows) %temp%
- (Linux) /tmp
Note
If you are reinstalling the Infrastructure Management Server due to a failure, you must delete all the existing installation directories and files.
Extract the downloaded zip files (the installer) to a temporary location outside the following location to avoid any file sharing conflicts:
- (Windows) C:\Program Files
- (Linux) /opt
(Linux) Apply executable rights to all the installation files by running the following command:
chmod -R 755 installationDirectoryFolderNameinstallationDirectoryFolderName is the name of the folder that contains all the installation files.
For example,
chmod -R 755 Disk1(Linux) Set the DISPLAY environment variable to ensure that the wizard-based installer launches the screens appropriately.
export DISPLAY=<IP address of the host computer>:0.0Note
Ensure that the following system requirements are met. If your target computer does not meet these requirements, you cannot proceed with the installation. However, in a test environment, you can skip the system requirements validation and run the installer by using the
-J MINIMAL=trueargument.- Total RAM (in MB): 32,000
- Available RAM (in MB): 25,000
- Total swap space / page file (in MB): 8,000
- Available swap space / page file (in MB): 8,000
By default, the TrueSight Infrastructure Management Server uses 256-bit encryption. However, AES 256-bit encryption is not allowed in some countries due to import regulations. You can change the default encryption key size when you invoke the installer.
Navigate to the Disk1 directory of the extracted folder, use one of the following options to run the installer.
BMC recommends that you run the installer by using
install.cmdand notsetup.exe.You must right-click on install.cmd and select Run as administrator.
Environment type Command Production environment with the default encryption setting
(Windows)
install.cmd(Linux)
./install.shProduction environment with user-specified encryption setting (Windows)
install.cmd –J BMC_TS_KEY_SZ=<128/256>(Linux)
./install.sh –J BMC_TS_KEY_SZ=<128/256>Test environment with the default encryption setting (Windows)
install.cmd -J MINIMAL=true(Linux)
./install.sh -J MINIMAL=trueTest environment with with user-specified encryption setting
(Windows)
install.cmd –J BMC_TS_KEY_SZ=<128/256> -J MINIMAL=true(Linux)
./install.sh –J BMC_TS_KEY_SZ=<128/256> -J MINIMAL=true- Review the welcome page, and click Next.
- Read the license agreement, agree to the terms, and click Next.
(Windows) Start the Windows Firewall service from services.msc and run the following commands:
- (Microsoft Windows 2008 R2)
netsh advfirewall set allprofiles state on - (Microsoft Windows 2012 R2)
netsh advfirewall set allprofiles state on - (Microsoft Windows 2012)
netsh firewall set opmode mode = ENABLE
- (Microsoft Windows 2008 R2)
Note
If you turn on the firewall when Remote Desktop Protocol (RDP) is running, the RDP session may get disconnected if it is blocked by the firewall.
(Windows) On the Configuring Firewall Rules page, perform one of the following tasks, and click Next.
- Select Automatically configure the Windows Firewall rules.
- The Windows Firewall inbound rules are configured.
- Select I will manually configure Windows Firewall Rules now before proceeding further and configure inbound rules for the pw processes that are listed on the page.
If you prefer to use a third party firewall application that is installed on your computer, you must manually create the firewall inbound rules. For more information about creating firewall inbound rules, refer to the documentation of the third party firewall application.
The default installation directory is:
(Windows) C:\Program Files\BMC Software\TrueSight
(Linux) /opt/bmc/TrueSight
Notes- (Windows) Do not install TrueSight Infrastructure Management Server in the root directory (for example C: or D: ), on a shared drive, or in the Documents and Settings folder.
- (Windows) While installing TrueSight Infrastructure Management Server on a 64-bit Windows computer, ensure that you do not install it in the Program Files (x86) directory path.
- (Linux) Do not install TrueSight Infrastructure Management Server in the root directory.
- (Linux) The directory in which the TrueSight Infrastructure Management Server is installed and all its parent directories must have 755 permissions (read, write, and execute permissions to owner, groups, and others) and must be owned by root as well as the other group. Without these permissions and ownership, you will not be able to log in to the TrueSight Infrastructure Management Server.
- (Linux, as a non-root user) To avoid problems related to user permissions, ensure that you log in to a new session as a non-root user (without using the su command).
- For Chinese, Korean, and Japanese installations, ensure that the system default locale is a UTF-8 locale. This enables the Input Method feature in the administration console.
The installer detects the FQDN of the host computer and populates the FQDN field automatically. Ensure that the FQDN is accessible by the other TrueSight components in your environment.
If you modify the FQDN:Do not manually type any IP address in the FQDN field.
Do not leave this field empty
Confirm this, and click Next.Select the configuration tasks that you want to perform, and click Next.
By default, Administrator e-mail from BMC TrueSight Infrastructure Management is selected. You can deselect it.
Ensure that you select the Configure to use an Oracle database option.
(Optional) Based on your selection, the applicable configuration pages are displayed. Type the appropriate details, and click Next.
Note
Configuring the TrueSight Infrastructure Management Server for integration with BMC Atrium CMDB is recommended, but not mandatory, during installation. If you do not configure the TrueSight Infrastructure Management Server for CMDB integration during installation, you can manually configure this integration any time after the installation is complete.
Before configuring BMC Atrium CMDB, ensure that BMC CMDB Extensions and modules are installed on the computer where the BMC Atrium CMDB is installed. If necessary, you can stop this installation, install the extensions, and then restart the TrueSight Infrastructure Management Server installation.
Field
Description
CMDB Host Host name of the AR Server. When integrating with the AR Server group, host name of the Load Balancer or Integration Server. CMDB Port BMC Atrium CMDB or AR System Server port number. The default is 0. If the AR System is configured with a Portmapper, enter port 0. CMDB User User name required to log on to the AR System Server. The default is Demo. This user requires the AR Server Administration rights. CMDB Password Password required to log on to the AR System server UDDI Host Host name of the UDDI registry for BMC Atrium CMDB UDDI Port Port number of the UDDI registry for CMDB. The default is 8080. UDDI User UDDI registry user name. The default is admin. UDDI Password Password for the specified UDDI user name. The default is admin. Note
The UDDI parameters are optional and are used only to cross-launch to other BMC products, such as Atrium AE and BMC Atrium Service Context.
If you integrate with BMC Atrium CMDB in the AR Server Group, you must manually configure the pserver.conf file. Edit the
ARSGroupMembersin the pserver.conf file and set to all AR Servers of the group that have reconciliation function enabled. See also Configuring the Publishing Server to integrate with an AR Server group
.
- If you are using a single Oracle instance and already created the users as specified at Complete the preinstall tasks for application high-availability mode, enter details of the primary server Oracle instance with the proact and reporting user username and passwords specified for the secondary server.
Specify whether to connect to a standalone Oracle database instance or to an Oracle Real Application Cluster (RAC) setup.
- For a Standalone Oracle database provide the following details:
- Host name or IP address of the computer that is running the standalone Oracle database instance.
- Oracle listener port on the computer. The default port is 1521.
- Oracle database SID
- For an Oracle Real Application Cluster (RAC) setup provide the following details:
- Service name of the Oracle server
- Host name of the computer that is running the Oracle RAC setup
When you provide the RAC SCAN host name, the pw dbconfig list displays the node count as 1, and node 1 is the SCAN host. - Port number through which the RAC communicates.
- For a Standalone Oracle database provide the following details:
- Specify a different (temporary) username and password for both proact and reporting user compared to the primary server.
Type the user name. Do not use the terms "sys" or "system." The default user name is proact.
Type the password of the database instance, and confirm it.
The system creates a report user to access views in Oracle. The report user name is derived by suffixing "ru" to the Infrastructure Management user and the password is same as the user name. For example, if the Infrastructure Management user name is proact, then the report user name is proactru and the password is proactru.
If you are creating a new user for the Oracle database:
Provide the user name and password of the Oracle Report User, and click Next.
Provide the following details, and click Next:
User name and password of the Oracle database. The user must have SYSDBA privileges.
Type of Infrastructure Management deployment. The size of the tablespace is determined by the type of deployment. The supported values are Small, Medium, and Large.
Names of the main and temporary tablespaces to be created.
- Data file names with the absolute path for the main and temporary tablespaces.
Review the installation details, and click Install.
Note
If the DNS configurations are not correct, a warning message is displayed. You can either correct the DNS configuration and restart the installation, or provide the IP address instead of the host name when you are prompted to enter the host name.
The installation may take upto 30 minutes.
After the installation is complete, the Installation Summary page is displayed.
- Select View Logs to open the installation logs.
(Linux) Verify that the following environment variables are set.
$BPPM_SERVER_HOME
- $BMC_PROACTIVENET_HOME
Run the following command to verify the Infrastructure Management installation:
(Windows)
# pw system status
(Linux)# pw system statusA list of pw server processes is displayed.
If errors occur, restart the BMC TrueSight Infrastructure Management Server by running the following command:
(Windows)
# pw system start
(Linux)# pw system startApply the Infrastructure Management license.
Note
- Applying or updating the license restarts the JServer process and forces all active user sessions on the Infrastructure Management Server to log off.
- You must have root privileges to apply the license.
When you purchased the product, you would have received the following license files in a .zip file from your BMC Software representative:
- proactivenet.lic
- proactivenet.sign
Do not move or delete the license file
- After loading the license, moving or changing the license files can cause a number of errors.
- When the Infrastructure Management is installed, a hidden .pbk file is created. It is recommended to save a back copy of this .pbk file. If the licence directory is removed and then re-created, the .pbk no longer exists. So the .pbk file must be re-added for Infrastructure Management licensing to function properly. This file can be captured from a backup of the installation (if a backup exists) or from another computer where Infrastructure Management is installed.
(Linux) If you installed Infrastructure Management Server as a non-root user, do the following:
Configure the TrueSight Infrastructure Management process to automatically start each time the TrueSight Infrastructure Management server is restarted. To do this, register the process as a service by running the script described in the following procedure. Running this script also results in copying the Integration Service security files required by the PATROL Agent to connect with the Integration Service.
- Locate the script at <Infrastructure-Management-Installation-Directory>/pw/scripts.
- Run the script in the following format:
create_startup_script.sh [<Non-root-User-Name>]
where,<Non-root-User-Name>refers to the non-root user name with which the process must be registered as a service.
Providing the non-root user name is optional. If you do not provide the non-root user name, by default, the script uses the non-root user name used for installing TrueSight Infrastructure Management to register the service.
Step C: Configure application high-availability
- Stop the Infrastructure Management process on both servers.
From the pw command prompt, run the following command:pw sys stop On the primary server:
- Run the following command from the pw command prompt:
pw ha enable
The command generates the HA configuration file ha-generated.conf in the installedDirectory\pw\pronto\tmp directory. - Copy the ha-generated.conf file to the secondary server.
- Run the following command from the pw command prompt:
On the secondary server, run the following command from the pw command prompt:
For details about the command, see pw ha enable standby commandpw ha enable standby file=<path of the ha-generated.conf file>
- Copy the installedDirectory\TrueSight\pw\pronto\tmp\addremoteagent file to the primary server.
- Copy the installedDirectory\TrueSight\pw\server\var\pncell_<host name>#1 folder from the primary server to the same location on the secondary server.
On the secondary server, rename the folder that you copied from the primary server to:
pncell_<host name>#2- Restart the primary server and then restart the secondary server.
From the pw command prompt, run the following command:pw sys start - Run the following command from the primary and secondary server to verify the high availability status:
pw ha status - Run the following command from the primary and secondary server to verify that both nodes are pointing to the same database instance:
pw dbconfig test - On the primary server, run the addremoteagent file.
(Optional - to configure remote cells)
- On the primary server, add each remote cell entry to the installedDirectory/server/etc/mcell.dir file in the following format:
cell <cell name> <encryption key> <cell host>:<cell port>
For example,cell aaa-test-bmc1 mc aaa-test-bmc1:1828 - On the primary server, run the iadmin command from the installedDirectory\pw\server\bin directory to register the remote cell:
iadmin -ac name=<cell name>:key=<encryption key>:primaryHost=<cell host name>:primaryPort=<cell port>:environment=Production:usergroups=* Perform the preceding steps on the secondary server.
On the primary server, run the mcontrol command from the installedDirectory\pw\server\bin directory to reload the cell configuration:
mcontrol -n <pncell name> reload dir
- On the primary server, add each remote cell entry to the installedDirectory/server/etc/mcell.dir file in the following format:
- To ensure that publishing works seamlessly, set the Publishing Server name of the secondary server to a different one than the primary server. For more information, see
Publishing server optional configurations
- Register TrueSight Infrastructure Managementwith the Presentation Server.
In the TrueSight console, go to Administration > Components, select the action menu
 next to Components, and select Add Component.
Select Infrastructure Management Server as the component type.
Enter the Host Name configured in the load balancer in FQDN format.
- (Optional) Delete the Oracle database schema (or Oracle instance, if you created a separate instance) of the secondary node, since it is no longer required after application high-availability is configured.
Important
The system requirements are validated every time you restart the host computer or product services. If the system requirements are not met, the product services are not started. To force-start the product services, see
Starting and stopping the TrueSight Operations Management components.
Comments
Log in or register to comment.