Creating a new notification policy
A notification policy sends a request to an external service to notify a user or group of users that the event has occurred.
For example, a notification event management policy might notify a system administrator about the imminent unavailability of a mission-critical piece of storage hardware.
Before you begin
You must add a notification service as described in How to add a notification service (notification policies only).
To create a new notification policy
- From the Event Management Policies tab of the Administration View, expand the By Policy Type folder.
- Under the By Policy Type folder, select Notification Policy and click OK.
- Click Add Policy
 .
.
A Selector Chooser dialog box is displayed.

- From the Selector Chooser dialog box, select the event selector that you want to use for this policy and click OK.
The Notification Policy Details tab is displayed in the details pane of the Administration View, as show in the following figure.
Notification Policy Details tab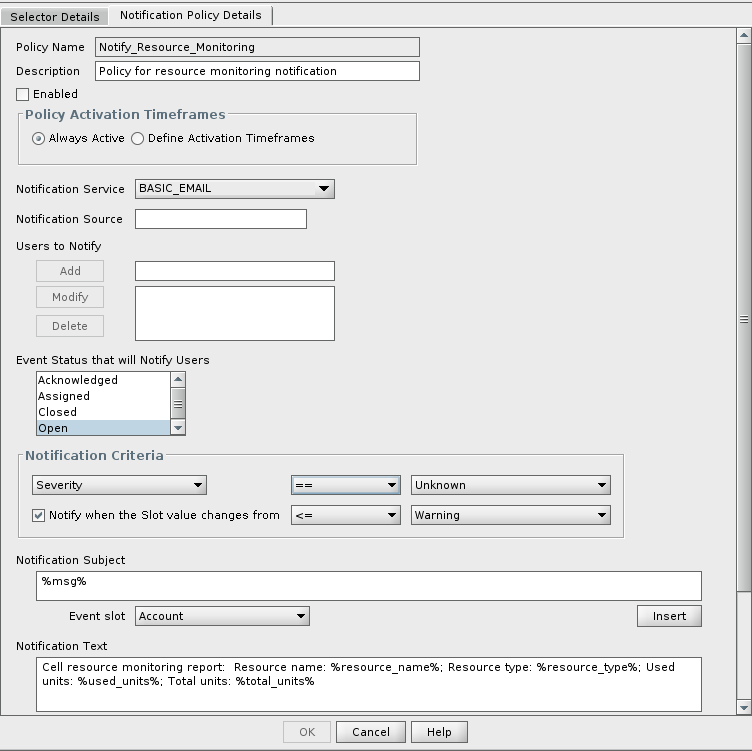
- In the Policy Name field, type a unique alphanumeric name for the event management policy. The name must contain no spaces.
- In the Description field, type a description of the event management policy.
- To enable the event management policy, select the Enabled check box. If you do not want to enable the policy at this time, you can return to this dialog box and enable the policy later.
- In the Policy Activation Timeframes section, define the periods of time the event management policy should be active (when enabled) by performing the following actions:
- Select one of the following choices:
- To make the event management policy active continuously, select Always Active.
- To specify when the policy is active or inactive, select Define Activation Timeframes.
The Active Timeframes and Not Active Timeframes check boxes are enabled.
- If you selected Define Activation Timeframes, depending on how you want to define the timeframe for your policy do one or both of the following:
- To specify the periods of time when the policy should be active, select the Active Timeframes check box and one or more timeframes from its scrollable list.
To specify the periods of time when the policy should be inactive, select the Not Active Timeframes check box and one or more timeframes from its scrollable list.
Note
You can select both check boxes to create active and inactive time periods. However, the inactive time period takes precedence over the active time period.
- Select one of the following choices:
- From the Notification Service drop list, select the service to use as the notification mechanism. The default service is e-mail.
- In the Notification Source field, enter the source of the notification.
- In the Add field, type the name of a person or group to notify. Click Add to add the name to the Notify slot. Add more names or groups if necessary.
- From the Event Status that will Notify Users list, select the event status that you want to trigger the notification.
Create a Notification Criteria by selecting event slot and conditions from the list.
If you select the Notify when the Slot value changes checkbox, the users will be notified when the event status changes as per the Notification criteria conditions. For example, as per the following image, the users will be notified if the Severity value changes to Unknown from the status that is lower or equal to Warning.
Notes
- The value of Event Status that will Notify User field is set to the default (empty) value in the following conditions:
When you upgrade a policy from an earlier version of the cell
When you copy a policy from an earlier version to the current version
When you edit an earlier version policy in the current version
Workaround: Edit the event notification policy in the current version, and set the Event Status that will Notify Users value manually. For example, if the Status value was Open, then ensure that you manually set the Event Status that will Notify Users value to Open in the current notification policy.
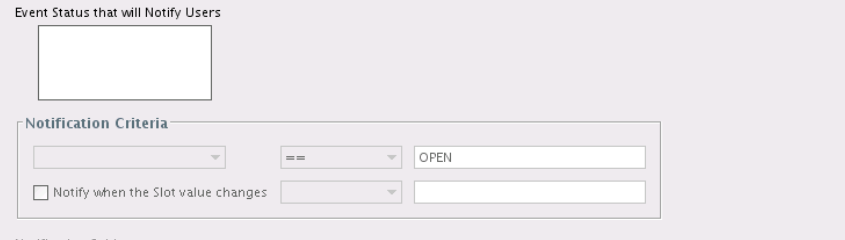
If you have selected the Event Status that will Notify User and set a Notification Criteria, you will receive two email notifications. One email to notify the event status and another email based on the selected notification criteria. However, only one email is sent if you did not set any Notification Criteria (empty values). For example, as per the selected notification criteria in the figure, you will receive two email notifications:
- Email to notify that the Severity value is Open.
- Email to notify that the Severity value is changed to Minor from the status value that is less than or equal to Warning.
- The value of Event Status that will Notify User field is set to the default (empty) value in the following conditions:
- In the Notification Subject field, enter the subject of the notification message. If desired, you can use the Event Slot list to select event slots to add to the notification subject. Click Insert to insert the slots into the subject. Enter a space before and after each slot that you add.
- In the Notification Text field, enter the notification message. If desired, you can use the Event Slot list to select event slots to add to the notification message. Click Insert to insert the selected slots into the message. Enter a space before and after each slot that you add.
- (Optional) Select the Auto Acknowledge check box to automatically acknowledge the event.
- (Optional) Select the Auto Assign check box to automatically assign the event to the user you select from the list.
- To save the completed event notification policy, click OK.
Administration console saves the defined event management policy, and it is displayed in the list of event policies for the selected event selector.
Comments
Hi There is a problem with the example pictures attached to this article
Can you please fix it.
Thanks Shai
Hello Shai,
Thanks for letting us know. This is now fixed.
Hi, the attached photos are still in error, as reported in 2019.
Hi Alexandru Florea,
Fixed those images. Please check.
We are using TrueSight 11.3.03 , i need to keep people in CC while sending notification. How i can achieve this.
Priyanka Patil , Jagdish Wagh ,
Can you please clarify the above feedback?
Thanks,
Rashmi
Supriya Bhanage , Please provide your inputs to address the above feedback. I have created a JIRA issue to track this https://jira.bmc.com/browse/DRTSA-516.
Closing the thread here.
Thanks,
Rashmi
Log in or register to comment.