Installing and configuring sites to run on-premises connectors
Connectors can run in a cloud or in an on-premises environment. Connectors that run in an on-premises environment require a local connector runtime environment to be installed. As the BMC Helix Integration Service Tenant administrator, you can install one or more local connector runtime environments, referred to as sites.
A site specifies where to host the connector service and includes information that the connector needs to operate. It enables your applications to securely connect to the third-party systems.
BMC Helix Integration Service supports the following types of sites:
| Site type | Description |
|---|---|
| Production | Use this type of site to deploy a connector to BMC Helix Integration Studio. A production site connects to on-premises applications that are located in a company network. |
| Development | Use this type of site to develop connectors in BMC Helix Connector Designer. For more information about developing connectors, see Developing connectors. |
To add a production or development site
Log in to BMC Helix Integration Studio, as a tenant administrator and navigate to Sites.
Click Add New Site, and select the type of site you want to add.
Enter a name and a description for the site, and click Save.
Note
After you add a production site, you must configure it. The site specifies which Integration Controller runs the connector and includes other relevant information that depends on the connector. Typically, the configuration includes the following information:
- The host where the target application is located.
- The port used to connect to the application.
- The protocol used to connect to the application.
Integration Controller communication connections
After you add a site, you must install Integration Controller on a virtual machine to connect to on-premises applications. The purpose of Integration Controller is to run connectors to execute flows and perform actions that involve other applications and services that run within your data center. The following illustration shows how Integration Controller interacts with on-premises applications and the BMC Helix Integration Service cloud:
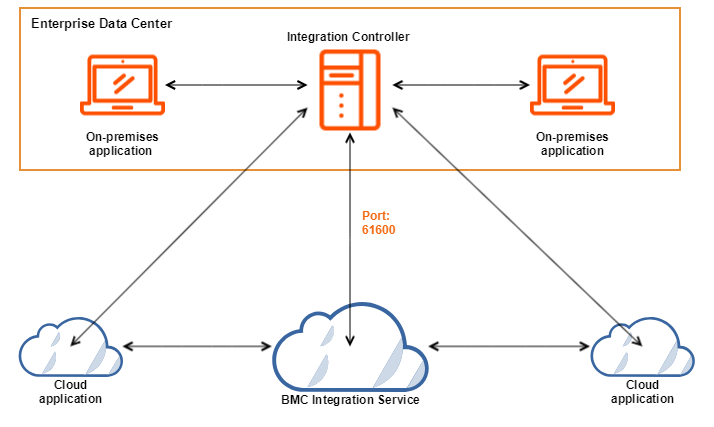
Integration Controller safely and securely communicates with the BMC Helix Integration Service cloud by establishing an outbound connection to the cloud on port 61600. The connection from Integration Controller to the BMC Helix Integration Service cloud is encrypted via Transport Layer Security (TLS).
Note
The BMC Helix Integration Service cloud does not establish any inbound connection to Integration Controller. You do not need to open any inbound ports in your corporate firewall.
Integration Controller connects to the message queue that runs in the cloud, and receives configuration information and instructions on the actions to be performed. The protocol that runs over this connection is the Open Wire protocol.
To install Integration Controllers for high availability
Best practice
To increase the stability of BMC Helix Integration Service performance, we recommend that you install primary and secondary Integration Controllers. These controllers are configured as an active-active pair—if one of the controllers goes down, the other one continues processing.
Installation of the the secondary Integration Controller and the sequence of installation are optional. You can install only primary, only secondary, or both Integration Controllers.
- In BMC Helix Integration Studio, go to Sites.
- Next to a newly created production site, click Get Controller.
Next to a newly added site, click Get Controller.
From the Install Integration Controller field, copy the installation command and run the command in a command shell.

Best practice
Integration Controller is installed in your current directory. We recommend that you create a new directory for the controller, and run thecURLcommand from the new directory. The installation process creates a number of files in the directory, such as docker-compose.yml, base-services.yml, reinitController, and panama-on-premise.env. You might need to use these files to troubleshoot.In the command shell, follow the instructions, and enter a host password for your user account.
Enter the controller instance you are installing: primary or secondary.
Refresh the Sites page in your browser.
The status of the installed controller is Online, as shown in the following image:

Integration Controller status
To verify the performance of either primary or secondary Integration Controller, check their statuses on the Sites tab in BMC Helix Integration Studio.
Integration Controllers can have the following statuses:
- Not Installed: Integration Controller is not installed for a site.
- Online: Integration Controller is installed and working.
- Offline: Integration Controller is stopped, or its connectivity is lost.
- Impaired: A connector that is configured for the site is not running.
Note
If you have both primary and secondary Integration Controllers installed, and one of them is Offline or Impaired, the flows continue to run as expected until one of the controllers is Online.
To update a production site
The Update button appears for the production sites when updates to one or more base controller components become available.
You can update a site only if it is Online.
- In BMC Helix Integration Studio, go to Sites.
Next to a required production site, click Update.
The primary and secondary Integration Controllers installed for the site restart, and then the site is updated.- Refresh any BMC Helix Integration Studio instances that are open in your browser.
To update a development site
When an update becomes available for a production site, you might want to update your development site as well.
- To open BMC Helix Connector Designer in your browser, navigate to https://localHost:3000/.
- From the top menu, select Integration Controller.
- Click Stop, and then click Start.

The Integration Controller installed for the site restarts, and then the site is updated. - Refresh any BMC Helix Integration Studio instances that are open in your browser.
To restart a connector
If an on-premises connector is down, as a part of the troubleshooting process, you can restart it as follows:
Note
This option applies only to the connectors deployed on-site, and not in the cloud.
- In BMC Helix Integration Studio, go to Sites.
- Next to the required site, view Site Details.
- In the Connector Status by Controller section, next to the required connector, click Restart connector.
For more information about troubleshooting a connector configuration, see Troubleshooting connector configuration issues
Comments
Hello, we have an proxy for outgoing communication and this can only work over port 80 and 443. Is it possible to configure the port 61600 to port 80
No, an HTTP proxy cannot be used for the TCP port 61600.
In order to connect two Helix ITSM environments through Integration studio, do we still need integration controller to be installed? if not how we can connect these two helix systems? what are we supposed to configure in connectors as Document doesn't give clear picture of all the fields in connector configuration.
Dnyaneshwar Nanaware , Integration controller is required for on-prem systems. I am working on getting the connector configuration information updated.
If we have an on prem integration controller with multiple connectors but one of the connectors is no longer needed how do we remove it?
Log in or register to comment.