Creating a SQL-based data mart for an advanced report template and a view in the TrueSight console
When adding a data mart, you can choose to add one that you can use to build advanced report templates or one suitable for custom views. The third, option, which is described here, creates a data mart that you can use for both purposes.
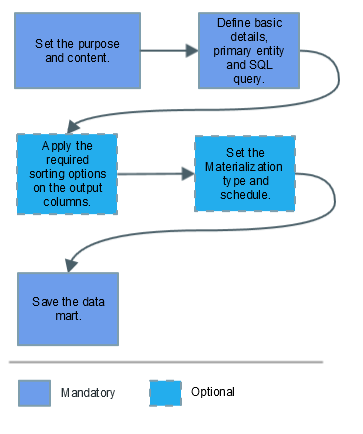
Steps for creating a data mart for an advanced report template and a custom view using the basic options
Before you begin
Access the Data marts page. For more details, see Managing data marts for custom views, reports, and report templates.
To add a data mart for an advanced report template and a view in the TrueSight console
On the Data marts list page, select Add > Data mart based on SQL.
On the Welcome page of the Data marts wizard, under the Purpose of data mart, select Both of the above purposes.
Under the Content of data mart, select one of the following options:
- Summary information for a set of entities: Adds a data mart that provides a summary information about the entities returned by the SQL query.
- Time series details for a set of entities: Adds a data mart that provides a time series details about the entities returned by the SQL query. When you select this option, columns returned by SQL query are checked to ensure that one column contains Timestamp set as the Meaning. This is automatically detected when the query is executed or can be manually set for the required column in the Columns page.
Click Next.
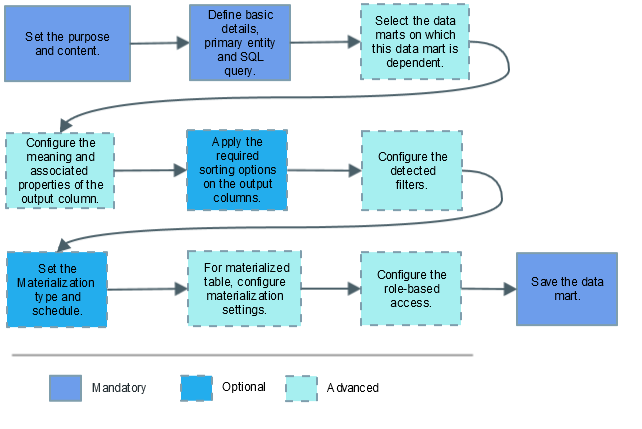
On the Definition page, set values for the following properties:
Primary entities: Select any one of the following options:
- System: Performs a check on the columns extracted by the query to identify whether one or more columns contain System Identifier as the meaning.
- Business driver: Performs a check on the columns extracted by the query to identify whether one or more columns contain Workload Identifier as the meaning.
- Domain: Performs a check on the columns extracted by the query to identify whether one or more columns contain Application Identifier as the meaning.
Other
SQL Query: Type SQL query to retrieve the required data by selecting the required columns of a table. You cannot use a query that contains macros.
Note
For the proper data mart column names, BMC recommends to use the Labels option in the Output Columns section instead of using table column aliases in the SQL query.
- On the Columns page, you can perform one of the following steps to modify the properties of output column:
In the Output Columns section, click the name of the required column to modify the meaning and associated properties of the columns.
The Editor of column with name: columnName page is displayed.
If the Meaning is set to any option other than None, set values for the following properties and click Apply.
By default, the Basic properties are displayed on the Columns page. These are the most common properties and it is acceptable to leave the default selections for each as is. For viewing the Advanced properties, select the Advanced tab of this table.
Basic properties
Field Description Label Type the required label for the column. Description Type the required description for the column. To view or configure the Advanced properties, click Advanced. You do not need to set or modify these properties unless you want to change the meaning of the column. These properties are for advanced users and scenarios only.
Advanced properties
Meaning option Description Output column Value Select this option if the output column contains a value that is a statistic derived from a metric. Following options are displayed when you select Value as the Meaning: - Related to metric: Select the required metric type to which this value in the output column is related. After you select the required metric type, select required metric from list. If there is no metric with which the output column can be associated, select None.
Unit of measure: When you select a metric in the Related to metric, the associated option is set in the Unit of measure. If the Related to metric is set to None, select the required option from the Frequently used drop-down list, or select Other and type the required unit of measure in the box for the value in the output column.
For example, if the Related to metric is CPU Utilization, the Unit of measure is set to %.
Identifier System Identifier Select this option to set the meaning as system identifier of the systems that are being evaluated. Following options are displayed when you select System Identifier as the Meaning: - Distinct values: Select this option to provide distinct values as options in the filter that is available in the TrueSight Console when this data mart is used.
- List of system types: Select this option to select the required systems from the All types table and them to the Filter on type table. The systems selected in the Filter on type table are used as options in the filter that is available in the TrueSight Console when this data mart is used.
Business Driver Identifier Select this option to set the meaning as business driver identifier of the systems or clusters that are being evaluated. Following options are displayed when you select Business Driver Identifier as the Meaning: - Distinct values: Select this option to provide distinct values as options in the filter that is available in the TrueSight Console when this data mart is used.
- List of business types: Select this option to select the required driver types from the All types table and them to the Filter on type table. The driver types selected in the Filter on type table are used as options in the filter that is available in the TrueSight Console when this data mart is used.
Domain Identifier Select this option to set the meaning as Domain identifier of the systems or clusters that are being evaluated. Following options are displayed when you select Domain Identifier as the Meaning: - Distinct values: Select this option to provide distinct values as options in the filter that is available in the TrueSight Console when this data mart is used.
- List of domain types: Select this option to select the required domains from the All types table and them to the Filter on type table. The domains selected in the Filter on type table are used as options in the filter that is available in the TrueSight Console when this data mart is used.
Name System Name Select this option to set the meaning as system name of the systems or clusters that are being evaluated. When you select System Name as the Meaning, the Filter behavior field is displayed with the value set as Distinct Values. Business Driver Name Select this option to set the meaning as business driver name of the systems that are being evaluated. When you select Business Driver Name as the Meaning, the Filter behavior field is displayed with the value set as Distinct Values. Domain Name Select this option to set the meaning as domain name of the systems that are being evaluated. When you select Domain Name as the Meaning, the Filter behavior field is displayed with the value set as Distinct Values. Type Identifier System Type Identifier Select this option to set the meaning as system type identifier of the systems or clusters that are being evaluated. When you select System Type Identifier as the Meaning, the Filter behavior field is displayed with the value set as Distinct Values. Business Driver Type Identifier Select this option to set the meaning as business driver name of the systems that are being evaluated. When you select Business Driver Type Name as the Meaning, the Filter behavior field is displayed with the value set as Distinct Values. Domain Type Identifier Select this option to set the meaning as domain type identifier of the systems that are being evaluated. When you select Domain Type Identifier as the Meaning, the Filter behavior field is displayed with the value set as Distinct Values. Type Name System Type Name
Select this option to set the meaning as system type name of the systems or clusters that are being evaluated. When you select System Type Name as the Meaning, the Filter behavior field is displayed with the value set as Distinct Values. Business Driver Type Name Select this option to set the meaning as business driver type name of the systems that are being evaluated. When you select Business Driver Type Name as the Meaning, the Filter behavior field is displayed with the value set as Distinct Values. Domain Type Name Select this option to set the meaning as domain type name of the systems that are being evaluated. When you select Domain Type Name as the Meaning, the Filter behavior field is displayed with the value set as Distinct Values. Other Timestamp Select this option if the value in the column indicates a timestamp for any activity. No additional options are displayed when you select Timestamp as the Meaning. Threshold Good Select this option if the value in the column indicates good threshold value for any metric. No additional options are displayed when you select Threshold Good as the Meaning. Threshold Warning Select this option if the value in the column indicates good threshold value for any metric. No additional options are displayed when you select Threshold Warning as the Meaning. If the Meaning is set to None, set values for the following properties and click Apply.
By default, the Basic properties are displayed on the Columns page. These are the most common properties and it is acceptable to leave the default selections for each as is. For viewing the Advanced properties, select the Advanced tab of this table.
Basic properties
Field Description Meaning Select the required option to be set as the meaning. For more details about the available options, see Advanced tab in the previous table. Label Type the required label for the column. Description Type the required description for the column. Unit of measure Select the required unit of measure from the Frequently used drop-down list or select Other and type the required unit of measure in the box for the value in the output column. This field is displayed only when the column contains numeric value.
To view or configure the Advanced properties, click Advanced. You do not need to set or modify this property unless you want to change the filter behavior. This property is for advanced users and scenarios only.
Advanced properties
Field Description Filer behavior The value is set to Distinct Values.
In the Sorting Options section, select the required columns from the Source table, and add them to the Selection table using the >>DESC or >>ASC button to sort the data in the descending order or ascending order respectively.
In the Selection table, select the required column, and add them to the Source table by using the << button.
You can also change the order of display of columns added to the Selection table by using the Up or Down arrow buttons.- In the Time period label box, type the required time period for the data in the data mart. In the TrueSight console, this label is displayed in the view that is built using this data mart.
The Time period label box is displayed only if there are no columns in the data mart that have the meaning set as Timestamp and the time filter is not applicable for the data mart. In the TrueSight console, when this label is displayed, the time filter for the selected view is disabled. In the Detected filters section, complete the following steps:
- Click the name of the filter.
- In the Editor of the filter name page, edit the Label and Description of the filter.
Click Apply.
On the Materialization page, specify the following details:
Materialization option Description Always see fresh data
Select this option to load fresh data every time you access the associated advanced report template or when you access the associated view in the TrueSight console.
Note: Every time the SQL query runs, it fetches data directly from the database. Hence, a complex query might require more time to run and the performance might be impacted.
Create materialized table
Select this option to load materialized data in the associated advanced report template or when you access the associated view in the TrueSight console.
This option is useful when you have a complex SQL query and you want to see or use the fetched data quickly. The data mart is materialized and the data is stored in a new table, which is shown whenever you choose to Preview or view the data.
Specify the following settings:
From the Materializer task list, select the task to be used for materializing the data mart. You can select from the available out-of-the-box tasks or create a new one. For more information about creating a materializer task, see Configuring the Data Mart Materializer task.
Tablespace Enter the name of the tablespace where the generated table is materialized. If no value is specified, the default tablespace of the product is used. Materialize validity Enter a number and select hour, day, or week to specify the time validity of the materialized data mart.
The data mart is not re-materialized if you run the associated materializer task again while the time specified in this field is still valid.
For example: Consider data mart A with Materialize validity of 6 hours. The associated materializer task for this data mart runs daily at 5 A.M.
If the associated materializer task runs again at 10 A.M., the data mart A is not re-materialized because the time specified in the Materializer validity field is still valid.
Index count Select the number of blocks of indexes that you need. You can choose maximum 4 blocks.
For each index block, in the corresponding Index # columns field, select the indexes from the Source list and move them to the Selection list by using the
 button.
And, enter the Index # tablespace name.
(Advanced only): To specify access permissions to DB users and DB roles to the materialized table in the database, configure the following advanced settings:
Field Description Grant to DB users Select the database users from the Source table, and add them to the Selection table using the  button.
Grant to DB roles Select the required database roles from the Source table, and add them to the Selection table using the button.Grant to user specified roles Type the required user specified (defined) roles separated by semi-colon to give them permissions to use this data mart. On the Name page, specify the following details:
Field Description Name Type the required name for the data mart.
Identifier Indicates the unique identifier for the data mart. Every identifier is prefixed with 'ER_V_'. By default, the identifier is suggested based on the data mart name. You can edit this value. The identifier must contain only letters, numbers or underscores, and it cannot be empty. This identifier can be used in the SQL query while creating dependent data marts.
Note: If you modify the identifier of the data mart that is currently in use by one or more data marts, the dependent data marts will stop working. A warning message is displayed with a list of dependent data marts. You can choose to revert the changes or proceed with the update. If you choose to proceed, you must update the identifier in the dependent data marts to continue to use them.Description Type the required description for the data mart. Click Finish.
The new data mart is added in the Data marts list page and can be used to build a capacity view in the TrueSight console.
Comments
Log in or register to comment.