Best practices for fault-tolerant BMC Client Management server cluster deployment
A fault-tolerant (high-availability (HA)) deployment safeguards you against any unplanned downtime of a member node. If one member node of the cluster goes down, the connection is automatically diverted to the other available nodes. This topic walks you through some best practices for such fault-tolerant BMC Client Management server cluster deployment.
Architecture
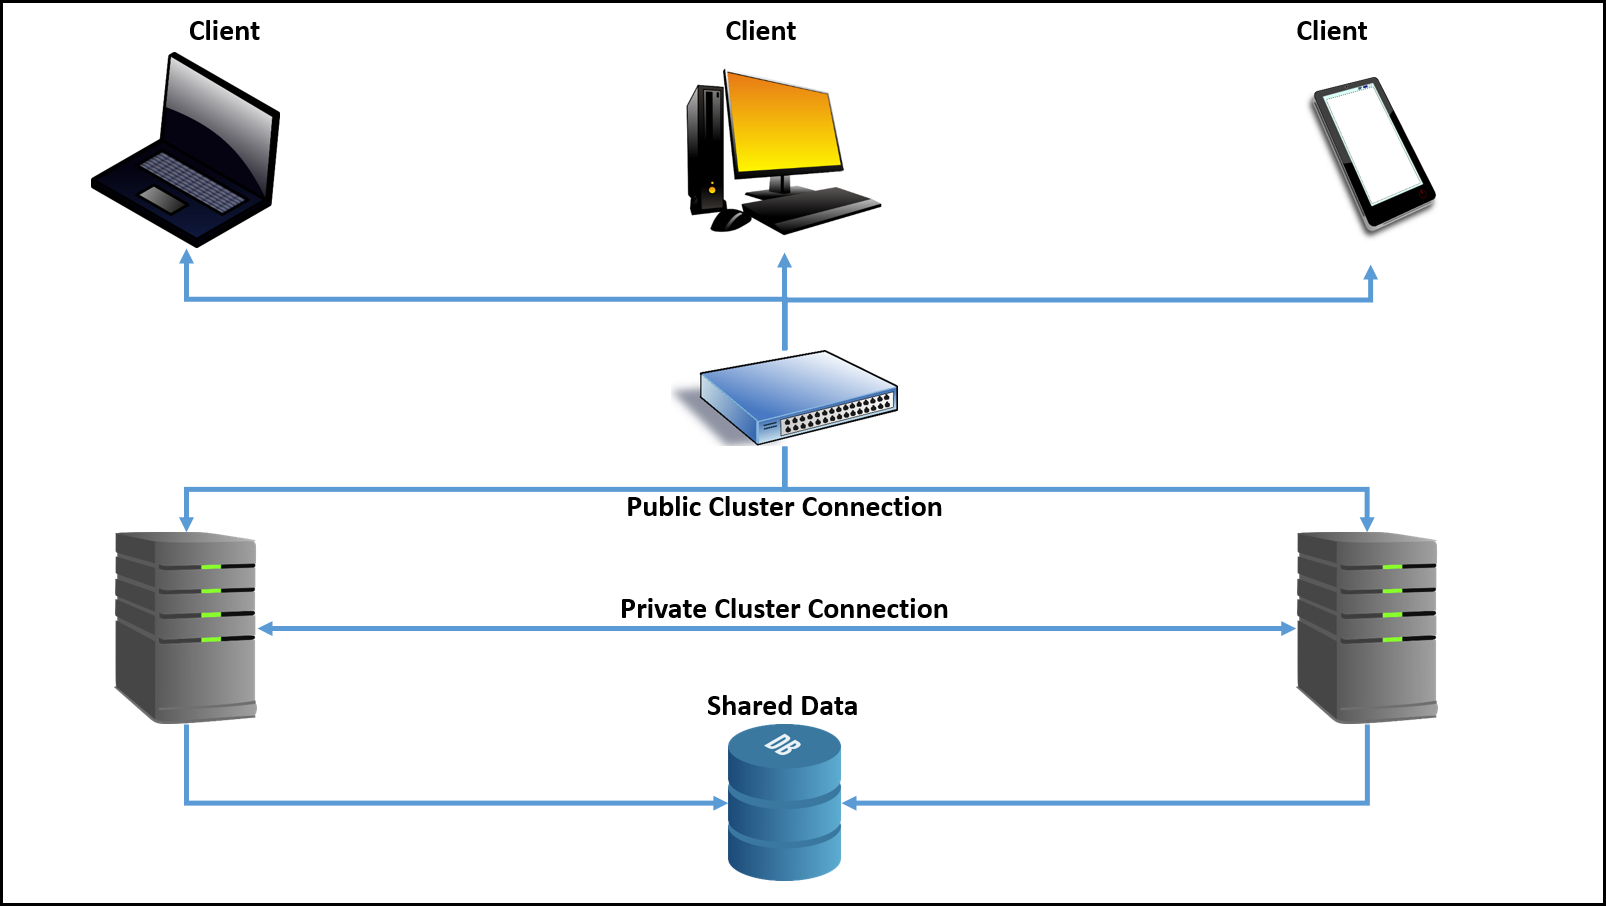
The basic concept of a BMC Client Management fault-tolerant cluster deployment is to have the service run on individual member nodes and use a common master file directory from a shared location. The following diagram provides a high-level view of the architecture:
Prerequisites
When deploying this cluster architecture, ensure the following:
- Minimum two servers as member nodes for the cluster with individual static IP address.
- Only one master directory on a shared location, which must be accessible to each member node in the cluster.
- A cluster management system to ensure that only one member node has the service running at any given time.
- For Windows: See http://technet.microsoft.com/en-us/library/cc731844(v=ws.10).aspx.
- For Linux: Different distributions have different high-availability (HA) suites in their repositories. See the corresponding documentation or consult technical support for the distribution.
Note
You can manage the cluster by starting and stopping the service on each member node manually. However, it is not recommended for production environment.
- All the member nodes have Java installed as per software requirement. It is recommended that all the member nodes have the same Java version.
Setting up the cluster
- Install the database client on each node.
For more information, see corresponding database client documentation. - On the currently active node, install BMC Client Management master server.
For more information, see Installing BMC Client Management on-premises. - On the other cluster nodes, create BMC Client Management agent service. To create the BMC Client Management service on other member nodes:
For Windows cluster, use the
SCcommand. For example:sc create "BMC Client Management Agent" binPath= "f:\Program Files\BMC Software\Client Management\Master\bin\mtxagent.exe" DisplayName= "BMC Client Management Agent"- For Linux cluster, copy the /etc/init.d/BMCClientManagementAgent file to each node.
- In the \BMC Software\Client management\Client\config\mtxagent.ini file, set the
StaticIPAddressparameter to include the IP address created by your cluster management system.
For more information, see the relevant cluster management system documentation or contact their technical support. In the \BMC Software\Client management\Client\config\identity.ini file, in the [identity] section, add a hostname parameter and provide a value to it as follows:
hostname = myMasterName.Note
By default, the hostname parameter is not available in the identity.ini file. You need to add this parameter and provide a master server name.
This name is displayed in the console all the time and not the name of the currently active cluster node.
Provide the IP address of the cluster to BMC Technical Support to generate appropriate license file.
Notes
- The IP address must be of the cluster and not of a member node.
- The license must not include a MAC address.
- When rolling out agents, set the
TrustedAddressparameter in the FileStore module configuration to include IP address of the each member node of the cluster and the cluster itself.
Comments
Log in or register to comment.