Deleting object types
Perform the following steps to delete object types:
- Select the object type to be deleted from the Select Monitor Types To Import screen. The Review Object Types Import/Unimport Warnings screen is displayed.
Click Continue to delete. The summary of server objects deleted is displayed.
Click Finish. The server objects are deleted.
Click Next. A summary of the imported application classes are displayed.
Perform one of the following actions:
Note
It might take some time for all monitor types to appear.
- Click Close to close the Wizard.
- Click Next to add monitor types.
If you choose to add monitor types on the Add BMC SCOM 2007 Adapter Object Types screen, select the monitor types to add. Click the + icon to expand the monitor types or click Select All to add all the monitor types of the adapter.
Perform one of the following actions:
- Click Close to close the Wizard.
- Click Next to create auto-synced devices and instances.
For instructions on including and excluding filters, see Filtering devices and instances
 . Device-level and instance-level filtering is available for BMC SCOM 2007.
Click Finish to display the Summary Details for Adapter screen. The Summary details for adapters are displayed.
Click Next. The scheduler screen is displayed.
Select Periodic, Daily, or Weekly options that give you the flexibility to schedule auto-sync poll periods:
- Periodic—Enables you to schedule auto-sync poll periods at a specific poll interval. For example, if you select the poll period as 24 hours, then every auto-sync occurs after every 24 hours.
- Sync Poll Interval—Specify the time interval between two consecutive auto-sync polls. Default is 24 hours.
- Auto-Sync Poll Timeout—Specify the timeout period for each poll of auto-sync data. Default is 15 minutes.
- Daily—Enables you to schedule auto-sync poll periods at a specific time in a day. For example, if you want to schedule auto-sync at 5.00 AM, then you have to select 5.00 AM.
- Auto-Sync Poll Time—Specify the time in a day when auto-sync poll is to occur.
- Time Zone—Specify the target time zone. By default, the screen displays BMC TrueSight Infrastructure Management Server time zone.
- Auto-Sync Poll Timeout—Specify the timeout period for each poll of auto-sync data. Default is 15 minutes.
- Weekly—Enables you to schedule auto-sync poll periods on a specific day of the week. For example, if you want to schedule auto-sync at 5.00 AM on Sunday, then you select 5.00 AM and Sunday.
- Auto-Sync Poll Time—Specify the time in a day at when auto-sync poll is to occur.
- Time Zone—Specify the target time zone. By default, the screen displays BMC TrueSight Infrastructure Management Server time zone.
- Days of the Week—Select the day on which the auto-sync poll is to occur. Select all to trigger the auto-sync poll on all days of the week.
- Auto-Sync Poll Timeout—Specify the timeout period for each poll of auto-sync data. Default is 15 minutes.
- Periodic—Enables you to schedule auto-sync poll periods at a specific poll interval. For example, if you select the poll period as 24 hours, then every auto-sync occurs after every 24 hours.
Click Next to display the Summary Details for Adapter screen.
Click Finish to display the Auto-sync Progress window.
The first progress bar displays the loading of instances for the selected application classes/monitor types. The status of the progress bar count is updated as the instance is loaded for each monitor type.
The second progress bar displays the auto-sync progress; this starts when the available instances are loaded. The status of the progress bar count is updated as the auto-sync for each loaded instance is done.Click Close in the Auto-sync Progress screen to return to the Administration Console.
Auto-sync progress can be checked later. To check the progress, expand the Adapters folder, right-click the monitor, and select Show Auto-Sync Progress.
After the device, instances, and rules are auto-synced, the auto-synced devices, instances, and rules are displayed with a special icon as shown in the following figure.
Auto-synced devices and monitors screen
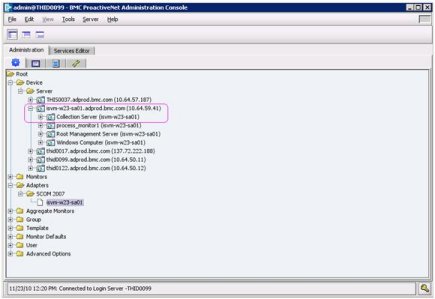
The data in parentheses indicates the host name of the monitored SCOM server. In an environment that monitors two different SCOM servers, this SCOM host name distinguishes between the monitor types.
Multiple SCOM servers

Note
Agent installation on Windows Server 2008 (Longhorn) does not include .NET 3.0. You must install .NET 3.0 or later manually by using the Role Management Tool.
Comments
Log in or register to comment.